Our Northland Neighbors Quilting group has made several Quilts of Valour so we decided to take a break and do some lap quilts for Hospice. Instead of working on them with the whole group, we are pairing up and doing a lot of the work outside the group. When we meet for our monthly gathering, we can bring whatever we need to do on the quilts. Friends Fran and Janice and I decided to work together with the design and choosing the fabric, but then sewing the quilt on our own.
 I don't know what the pattern is called that I decided to use. I just saw a flickr picture of a block on Pinterest and liked it. I decided to call it Crossroads because that is what it reminds me of with the four printed fabrics. One of our goals with these projects is to use up some of our stash. The pattern requires five fabrics- four prints and one solid. I found two print pieces in our church group's stash, the solid, from my stash at home, and then Janice and I found two print pieces at an estate sale. We were really lucky to find two that we thought would work well with the other three when we didn't have the other three with us. One of the pieces we had at church was also a large piece that worked well for the backing also.
This pattern works well with your stash because you can easily get by with 1/2 yard each of the five prints for the quilt top. If the fabric is 42 inches wide, you can actually get by with 3/8 yards; just don't make any mistakes. You will cut three strips the width of the fabric and 3-1/2 inches wide. That means you need 10-1/2 inches of the fabric that must be 42 inches wide not counting any selvage the fabric might have. (3/8 of a yard is 13-1/2 inches.)
The quilt top goes together really quickly as you are working with strips that are 3-1/2" x wof (width of fabric).
 You will cut three of these strips from each of the four prints and four strips from the solid.
From each print you need twelve pieces 6-1/2 x 3-1/2 - inches and twelve 3-1/2 x 3-1/2 - inch squares. From the solid you need forty-eight 3-1/2 x 3-1/2 - inch squares.
We will cut the rectangular pieces first.
 From each print -you will cut two of the strips every 6-1/2 inches to make rectangles 6-1/2 x 3-1/2 - inches. (Remember - You always want to start cutting from the selvage ends. There are times when you can open out the "fold" - the little piece on the left end - and be able to cut another piece.) You will be able to cut six rectangles from each strip giving you the twelve rectangles you need for the quilt top.
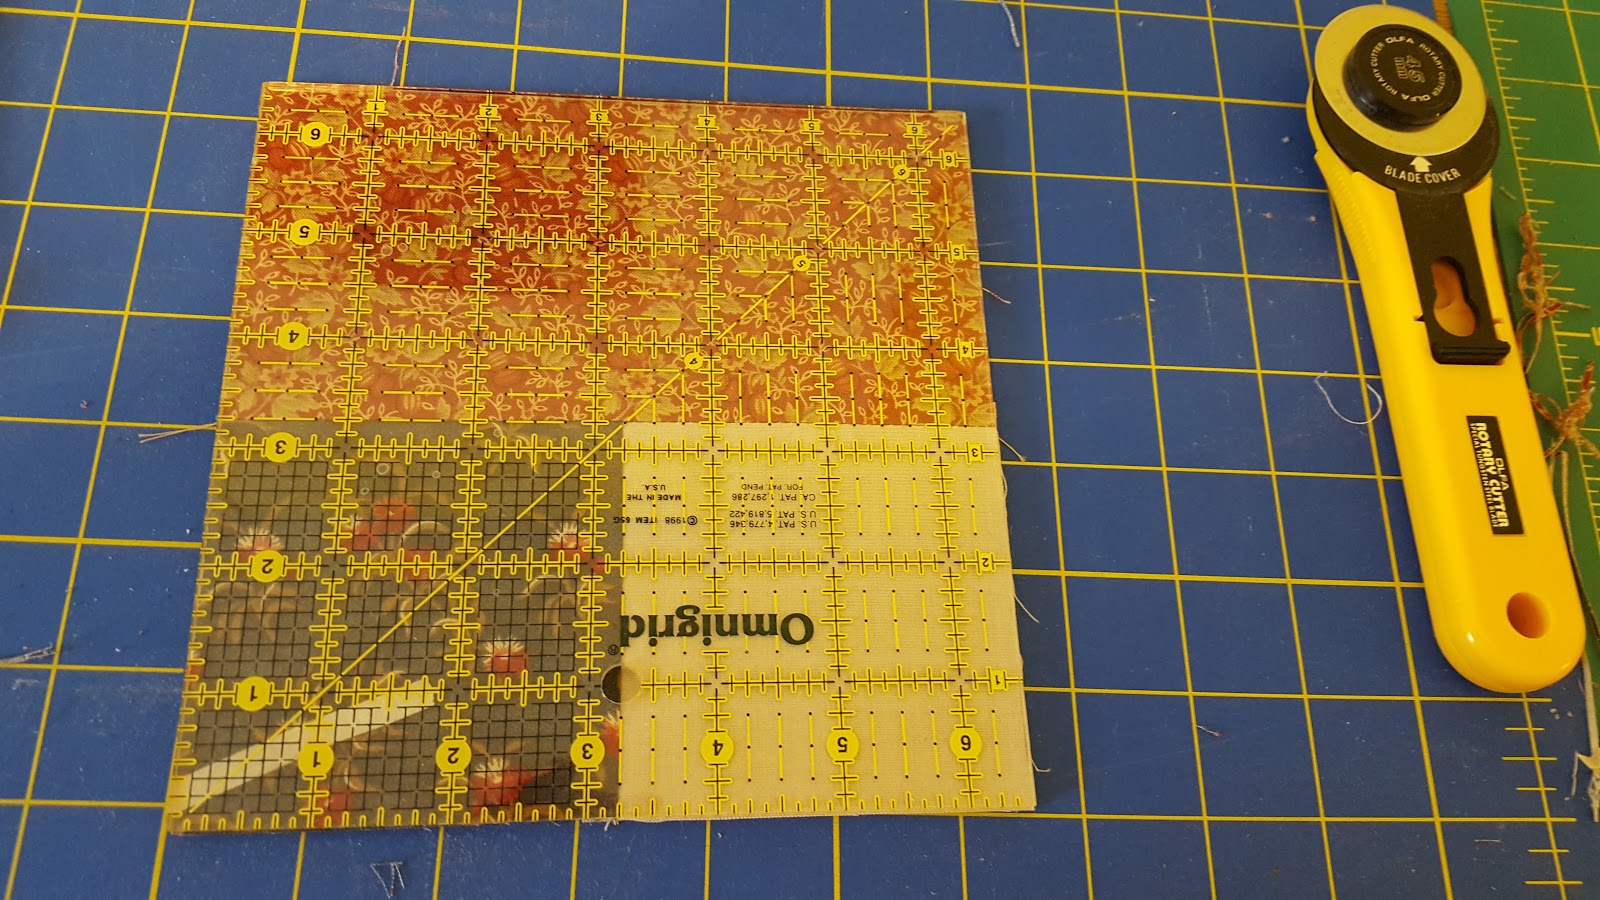
An easier and faster way to make the 3-1/2 - inch squares - making "twozies"
 Instead of cutting 3-1/2 inch squares and sewing them together, you will take the third strips and sew each to one of the four solid strips using a scant quarter - inch seam allowance. (You want to sew a scant - a little less than - quarter inch seam because when you press open the seam, it will take some of the fabric to do this. If you use a full quarter inch seam, the finished block will be smaller than what you planned it to be.)
 After you press open the seam,
 you will cut this sewed strip every 3-1/2 inches. If the wof is at least 42 inches, you will be able to cut the twelve pieces you need.
 One of my prints was less than 42 inches wide, but my solid was more.
 All I had to do was cut one 3-1/2 " square from the print. Then I "unsewed" (aka ripped out) the short piece from the solid piece and sewed the square I had cut to the rest of the strip.
 I then trimmed off the excess of the solid and had my twelfth "twozie". I didn't take a picture illustrating this, but when you press open the seam of the twozies, press the seam toward the print.
You should now have twelve rectangles measuring 6-1/2 x 3-1/2 inches from each print and twelve "twozies" with each print and the solid and are ready to have fun choosing the arrangement.
I basically had two options....


I had a little fun here. I am a member of a group on Facebook called HGTV Fixer Upper Show Followers. I decided to share the two pictures and asked for input into deciding which one to go with. Well, while a few people liked the first picture, overwhelmingly the latter option was the preferred choice.
 Once you decide the arrangements of the pieces, I suggest you check the twozies and the rectangles to make sure they are the desired sizes - especially the twozies. Trim away any excess - small as it is.
 Now you are ready to sew a twozie with a rectangle to make the smaller block. The easy thing is you will sew the same twozie (print) to the same rectangular print - making twelve of the blocks.
 Using one from each pile, I arranged the chosen block pattern on my design wall above my work area showing the "finished" 12 - inch block so that I wouldn't make a mistake as I sewed the strips together to make my columns and have to "unsew". By making rows or columns instead of the 12 - inch blocks, it is much faster sewing the pieces together.
Maybe I should interrupt this tutorial by saying that I decided before I got started that I was going to piece this quilt top together in a method I call "Sew and Quilt-in-One". I have been really successful with this method. Free Motion Quilting scares me to death. That means most of my machine quilting is "stitching in the ditch", outlining, or diagonally stitching. If the pattern you are using can go together in rows or columns, I suggest you check out this method and consider trying it.
So....back to this quilt. The quilt top is made with a total of twelve 12 - inch blocks arranged with three blocks across the width of the quilt and four blocks forming the length. Strips across the quilt are called "rows" and strips the length of the quilt are called "columns". This pattern will have six columns or eight rows. I chose to sew six columns instead of the eight rows as it is less stopping and starting for a new row.
 So when I sewed the pieces together to form the column, I was looking at the block and the two vertical blocks as a set instead of the two horizontal blocks. (The one with the blue background print and not the one with the brown background.)
 Before you start sewing though - Did I mention that I checked each smaller block to make sure it was 6-1/2 inch square before I started sewing them together? (It really helps if you have a 6-1/2 inch template.)
 You will have four sets for each column. Here are the four sets for the first column. Now you will sew them together to make the first column strip - the blue set. You will not be matching any seams this time. (Yay!)
Now you will repeat this process to make the second column strip (left side of my block on my design wall - the brown sets.)
Remember I told you this was a fast and easy pattern. Why? You will repeat this process two more times for a total of six column strips.
For the pressing of the column strips
 Most of the time when you are pressing seams after you have sewn them, you want to press seams that are going to be sewn together in opposite directions so that the seams will "nest" together when you are sewing them together.
 In this pattern because I pressed the twozies seam toward the print, when you sew the columns together the seams will not "nest" where the twozies meet up.
 It just means you will have to make sure they match and pin on the thicker side so they don't move when you sew.
 When I press the seams for the strips, I usually press strip 1 "away" from me and strip 2 "toward" me.
 This picture shows the strips before I pick them up and pin them together to illustrate what I mean...
 The seams nesting nicely together...
Once you have the column strips sewed together and pressed, you are ready to sew them together. You may choose to sew them together making the quilt top and then quilting it to the backing with batting OR you can use my method to sew and quilt-in-one the quilt. The process for this quilt is a little more involved than it is if you are just sewing strips because of the seams, but with a little work, it will turn out beautiful and you don't have to do anymore sewing to quilt the blanket.
How to Sew and Quilt-In-One
1. Place the fabric you are using for the backing on your work table with the right side of the fabric down - facing the table. (If you are working with a large piece of fabric like for a baby quilt etc, you might want to secure the edges with some tape in a few places.)
2. Lay the piece of batting (I suggest you use the thinner natural batting for this technique.) over the fabric making sure you have no wrinkles.
3. Secure the batting to the backing with safety pins in choice places starting in the center and working your way out to edges making sure the backing has no wrinkles in it.
4. Place the first strip with right side up and wrong side next to batting along the edge of the batting on either side making sure it is smooth.. (I usually work from the right to the left. This means I roll up the left side of the work when I am working on a larger piece if necessary. I have more of my sewing machine table on the left of the sewing machine so this isn't always necessary.)
5. Place the second strip with the right side down facing the right side of the first strip and raw edges on the left together. (Sometimes you may chose to work with strips that are different widths.) Pinning them ever so often is just up to you. I usually do not pin them but I am used to doing this also.
6. Sew the two strips together using a scant 1/4 inch seam. (I move my needle over to the left to the location I have tested and know it will produce a scant 1/4 inch seam if I use a particular "foot" on my sewing machine.) You are sewing through the two strips, the batting, and the backing at the same time.
7. Open out the seam (flip out the second strip) and press the seam and second strip out flat.
8. Repeat this with the next strip until you have worked all the way across the fabric. You will need to remove safety pins as necessary as you add each additional strip.
If you need to see some pictures illustrating this method, check out this POST. I also show you pictures for sewing the binding on the quilt also.
Back to making this quilt using this method, I used these same general directions, but because my strip was a strip of blocks I had sewed together instead of a strip of fabric, I had to add the step of making sure the seams matched up on the two strips
 The finished size of this quilt is 36 x 48 inches. You will need a piece of fabric cut about 50 inches long and the wof. Cut the batting a little larger than 36 x 48 inches. Lay it smoothly on top of the backing and pin it together about 8 inches apart (You can see that in the picture. I have laid both of the first two strips along the right edge of the batting in this picture.)
 The easiest way I found to match the seams and make sure I would sew them together was to lift up the two strips about half way up and pin the seams as I matched them. For this first one only, you can pin the first strip down to the batting close to the right edge to make sure the first strip stays in place with the batting and backing.

 Then I repinned these pins through the batting/backing making sure the two strips were flat.
 Before I took the work to my sewing machine, (since it was a larger piece than the placemats I usually make), I rolled the excess on the left up to make it easier to sew the two strips and layers together.
 Then when I got to my sewing machine, I rolled up the excess along the strips (between the machine and my body) and unrolled it as I sewed down the strips...
 until I had sewed the length.
 Then I moved the work to my ironing board and pressed the seam opened.
 I continued doing this until I had the sewed all of the strips down. (FYI - I laid the quilt on the floor upside down as far as the way I sewed on the strips.
 I can turn the picture around to sew it the way I sewed it - right to left but it looks funny. Then you can see the excess I had when I finished with the backing though.)
 I squared up the sides trimming away the excess and then the quilt was ready for the binding. Since this post is already so long. I think I will show that in another post. If you can't wait, you can see how I do it in the above link for making the Sew and Quilt-in-One Baby Quilt tutorial I referred you to at the end of the general directions for the process.
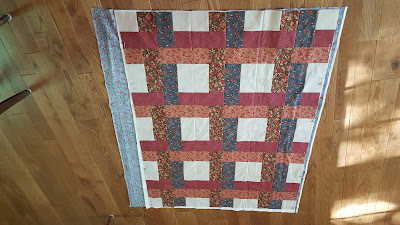
Here is a another picture of the finished quilt though if you are still with me. I will share that with you here.


As always with my tutorials, if you have any questions, please leave them in the comments below or you can email me at mypatchworkquilt@gmail.com.

This pattern works well with your stash because you can easily get by with 1/2 yard each of the five prints for the quilt top. If the fabric is 42 inches wide, you can actually get by with 3/8 yards; just don't make any mistakes. You will cut three strips the width of the fabric and 3-1/2 inches wide. That means you need 10-1/2 inches of the fabric that must be 42 inches wide not counting any selvage the fabric might have. (3/8 of a yard is 13-1/2 inches.)
The quilt top goes together really quickly as you are working with strips that are 3-1/2" x wof (width of fabric).

From each print you need twelve pieces 6-1/2 x 3-1/2 - inches and twelve 3-1/2 x 3-1/2 - inch squares. From the solid you need forty-eight 3-1/2 x 3-1/2 - inch squares.
We will cut the rectangular pieces first.

An easier and faster way to make the 3-1/2 - inch squares - making "twozies"


I basically had two options....


I had a little fun here. I am a member of a group on Facebook called HGTV Fixer Upper Show Followers. I decided to share the two pictures and asked for input into deciding which one to go with. Well, while a few people liked the first picture, overwhelmingly the latter option was the preferred choice.


Maybe I should interrupt this tutorial by saying that I decided before I got started that I was going to piece this quilt top together in a method I call "Sew and Quilt-in-One". I have been really successful with this method. Free Motion Quilting scares me to death. That means most of my machine quilting is "stitching in the ditch", outlining, or diagonally stitching. If the pattern you are using can go together in rows or columns, I suggest you check out this method and consider trying it.
So....back to this quilt. The quilt top is made with a total of twelve 12 - inch blocks arranged with three blocks across the width of the quilt and four blocks forming the length. Strips across the quilt are called "rows" and strips the length of the quilt are called "columns". This pattern will have six columns or eight rows. I chose to sew six columns instead of the eight rows as it is less stopping and starting for a new row.


Now you will repeat this process to make the second column strip (left side of my block on my design wall - the brown sets.)
Remember I told you this was a fast and easy pattern. Why? You will repeat this process two more times for a total of six column strips.
For the pressing of the column strips


How to Sew and Quilt-In-One
1. Place the fabric you are using for the backing on your work table with the right side of the fabric down - facing the table. (If you are working with a large piece of fabric like for a baby quilt etc, you might want to secure the edges with some tape in a few places.)
2. Lay the piece of batting (I suggest you use the thinner natural batting for this technique.) over the fabric making sure you have no wrinkles.
3. Secure the batting to the backing with safety pins in choice places starting in the center and working your way out to edges making sure the backing has no wrinkles in it.
4. Place the first strip with right side up and wrong side next to batting along the edge of the batting on either side making sure it is smooth.. (I usually work from the right to the left. This means I roll up the left side of the work when I am working on a larger piece if necessary. I have more of my sewing machine table on the left of the sewing machine so this isn't always necessary.)
5. Place the second strip with the right side down facing the right side of the first strip and raw edges on the left together. (Sometimes you may chose to work with strips that are different widths.) Pinning them ever so often is just up to you. I usually do not pin them but I am used to doing this also.
6. Sew the two strips together using a scant 1/4 inch seam. (I move my needle over to the left to the location I have tested and know it will produce a scant 1/4 inch seam if I use a particular "foot" on my sewing machine.) You are sewing through the two strips, the batting, and the backing at the same time.
7. Open out the seam (flip out the second strip) and press the seam and second strip out flat.
8. Repeat this with the next strip until you have worked all the way across the fabric. You will need to remove safety pins as necessary as you add each additional strip.
If you need to see some pictures illustrating this method, check out this POST. I also show you pictures for sewing the binding on the quilt also.
Back to making this quilt using this method, I used these same general directions, but because my strip was a strip of blocks I had sewed together instead of a strip of fabric, I had to add the step of making sure the seams matched up on the two strips


Here is a another picture of the finished quilt though if you are still with me. I will share that with you here.


As always with my tutorials, if you have any questions, please leave them in the comments below or you can email me at mypatchworkquilt@gmail.com.
No comments:
Post a Comment