Wednesday, March 30, 2022

BLOCK 16: A STROLL THROUGH THE FLOWER GARDEN

I decided to take a break from HSTs and just deal with squares. I've had this fabric out for a while waiting for the perfect pattern come along and finally it did. It just looks like a flower garden and the darker blue squares allow anyone to walk through and get a closer look. Thus the title "A Stroll Through the Flower Garden". I think I've seen the pattern called  while I have been "Scrolling Through the Internet".

The twelve inch block is made with a total of twenty-one blocks and two different prints. The four blocks that form the corners I call "fourzies". The other five blocks don't have a special name, but they are very special to the block. Using different prints to make the block, could totally change the story that the block tells.

While I enjoy making easy blocks, I also like to make them precise. My friends consider me a perfectionist and I guess I agree with them. I fall back on the saying, "If it's not worth doing well, it's not worth doing". I'm sharing this with you to explain some of the extremes (?) I go to. 

If you have follow me or have just read a tutorial or two especially if HSTs are involved, you know I cut the square a full inch bigger than the finished size so I can square up the block and trim off the excess. This also means I have the seam in a corner right where I want it to be to meet up nicely (I didn't say perfectly, but almost did) in the block. It seems no matter how hard I try, it's never perfect, but quilters will tell you quickly that keeps you humble and proves only Jesus is perfect. Sometimes I end up having a lot of "humility squares/blocks" in my work.

Another extreme I go to is cutting strips just a little bit bigger than they are supposed to be cut if I am working on fourzies. Then I can trim them down so my fourzie will be square. I will tell you the actual width to cut the strips, but if you look closely at the picture, you will see I cut the strip 1/8th" wider.

But I need to get on with the tutorial for A Stroll Through the Flower Garden Block Square.


HOW TO MAKE AN IRISH CHAIN BLOCK (A Stroll Through the Flower Garden)

Choose three prints - a light background print, 

                                  a dark print, 

                                  and a bright focal print with flowers

  CUT  one(1) 4.5" square from Print #1

            four (4) 4.5" squares from Print #2

            one(1) 2.5" x 20.5" strip from Print #1 AND Background *

*If you are using scraps and don't have a strip that long, CUT eight (8) 2.5" squares from the Print #1 AND Background.


The first thing is to sew the two strips together right sides facing to make the fourzies using a 1/4" seam.


This picture shows how I cut the strip 1/8" wider than 2.5". Ignore the arrow - that was from a different project.

PRESS the seam open first on the wrong side and then on the right side with the seam pressed toward the dark fabric. 

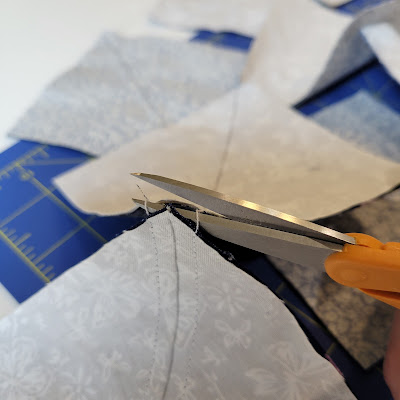
            Trimming one end of the two-pieced strip, I cut a clean end and then cut the strip into 2.5" sections.


I placed the pieces on my design wall for the following pattern (If you have a keen eye, you might catch my first mistake, but I'm good, I will fix it before the important sewing takes place.)


I will make the fourzies first by sewing two of the blue/yellow strips together making sure I "nest" the seams together flatly.


PRESS the seams either way. They never meet up with another seam in the block so it doesn't matter.


PRESS first on the wrong side and

then on the right side.

Do this until you have all of the fourzies made. I made the first one completely but then decided to make the other three by "chain piecing" to show you a different technique that might save you some time and thread.

First secure the seam with a pin that you nested.

You sew one pair together and after "sewing" a few extra stitches, you can slide the next pair under the pressure foot until it catches the piece and draws it under the needle. Just make sure that you have the two pieces completely together properly before sliding it. Cut the threads between the pairs and complete as you did the first one.


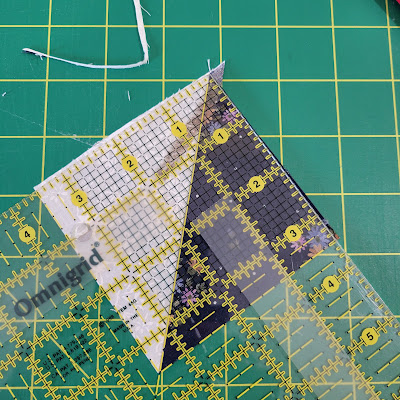
The next step is to square up the fourzies and trim off the excess fabric. Notice how the diagonal line goes diagonally through the block and the dotted line at 2-1/4 lines up the top middle seam. You trim the square to 4.5"


Back on the design wall, and I hope you noticed I have the blue "steppin' stones" correct this time because we are ready to sew the rows together and finish the block. It doesn't really matter how you sew the blocks together to make the rows, I think you will do what is most comfortable to you. I almost always start from the bottom and go up when I am making a block. When I am sewing a blanket, I usually sew by columns instead of rows because there are usually less columns than there are rows. But that is a "whole nother ballgame".


This time I sewed the whole row together, pressed and all and then moved to the next row, completed it, and sewed the row to the previous row. I did this to make it easier to see which direction I needed to press the seams. I could quickly look at the design wall, fold the seam back a little so I could see, and then returned to my ironing board to press the seams. 

I could also press the seams the way they seemed to want to be pressed. (Sometimes you have to press them the way you want them to be pressed for sewing purposes.)
I wanted to make sure and tell you to secure the strips with pins and don't be afraid to use pins. The middle block here wanted to have a little bubble in it, so I worked (eased) the material down flat and pinned it in place. You also want to make sure you sew the seams the directions you pressed them.


The last thing you do before considering yourself finished with the block is to square it up and trim off the excess. You are squaring it up to 12.5"


Once again notice how your block lines up with the marks on the ruler. That's when you feel good and are proud of the job you have done with just a little extra care along the way.


Monday, March 28, 2022

BLOCK 15: SARA'S CHOICE

 This block is another variation of the Star pattern.  I decided to give it the name, Sara's Choice, because I think my dil Sara would like it with the pink and purple. The Star pattern is not a difficult block to make just takes a little extra time if you want the points to come out meeting and looking nice. Even though there are a lot of lines, the pattern just consists of four squares that are cut 3.5" square and twelve squares cut 4" square. Those last twelve squares will be used to make twelve HST (half-square-triangles). If you aren't used to making HSTs and would like some extra help, check out my tutorial on How to Make HSTs. I go in more detail than I do here with more pictures also.

For this version of the Star Pattern who want to chose three different fabrics ... one for the background (I chose the green because it was the other color in my print), one bright solid color, and one print that is medium to dark that coordinates really well with the solid color. Remember all seams are 1/4". When you press the blocks, press toward the darker print first on the wrong side and then on the right side. When are are sewing seams together, you may have to repress one of the seams to the other directions if you can not "nest" (butt the seams together as best you can) the seams. Just pin the seam over and you can repress it when you sew the new seam. 


SARA'S CHOICE

CUT  four (4) squares - 3.5" from the background fabric

CUT  four (4) squares - 4" from Print # 1 and also Print # 2 and from the background print for a total of twelve (12) 4" squares.


Match the two fabrics as shown to make the HSTs.


On the wrong side of one of the fabrics in each pair, draw a diagonal line from any two opposite corners. A good tip to remember is start in the middle and draw the line out to the edges to keep the fabric in place.

Make sure you have the right sides of the fabric facing each other squarely and sew 1/4" from each side of the diagonal line you drew. You may do this one square at a time or use the chain stitching method. I used the latter. It is faster and can save on thread. Once you have sewn on one side of all of them, turn the squares around and proceed to sew 1/4" on the other side.

Cut the connecting threads and

then cut down the drawn line making two triangles.

Press open and

then square up and trim to 3.5".


As I did this I couldn't help but start placing the HSTs on my design wall and complete the block like a puzzle.


You are now ready to sew the rows together and even though it doesn't matter which way you do this, I usually start at the bottom and

work my way up.

I save the pressing of the strips until I have all of the rows finished. That way I can make sure that I have the seams on every other row going the opposite direction so I can "nest" the seams together together. Once you get used to doing this you can remember to press the odd numbered row one way and the even numbered rows the other direction.

Once you have the block all sewed, make sure you have pressed the seams flat so that your block will lay flat.


Square up the block using a 12.5" square ruler and trim off any access.

Remember if you need more instruction for making the HSTs, please use the LINK to go to my more inclusive tutorial from start to finish for making a HST.


Friday, March 25, 2022

BLOCK 14: YANKEE PUZZLE BLOCK PATTERN

 I think I saw this block pattern was on Pinterest while I was just scrolling through looking for patterns I might want to try. Then one day on Facebook someone in a quilting group I belong to, someone shared the same picture asking if anyone knew the name of the pattern. I couldn't remember it, but I went back to where I had been and found it. Before I answered her question, I drew the pattern on my graph paper and knew I was going to be making it. 

Yankee Puzzle is a beautiful block. The picture had it made in two shades of red. I decided to do mine in two shades of blue. I personally think it would be beautiful in any color. Since the whole block is nothing but HSTs, you definitely have to enjoy making them. But they make an awesome looking block.


When I make HSTs, I cut the squares a whole inch bigger than the finished size instead of the customary 7/8" bigger. Then after I get it made, I can square it up and trim off the excess and come closer to making perfect HSTs. If you would like to read more about making HSTs, check out my post HERE.  This pattern is 4 x 4  and a 12" finished square. That means each HST will be a finished 3" so I cut each square 4".

If you look at my graph drawing a lot of ones around the edge but the other half sometimes is two and sometimes 3. So the first thing I did was count how many 1/2 combinations I had and how many 1/3 combos I had. Turns out the combo of 1/2 appears eight (8) times and 1/3 appears four (4) times. The center of the block is made with four HSTs of 2/3 combination. Since we will be making two HSTs out of each square, I will cut half as many squares of each print.

CUT four (4) squares from print #1 (white) and print #2 ( darker print)

CUT two (2) squares from print #1 (white) and print #3 ( medium print)

CUT two (2) squares from print #2 (darker print) and print #3 (medium print)

If you are still with me that means... 

CUT six (6) squares from prints #1 and #2 and four (4) squares from print #3 


After you cut the squares an inch bigger than finished size and match )the two fabrics together, you need to draw a diagonal line from two opposite corners on the wrong side of one of the fabrics (usually the lightest side so you can see the pencil line).


Because I am sewing nothing but HSTs, I used the chain method to save time and thread. To make two HST, you will sew 1/4" from each side of the line you drew, cut the threads between the squares, cut on the drawn line, press toward darker print (wrong side first and then the right side), and then trim down to 3.5".  My eagerness to see the pattern, as I trimmed each HST, I started placing them on my design wall in the pattern.


Now that I have all the HSTs made, sized up, and pressed, I started sewing them in pairs starting in the lower left hand corner.

I won't do this with each pair, but make sure you "next" the two angled seams together. If there is an issue with the pressed seams both going in the same directions so that the seams will not "nest", just pin one of them in the other direction and you can repress it when you press the seam you are about to make.

Secure the edges with pins and sew across so you hope when you remove the pins and

open it up, the pair will look like this. Repeat this process until you have all eight pairs sewed and

are ready to sew the pairs together to make four rows.

Once you have the four rows,

you will press the seams so that you will be able to "nest" the seams.  If the top row has the seams going to the left, then the next rows' seams should be pressed to the right. (I will show you a picture later of the four rows pressed so you can get the full picture.)

Sew the top two rows together and

then the bottom two rows. Once the block is completed and pressed,

you want to square it up with a 12.5" square ruler. Use the diagonal line and other marked lines to line up the square.

Cut off excess...

The wrong side...


and the right side...