Friday, March 18, 2022

HOW TO MAKE HALF-SQUARE-TRIANGLES (HST)

 I am staying busy lately making different blocks for a 30-Block Exchange Group. There are 30 members in the group and everyone makes 30 blocks and sends out 29 of them to the rest of the group. It has been just about the most fun I have had in a long time. I am currently a little over half way through. I have already received six from six of the members. I could have been through but I have been trying to write up a tutorial for each block I am making. I was doing really well at first. I didn't start a new block until after I had written the tutorial. Then after Block #6 and #7, the same block just made differently, I was writing the tutorial on my new laptop and was almost finished with the post (it was long and detailed and had taken about three or four hours to write) and I hit a key and it all disappeared. I was so upset. Unfortunately I didn't know about the backward arrow then. Trust me I do now. So that won't ever happen again. BUT I was so upset, all I wanted to do was make another block and then another block. You get the picture. I still haven't rewritten the post for the two blocks.

Today as I was making a block that was nothing but half-square triangles (HST), I thought, "Patricia, you should write up a tutorial on just making HSTs and QST" ( quarter-square-triangles). So that's what I'm doing.

Blocks with "stars" or triangles instead of squares and rectangles use HST or even QSTs. A friend Linda thinks of them all as HST just smaller and you could. I remember how I used to avoid any pattern with triangles. My problem was I just didn't know how easy they were to make. 

You see I started out as a seamstress. My grandmother taught me to sew - make a simple straight skirt when I was in the 6th grade. I had to take home-ec in high school which wasn't a great experience because my teacher didn't like how I sewed and wanted me to sew her way. I made the one dress and didn't pick it back up until college when I wanted more clothes. Later in life when I started quilting, I just learned on my own.

I'm going to show you two different ways to make HST. I use both ways; it just depends on how many I need to make for the pattern and what the other half is.

The first thing you have to decide is how big the HST is supposed to be. Quilters use two different figures when they talk about pattern blocks - finished size and unfinished size. The finished size is the size when the block is finished and the unfinished size is the cut size. The difference is 1/2 inch. That's because quilters sew the seams 1/4". So 1/4" on all four sides makes 1/2" on opposite sides.

The reason I started with this knowledge is when you are making HST you want to think the finished size and it has to be made bigger than the cut or unfinished size. (I learned this the hard way the first time I had to make a triangle. I cut the squares in half to make a triangle and they were too small when I sewed them in the quilt.) You might read to make the square 7/8" bigger. I say 1" bigger. It's easier to remember and who wants to do the math anyway? I taught math and I know 3 + 7/8 = is easy but 3-1/2 + 7/8 = ? The other reason I like to make the square an inch bigger is so I can trim off the excess and truly have my HST 3-1/2. You see no matter how hard you try to make sure you are cutting the square the right amount, sew exactly 1/4" for the seam, and press it correctly, rarely will your finished product by what it was supposed to be; in my example, 3-1/2.

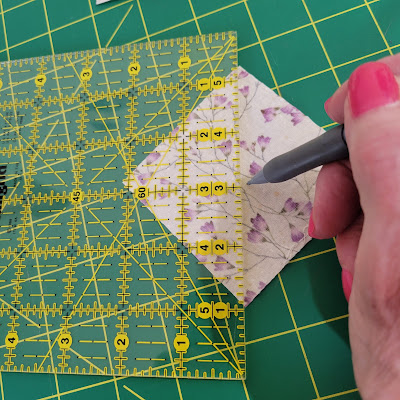
So we are going to cut the square 1" bigger than the finished size. 


If you need more than one HST just alike, you can make two HSTs out of one square. HSTs are made using two different prints, cut the same size (1" bigger than finished size), and placed so that right sides are facing each other. 


The next thing you will do is to mark the diagonal of the square.

On the wrong side of one of the squares - the lighter one - line the ruler up with two opposite corners for the diagonal of the square. Move the ruler off about the thickness of the lead in the pencil you are using and mark the line.

Hint: start marking in the center out instead of starting at one end and marking across.


When you take the piece to the sewing machine, recheck to make sure the two squares are lined up correctly and place the sewing machine needle 1/4" from the line. My machine has a setting for 1/4" stitch so I can use the outer edge of the foot I am using as my guide. It isn't necessary to backstitch or stitch in place when you start.

Once you get across you can stop and cut the thread OR

if you have several to sew, you can use a method called chain stitching and sew all of them before cutting the thread. This saves me  more time than thread since my machine also cuts the thread, but Friend Linda says it saves her time and thread. When you get close to the end of the square, you sew a few extra stitches and then move the next square slowly in under the foot so that you are lined up with your guide and the foot will pick up the next block and you will be sewing it.

Once you finish all of them, you will stop, cut the thread and

sew back down the chain you have made on the other side of the line.

When you finish this time, your chain will have spacing between each square and

you will carefully cut the threads and not the squares. Now you will go back to your cutting table and cut down through each square on the drawn line creating two halves that when

opened out and pressed on the wrong side and then 

the right side, you have a HST. 


If you remember earlier I said another good thing about cutting the square a whole inch bigger than the finished size is you can trim the HST to the desired size. This is another step that you don't want to hurry and it helps if you have a square ruler. There are so many "lines" that sometimes they can all become confusing, but they are very helpful for certain things you want to measure or do with the ruler.

To square up or trim a HST you are going to use the diagonal line also marked as 45 degrees to line up with your diagonal seam you made. That's where you start and then move the ruler along the line to center the ruler over the HST for the desired dimensions. If you can line up the edge of the HST with the measurement line if possible, you can. In this picture you can see that the bottom purple edge lines up with the 2.5" measurement but the white side doesn't perfectly. You can line the ruler up here and all you will to cut off the bottom edge will be the folded seam.

Once you trim down the two sides, turn the HST around and line up the cut sides with the ruler and trim the outer edges.
And now you have a perfectly made 3.5" HST.


Sometimes you may have a pattern that has HSTs but while one half uses the same print, the other one uses a different print as in this example.  I used a charm pack which is made from 5" squares precut. The only problem was that each square in this pattern is 3", but a charm pack is the easiest thing to use for this and I had a partial charm pack I needed to use up.

I decided to cut each charm square in half and placed one half in my scrap bag.

Then I used my 6" square ruler and lined it up with the cut diagonal so that the 4" marks lined up with both edges of the diagonal and

trimmed off the access. I have now a triangle with two sides equally 4".

I cut the charm squares in half and

added the other half to my scrap group.

Now you will place the two triangles right sides facing and using the cut diagonal edge, stitch the two triangles together to

make a HST. It just needs to be pressed and trimmed down to the desired size.

To make QST (quarter-square-triangles) you start out the same as making HST by cutting the squares 1" bigger and drawing a diagonal line from two opposite corners and

stitch 1/4" from each side of the line. Then instead of cutting along the diagonal line,

you will line up the ruler with the other two points and

cut. Then when

you cut along the drawn line, you will have quarter square triangles.

When all is finished, you can have an hourglass block like this...


I hope this has been helpful for you, if you have any questions, just leave them below in the comment section and I will try to answer them. If you would like to view some of my tutorials, please view the web version either by using a laptop to view my blog OR you can scroll down to the bottom of the post if you are using your phone and just before the ad, you will see VIEW WEB VERSION. Click on that and you will see what my blog really looks like. On the right side are different features one being LABELS. Click on 30-Block Exchange Group and you will be taken to tutorials I am doing on 30 different blocks.


No comments:

Post a Comment