Friday, April 28, 2023

LEMONY-STRAWBERRY YOGURT MUFFINS (SF)

 I'm just a little delayed in sharing these delicious mini-muffins that I made for the Cafe Treats back in the middle of March. I made two different recipes for mini-muffins that I made for those people needing or wishing for less sugar. I shared the Blueberry Mini-Muffins recipe, but not sure why I never got around to sharing the Lemony-Strawberry Yogurt ones. 

I found both recipe in my go-to cookbook, The Heartstone Inn from Eureka Springs, AR. I have made so many recipes from it. I love cookbooks from B & B's, Inns, or cafes. You can pretty much depend on all of the recipes to be great! 

The only change I made when making these muffins, other than making them mini-muffins instead of regular sized one, was changing the lemon yogurt to a zero sugar strawberry Greek yogurt (because I didn't have any lemon yogurt). I guess I should add that I omitted the chopped pecans but that's because the Cafe Treats is a "nut-free" zone.

The recipe made 27 mini-muffins.

PRINT RECIPE


LEMONY-STRAWBERRY YOGURT MUFFINS (SF)

2       cups flour

2-1/2 teaspoons baking powder

1/2    teaspoon baking soda

1/2    teaspoon salt

1       tablespoon grated lemon peel (I use dried lemon peel)

1       egg

1       cup sugar (I use Stevia)

1       cup (8 oz) carton lemon or strawberry yogurt (I used zero-sugar strawberry Greek yogurt)

1/4    cup oil 

1/2    cup chopped pecans (optional)


Preheat the oven to 400 degrees F. Grease or use paper liner cups for muffin tin.


Sift together the flour, baking powder, soda, and salt.

Stir in lemon peel.


Mix the egg, oil, sugar, and yogurt, 


blending well.

Add the liquid mixture to the dry mixture and

stir just until moistened.


Stir in the pecans if you are using them.

Fill cups 2/3 full.


Bake for 12 - 14 minutes for the mini-muffins and 18 minutes for regular muffins or until golden brown.


Cool 2 minutes before removing to finish cooling.


Store in an airtight container.

TIP: If you don't feel all of the cups, add a little water to the empty cups so the muffins will bake evenly.
Here's a picture from the Cafe of the two SF mini-muffins I made for the Cafe Treats that Sunday.


BLUEBERRY MINI-MUFFINS


Lemony-Strawberry Yogurt Mini-Muffins 

Thursday, April 27, 2023

MY LATEST BLANKET OF HOPE, JANUARY 2023


I dreamed about this latest Blanket of Hope for several months before I finally was able to make it. Maybe you have done this or not. I don't know. But I "saw" the general pattern for the block and couldn't get it out of my mind. 

It's not a new creation. The block is a common one that has been around, but I knew how I wanted to utilize it in a quilt. I didn't see the actual fabric, that would be really weird. I just knew how I wanted to use my fabric with the pattern. Finally the material was another interesting happening though. 

At our first meeting of 2023, we had decided at our December end-of-the year celebration brunch that we would start the year off by getting our closet and cabinets in the room we use at the church reorganized. We had added quite a bit of material to our stash the last several month of 2022 and everything was looking very messy.

A couple of us were doing other things that afternoon though and I didn't go down and look at the hall closet like I should have. The four who worked on it worked for almost 2 hours and deserved a show of appreciation from the three of us working on future things. One Sunday in January my Sunday school class was serving with the Hospitality Team and during a downtime I went upstairs and decided to take a look at the closet. That is when I saw the material in a nice little stack. I knew immediately that that was the perfect material I needed for my "dream" quilt. I took the three different coordinating prints home with me.

The next day I cut out all of the pieces, decided to use a new technique for me -- chain stitching the pieces together to make the blocks and then chain stitching what I could of the blocks together to make the quilt top. I was finished with the top within a couple of hours. (I did have to do a little math and a whole lot of pressing during that time also.)

We try to make our Blankets of Hope 42" x 48 ".  This was the measurement we were given especially good for use with a wheel chair, but also if the blankets/quilts are only 42 inches wide we don't have to have a seam in the backing. Since traditionally the blocks for the blankets are cut 6-1/2" squares, that makes the blanket pattern 7 x 8 blocks or 56 total blocks.

I started with a 6-1/2" block but added the two strips down two sides. I cut them 2-1/2" wide so that gave me an 8-1/2" block and a finished quilt of 40 x 48 " or a pattern of 5 x 6 blocks or 30 total blocks.

I chose the larger print for the 6-1/2" square. I needed thirty (30) of them or five (5) strips cut the width of the fabric and 6-1/2" wide. That will produce exactly 30 squares. I considered using a strip from each of the other prints with the 6-1/2" square, but that isn't how I had pictured it in my "dream". One of the first quilts I ever made was a Rail Fence Quilt. I guess that pattern is always in my mind. Since the quilt will be thirty (30) blocks and following a rail fence style, half of them will include one of the small prints and half will be the other small print.

Time for a little math ... 15 x 2.5 = 37.5 . Cutting a strip the width of the fabric and 8-1/2" wide, then cut fifteen (15) 2-1/2" wide. From the remaining strip, cut one strip 6" x 2-1/2". Cut a second strip the width of the fabric and 6-1/2" wide. Cut 14 strips 2-1/2" wide. Save the rest for your scrap bag.


Chain stitching is a method of sewing to basically save thread as I see it since you are feeding the next pieces to sew without cutting the thread. Since my machine cuts the thread, that wasn't that big of a deal for me. But after trying it, I see it also saves me time. I usually sew from my design wall (a large piece of felt hanging on my wall that I press the cut pieces to in the pattern I am making.) That means I get up and get the pieces I am going to sew together between each piece. That does take time which I just consider exercise. 


With chain stitching, I had my thirty (30) squares and the fifteen (15) strips of each print. (Yes, I have two sets of strips for each print, but I just worked with one size at a time.)


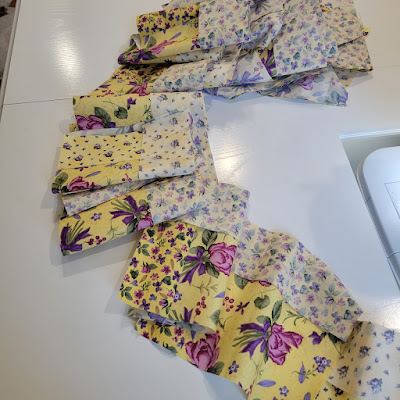
I started by sewing the shorter strip across the bottom of square so I chose the top and bottom of the square when I placed the edge of the short strip along the edge of the square to sew my 1/4" seam.


After sewing the first "block", I moved the second block close to the end of the first one and continued to run the machine until the next block was "picked up" by the sewing machine foot attachment.


I continued until I had finished sewing on the shorter (6-1/2") strips of one print and


continued with the other print of the same length.


That took about 10 minutes or so. I then cut the thread between the blocks to separate them.


Before I could sew the longer strip on I had to get up and press the seams open that I had just sewed. 


1) Set the seams. Quickly press on top of the seam on the wrong side. 


2) Open the seam out and start in the center of the seam on the right side to press. I find this is the easiest way to press the seam to one side. I pressed toward the short strip. 


With the shorter strip sewed on, I was ready to sew on the longer strip following the same chain stitching method

but this time on the left side of the block.


(This means you are sewing from the bottom up.)


Repeat the process, cutting the connecting threads, setting the seams, and pressing the seams open.


Important Note. This time when you are pressing the long strip, you will not be pressing them the same way. Press one of the prints toward the square and the other print toward the strip. Then when you sew the blocks together the seam will nest (fit together smoothly) in the one place that you have two seams together. (where the longer strips meet at the top of one square and the bottom of the above square.)


The thirty blocks on my design wall...


This was the challenge for me with the chain stitching, but since the quilt had six (6) rows and five (5) columns, I could start at the upper left top corner and sew the two blocks together going down the column.

And then stitched the two beneath and finally the bottom two in the first column on the left. (Notice I did pin the ends and where there was a seam and then in-between.)

Once I had the three pairs of the first column, I could just move to the second column and so on until I had the whole top in pairs.

I cut them apart and

then sewed the first two-block pairs together.  At this point I had to stop my chain stitching because I only had one block pair left for the first column.

I sewed the last block pair onto the four blocks and had the first column sewed.

I placed each column on my design wall to make sure I wasn't messing up the pattern. 


Before I could sew the column strips together I had to press the seams I had made. A while back I started pressing the odd numbered row/column away from me and the even numbered rows/columns toward me, so that is what I did. 

I sewed the first two columns together from the left, then the next two, leaving a single column on the right. Then I just sewed the three "sets" together to have my finished top.

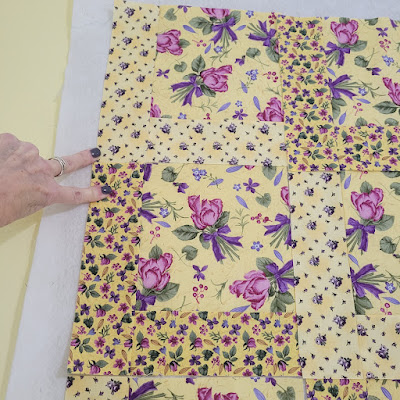
Here is a close up so you can see the prints all together. This has to be just about my all-time favorite quilt I have made. I just love how all of the prints and colors went together.


With the top finished, it had to be sandwiched with the batting and the backing and machine quilted - I just sewed in the ditch a bunch. (sorry I didn't take pictures of this part.) 


After I squared up the quilt and trimmed the excess, I had to chose a fabric for the binding. This purple, yes, it is purple that looks a little blue in this picture, was the winner.

If you would like to view my tutorial on making the binding, you can check out this POST. 

I cut the strips 2-1/4 inches wide for the binding (five of them), made one long strip that I folded in half lengthwise and pressed the fold. I sewed it to the quilt top a quarter inch from the edges.

I fold the binding to the back and secure it down with clips.

I blindstitched it down on the back side.


The finished quilt and one of my most favorite Blankets of Hope I have made.


If you have any questions, please ask away. I will try to answer them.

SNICKERDOODLES

 Several of our Cafe Treats Bakers have made snickerdoodle to share. I even made one that was zero sugar. One baker made some using Bisquick. (I never got her recipe to share.) There are so many different recipes out there for this All-Star Cookie. You will have to check your recipe with it.

Baker Nancy did get her recipe to me and that's what I'm sharing with you today. I did get to eat one and can vouch for it goodness.

PRINT RECIPE.


SNICKERDOODLES

1/2       cup shortening

1/2       cup butter

2          eggs

2-3/4    cups flour

2          teaspoons cream of tartar

1          teaspoon baking soda

1/4       teaspoon salt

*2          tablespoons sugar

*2          teaspoons cinnamon

Preheat the oven to 400 degrees F.

Cream together the shortening, butter, sugar, and eggs. Sift dry ingredients together and stir into the creamed mixture. Mix together the sugar and the cinnamon in a small bowl. Roll cookie dough into balls the size of a small walnut. Roll the dough balls in the *cinnamon sugar. Bake for 8 to 10 minutes. 

Wednesday, April 26, 2023

ORIGINAL TOLL HOUSE CHOCOLATE CHIP COOKIES

Chocolate Chip Cookies are very popular with the Cafe Treats and there are so many different recipes for making them. Some people like to even add oats to their recipe. I bought a small Toll House Cookbook by Ruth Wakefield at an estate sale that contains 888 superb, easy-to-follow recipes from America's most famous country inn. I didn't realize the Toll House in the name of the recipe was a country inn.

When Cafe Treats Baker Linda brought chocolate chip cookies one Sunday, she forgot to include her recipe for me to share. I took a picture of the page from my cookbook and asked her if this was her recipe. She said it was similar and sent me a picture of the recipe she used.

When I compared the two recipes, the only thing different I noticed at first was in my cookbook, you dissolve the baking soda in 1 teaspoon hot water. The addition of 1 to 2 tablespoons of flour if you are omitting the nuts in Linda's recipe is not mentioned in Mrs. Wakefield's recipe. Then I read the note from the Toll House Inn,

"At Toll House, we chill this dough overnight. When ready for baking, we roll a teaspoon of dough between palms of hands and place balls 2 inches apart on greased baking sheet. Then we press balls with finger tips to form the rounds. This way cookies do not spread as much in the baking and they keep uniformly round. They should be brown through, and crispy, not white and hard as I have sometimes seen them."

I found that interesting. She made 100 cookies. Nowadays, everything is so much bigger and scoops of dough is more like a tablespoon. That also means more calories per cookie.  

PRINT RECIPE.


ORIGINAL TOLL HOUSE CHOCOLATE CHIP COOKIES

2-1/4     cups flour

1           teaspoon baking soda

1           teaspoon salt

1           cup (2 sticks) butter, softened

3/4        cup granulated sugar

3/4        cup packed brown sugar

1           teaspoon vanilla

2           large eggs) 

2           cups (12 - ounce package) Nestle Toll House Semi-Sweet Chocolate Morsels

1           cup chopped nuts (Optional. If omitting, add 1 to 2 tablespoons flour)

Preheat the oven to 375 degrees F.

Combine the flour, baking soda, and salt in a small bowl.

Beat the butter, sugars, and vanilla 

in a large mixer bowl until creamy.

Add eggs, one at a time, beating well after each addition.

Gradually beat in the flour mixture.

Stir in morsels and nuts (if using).

Drop by rounded tablespoon onto ungreased baking sheets.

Bake for 9 to 11 minutes or until golden brown. 

Cool on baking sheets for 2 minutes; remove to wire racks to cool completely.

Notes: Linda used mini chips instead of the regular sized ones and she did omit the nuts since the Cafe Treats if a nut-free zone.

Monday, April 24, 2023

LEMON ICEBOX CAKE

 I have been so busy sharing Cafe Treats with you that I have left behind some delicious desserts I have made for other events. I hope you have been visiting My Patchwork Quilt often and tried or at least saved some of the awesome Cafe Treats recipes. I started making three different treats - 3 dozen of each and we now have as many as six different treats each Sunday - we are so popular. I am so thankful for the willingness of others to join this ministry. I now have twenty people in the group. What a blessing!

I chose this Lemon Icebox Cake to make and serve to the Tasty Bunch when they met at our house earlier this month. It was the second one I made because the first recipe for a lemon cheesecake didn't work out. I was so nervous after having the first failure that I also made some cookies to serve with ice cream just in case. (I shared them earlier HERE.) The dessert worked out great so we didn't eat the cookies, but Friend Carol did take some home. 

It is not unusual for me to tweak a recipe a little and I did that to this recipe mainly to make the serving thicker. Everyone was so pleased with the result, I'm not even going to share the original recipe. Sometimes you find a recipe that just doesn't work the way it is pictured.

You could decrease the amount of sugar by using a zero sugar instant lemon pudding mix and sugar-free whipped topping or not. Whatever is your pleasure.

PRINT RECIPE.


LEMON ICEBOX CAKE

2        (3.4 oz) packages lemon instant pudding mix

2-1/2  cups milk (I do use non-fat milk)

1         (8  oz) tub of whipped topping, thawed and divided

1          package - graham crackers


In a large bowl, whisk together the pudding mix and milk until it thickens, about 2 minutes.


Fold in about 3/4 of the whipped topping. 


Cover the bottom of an 8-1/2 or 9 inch square glass dish with graham crackers. Gently break along the perforations to cover the empty places after placing the whole crackers.


Spoon half of the pudding mixture over the bottom layer of crackers. Gently place another layer of crackers over the top of the pudding. (I alternate the second layer of crackers from the way they were placed the first time. Also the dish gradually gets bigger so break the crackers so that they basically cover the layer of pudding.)

Spoon the rest of the pudding mixture over the top of the second layer of crackers spreading out to completely cover the crackers.

Spread the rest of the whipped topping on top.

Crumble three of crackers using a rolling pin and ziplock bag


to sprinkle on top.

I like to use a glass dish because the dessert shows off so nicely in it.


Refrigerate for several hours or overnight (which is what I always do) before serving.


Cut into squares to serve.