Monday, January 30, 2023

GRANDMA'S CHICKEN CASSEROLE

 I've always been into easy and quick recipes. Maybe that is because I was teaching school and that is a job that doesn't stop when you walk out of the classroom. Also as a mother of two athletic boys who were always playing a sport, I didn't have time for elaborate dishes that took a lot of ingredients and time to make.

Now that I am retired I have the time, most of the time, but I still like quick and easy. I'm fortunate that Wayne will eat the same meal until we eat it all - as long as he likes it. That is especially helpful on the days that I have a full agenda.

This recipe called Grandma's Chicken Casserole is not one of my grandma's - just the name of it from Betty Crocker. It fits all of my requirements for quick and easy plus I could make less by cutting the recipe in half. It still lasted us several days, but that was okay because I really enjoyed it. If you have a larger family or having friends over, just double the recipe and bake in a 9 x 13 - inch glass baking dish.

The can of soup is the only fixed ingredient. The rest of the ingredients can be adjusted to fit your baking dish.

PRINT the recipe.


GRANDMA'S CHICKEN CASSEROLE

1-1/2   cups chopped cooked chicken

1         can (10.5 oz) condensed cream of chicken soup

1         cup shredded cheese ( 4 oz)

1-1/2   cup crispy bread crumbs

3         tablespoons butter, melted

Preheat oven to 350 degrees F.


Place prepared chicken evenly in bottom of ungreased glass baking dish. My dish is about 7 x 11 - inches. (I had cooked two chicken breasts and used enough chicken to cover the bottom.)


Spoon and spread the soup evenly over the chicken.


Sprinkle with cheese. 


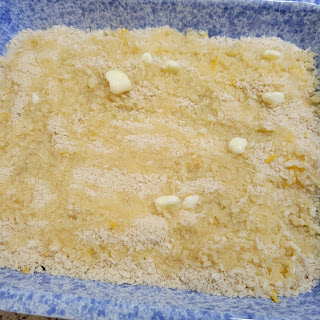
Sprinkle the bread crumbs over the cheese.

Drizzle the melted butter over top.


Bake 30 to 35 minutes or until cheese is melted and bread crumbs are golden brown and thoroughly heated.


Serve warm.

Thursday, January 26, 2023

EASY PASTA/BEEF CASSEROLE

 It all started one day when I thought I would make us spaghetti. I had gotten a package of ground beef out of the freezer not sure what I would make but knowing I would come up with something by the time I would be ready to cook it. I thought I would come up with something fabulous but I didn't. 

I came up with something fantastic. And with normal ingredients that I had in the pantry. In fact if you don't count the two extra seasonings I added, I only used three ingredients. I'm almost embarrassed to write it up. BUT it's just a good example of throwing a few ingredients together and coming up with a delicious meal. A meal that lasted us probably 3 or 4 meals.


EASY PASTA/BEEF CASSEROLE

1               lb. ground beef

1-1/2 to 2  cups uncooked pasta (I used a chickpea rotini)

1                24 - ounce bottle of pasta sauce (I used a fresh tomato & basil & onion no-sugar-added pasta sauce)

1                teaspoon basil

1/2             teaspoon minced garlic        

2                cups your favorite shredded cheese


Preheat oven to 350 degrees F. Spray a casserole dish with a non-sticking cooking spray. (I used a 9-1/2 - inch square casserole dish.)


Cook pasta according to package direction.


Cook ground beef until done. Drain if necessary. Add the pasta sauce to the cooked ground beef.

(I added about a teaspoon basil and some minced garlic.)

I added the pasta to the skillet but

my skillet wasn't really big enough so

I transferred the ingredients to the casserole dish. If you can combine the three ingredients in your skillet, do and then till the casserole dish with about half of the mixture and then add 1 cup of the cheese and stir to combine. Then add the rest of the pasta mixture to the casserole and top with the rest of the cheese. 


Since I couldn't do this I poured everything into the casserole dish and

then added half of the cheese and stirred it well.

Then I sprinkled the rest of the cheese on top.

I heated the casserole in the oven for 15 to 30 minutes.


Serve warm


For leftovers...

Spoon serving into microwavable dish, sprinkle with a little water, and cover. Heat on pasta setting for about 1-1/2 minutes. Then uncover and sprinkle some more shredded cheese on top, cover and return to microwave for about 30 more seconds or until cheese is melted. Taste just like it just came fresh out of the oven.

Monday, January 23, 2023

PATRICIA'S PEANUT BUTTER CUP CHEESECAKE

 Our favorite locally-owned restaurant called Roxanne's Cafe offers a Reese's peanut butter chocolate pie that we really like. So much so that I have tried for several years to duplicate it. They have told me what the ingredients are but because they make several when they make it, I haven't been able to reproduce it with the same results. Until now...well almost. Wayne says he likes mine better but we won't tell Roxanne that. 

Last Friday night was our turn at hosting our small Tasty Bunch group. We meet once a month at a restaurant for dinner which has been chosen by one of the couples. After dinner we proceed to the house of the host and have dessert and more fellowship. I had several desserts I wanted to try and am not really sure what made me decide on the peanut butter pie. But after each "husband" told me what a winner my dessert was, I'm glad I chose it. I'll do the other ones next time.

I found a recipe for a frozen peanut butter pie that I started with and then I got creative. I had some peanut butter cups left from before Christmas and I had a sugar-free chocolate instant pudding mix, but I wanted to use a chocolate fudge mix so I had to go to the grocery store to get it. I wanted another sugar-free one but they didn't have it. I had placed the chocolate fudge mix in my cart when I noticed on the top shelf an instant pudding mix by Dove that was dark chocolate. (I am not paid to say this.) I just love their dark chocolate wrapped candies. Well, I immediately removed the other box and replaced it with the Dove brand mix. I think that made the difference in my end result. 

I also chopped up some of the peanut butter cups and added some whipped topping. I took the easy way out and used ready-made graham cracker crusts. I just don't have confidence in my homemade crust. Seems like the crust doesn't stick together like the bought ones do. I almost forgot to say I made two pies. What's better than that? Now I have another whole pie since I cut the one Friday night into 6 pieces. Guess my friend Fran will end up with part of the second one. But I think it will be a while. I just decided to leave it in the freezer for a week or longer. That way I will know how it stays frozen and I can make it again.

PRINT the recipe.


PATRICIA'S PEANUT BUTTER CUP CHEESECAKE

1       8-oz  1/3 less fat Neufchatel cheese, at room temperature (or cream cheese)

1       cup peanut butter (I used no-sugar-added peanut butter)

1       cup powdered sugar

1/2    cup milk (non-fat works fine)

2       8-oz tubs sugar-free whipped topping (or regular)

10     peanut butter cups, unwrapped and finely chopped (I used the smaller individually wrapped ones - just use as much as you like.)

1       (4-serving size) box of chocolate-fudge instant pudding mix (I used a Dove dark chocolate instant pudding mix)

1-1/2 cups milk (non-fat is fine)

2       graham cracker pie crusts


In a mixing bowl, beat the cream cheese til fluffy. (Beat on high several minutes, don't hurry it. You want a lot of air in it.)


Add the peanut butter and sugar.

I sifted the powdered sugar into the mixture. Stir slowly so the powdered sugar doesn't go everywhere. Then increase the speed of the mixer to medium high or high to make it fluffy again.

Then slowly add the milk on a lower speed at first, then you can increase the speed. You want this part of the pie to not be heavy and by beating it well, it will be lighter tasting.
Clean the beaters and

stir to make sure you have the ingredients completely blended.

Fold in one of the tubs of whipped topping until completely blended.


Divide the mixture evenly between the two crusts.


Chop up the peanut butter cups (5 miniature wrapped ones) and

sprinkle over the two pies. Gently press the pieces down into the pie.

Cover and freeze for one hour.


Just before the hour is up, make the pudding using the mix with the 1-1/2 cups of milk.

Whisk until thick.


Remove the pies from the freezer and remove the covers.

Spread the pudding mix over the top of both pies. This will be a thin layer which was fine with us. If you want a thicker layer of chocolate pudding, you will need to use two boxes of pudding and 3-1/2 cups of milk.


Re-cover and return to the freezer for another hour or at least an hour before you are ready to serve.


I used the cover that comes with the prepared crust which doesn't allow for a very thick pie, so I waited until I was ready to serve them to add the whipped topping and additional chopped peanut butter cups.

Actually, I cut the pieces first and then added the topping to each cut piece and sprinkled the additional chopped candy on top. 


Get ready for an experience!


Tuesday, January 17, 2023

HYATT REGENCY DATE NUT BREAD

 We just got home from celebrating Christmas this weekend with our older son and his family in Colorado. It was such an enjoyable time with them and the weather was so cooperative for the middle of January. We had a dusting of snow Sunday evening so Pike's Peak looked beautiful this morning when we left. I will share a picture I managed to capture on the way out.

I didn't get a post written before we left on Friday morning so that meant I didn't have one to publish today, Monday. To make up for that I have chosen this date nut bread recipe from the Hyatt Regency in Milwaukee, Wisconsin. I have this booklet type cookbook from the Milwaukee Sentinel called 1983 Recipe Book. The note for the recipe said, "A reader requested the recipe for this tasty bread served at Milwaukee's newest hotel at 333 W. Kilbourn Ave."

I have made the recipe twice now. The first time I made a 9 x 5 x 3" loaf and gave it to Gina, who does my nails. I don't usually do that - give something away that I haven't tasted, but I trusted the recipe would be good. I made it the morning before I went so I wrapped it in wax paper as the recipe directed and told her she had to wait until the next day before she could cut it. She didn't quite understand why and I admit it was a cruel thing for me to do but I didn't chose the recipe until that morning.

When I went back the next week to get a pedicure, she couldn't quit expressing how good it was and how much she and her family liked it. I'm not sure if her husband ever tried it because he expected it to be real sweet and he doesn't like real sweet dishes. She said she tried to convince him that it wasn't. That's why I think she really liked it.

It isn't real sweet so don't be expecting it to be. The second time I made it, I made two smaller loaves for us. I froze one and we ate the other. I stored it in the refrigerator while we enjoyed it. Both times I substituted orange juice for the wine. I also substituted oil for the melted shortening. Otherwise, I followed the recipe.

PRINT the recipe.


HYATT REGENCY DATE NUT BREAD

1-2/3     cups flour

1-1/2     teaspoons baking powder

1/2        teaspoon baking soda

2/3        cup non-fat dry milk

3/4        teaspoon salt

1/2        cup sugar

1/4        cup chopped, pitted dates

1/4        cup chopped nuts

2-2/3     tablespoons brown sugar

1           egg

1/2        cup Madeira wine (I used orange juice)

1/2        cup water

3           tablespoons melted shortening (I used oil)

Preheat the oven to 350 degrees . Spray the bottom of a 9 x 5 x 3" loaf pan. Set aside.


Mix and sift the flour, baking powder, baking soda, non-fat dry milk, salt, and granulated sugar in a mixing bowl.


Add the dates, nuts, and brown sugar.

Mix well.

Add the egg, wine (or orange juice), water, and shortening (or oil), and

blend well.


Pour in pan and bake for 45 minutes or until done.

Cool thoroughly on wire rack. (I waited about 10 minutes before I removed

it from the pan.
) Wrap in waxed paper and store overnight before slicing. 
Here are the two smaller loaves I made the next week.

Here are a couple of pictures of Pike's Peak. It is so beautiful to see as you drive around the city of Colorado Springs.