Thursday, May 29, 2014

PINEAPPLE CRUNCH CAKE

Another great recipe from Colonial Cooks!, a cookbook from Colonial Presbyterian Church in Overland Park, KS that I got at an estate sale.  It was contributed by Debbie Watson.

I made this cake to take to Hillcrest Thrift Shop on Tuesday.  Since the tax season is over, Hillcrest is the only place I have to share my "goodies".  I said this to a group of friends the other day at canasta and two of the ladies immediately raised their hands. Thanks, Darlene and Sue.

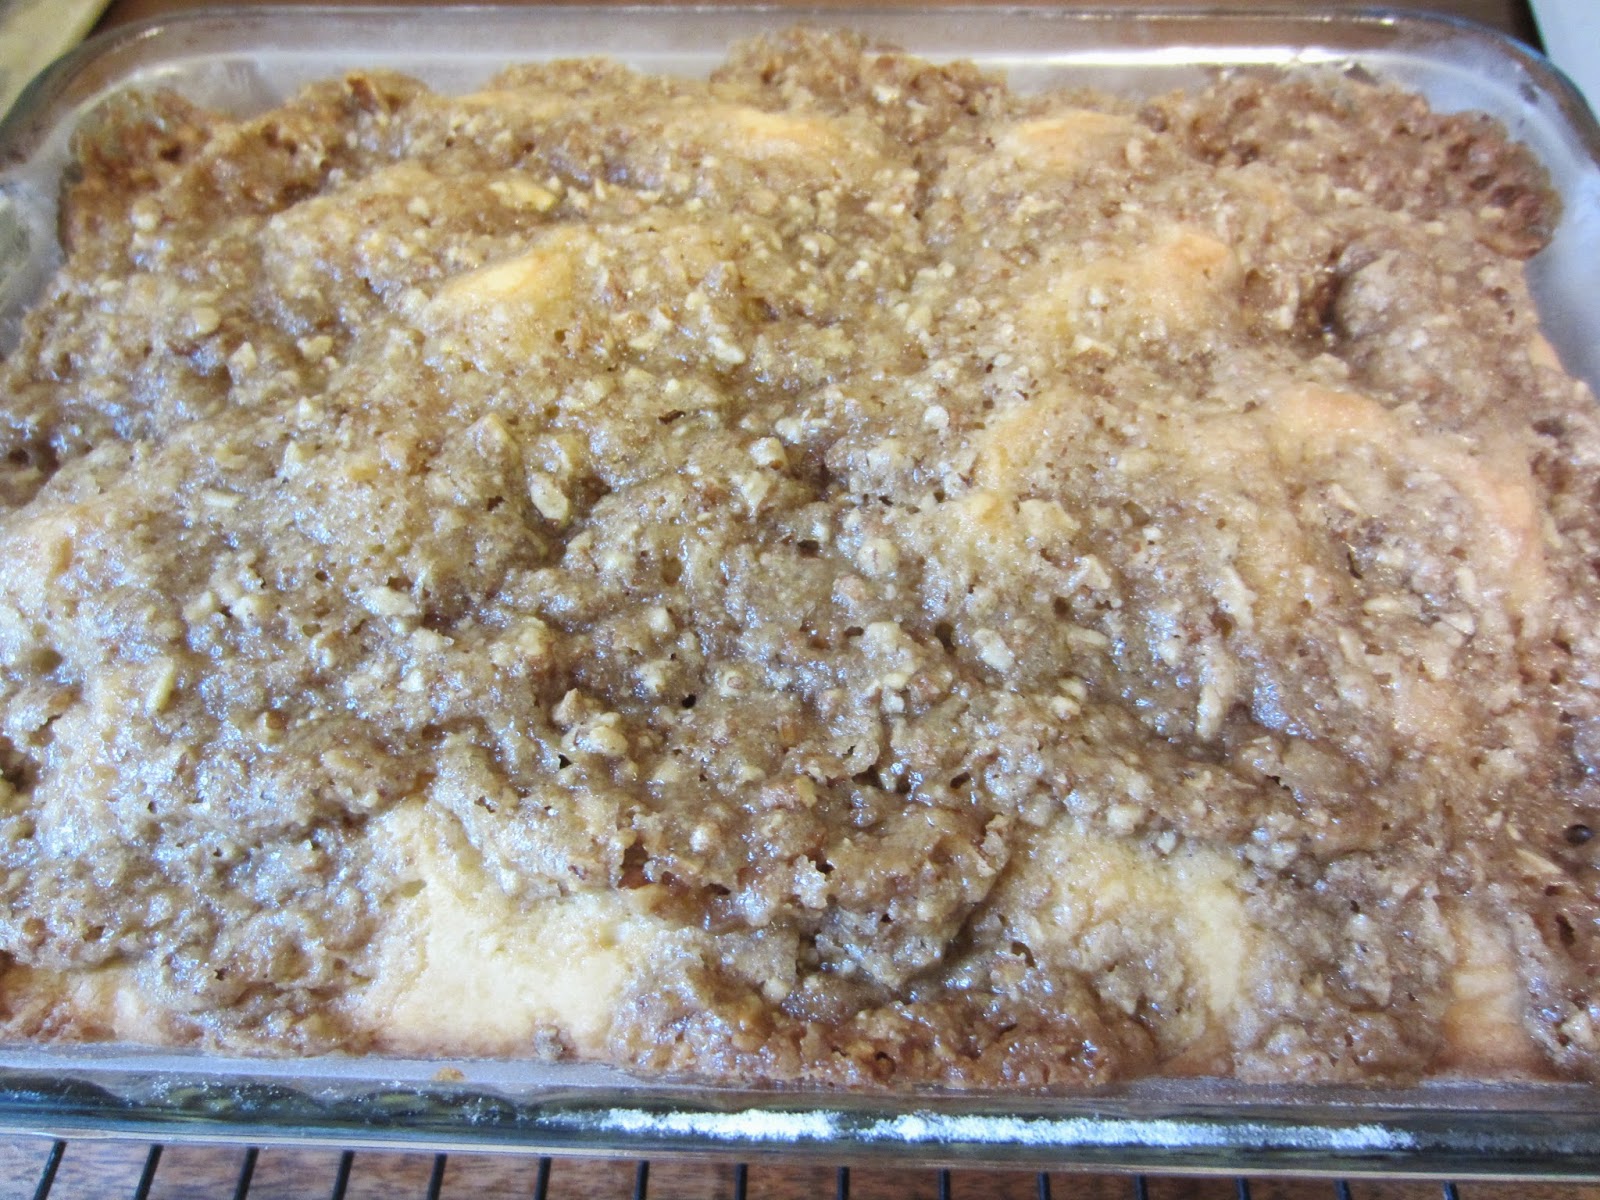
This cake is so unbelievably moist and the extra thick nutty topping is perfect. I received many compliments for it.  When I told them what was in the cake and how little sugar was in it, Willard said, "Well, if I had known that.....give me another piece."  Cute, Willard! Josh said it tasted like a pineapple upside down cake. Hmmm? Okay. The pineapple does taste delicious in it.

Remember if you use the print friendly button at the bottom of the post, it will give you the option to remove the images.


PINEAPPLE CRUNCH CAKE

1       20 oz cam crushed pineapple (in its own juice/no sugar added)
1       box yellow cake mix (I used Pillsbury Sugar Free yellow cake mix)
2      eggs

TOP WITH:

3/4    cup brown sugar, packed (could use brown/sugar blend to reduce calories)
3/4    cup chopped pecans
3/4    cup coconut (I used unsweetened coconut)

Preheat oven to 350 degrees F.  Grease and flour a 9 x 13 - inch pan.

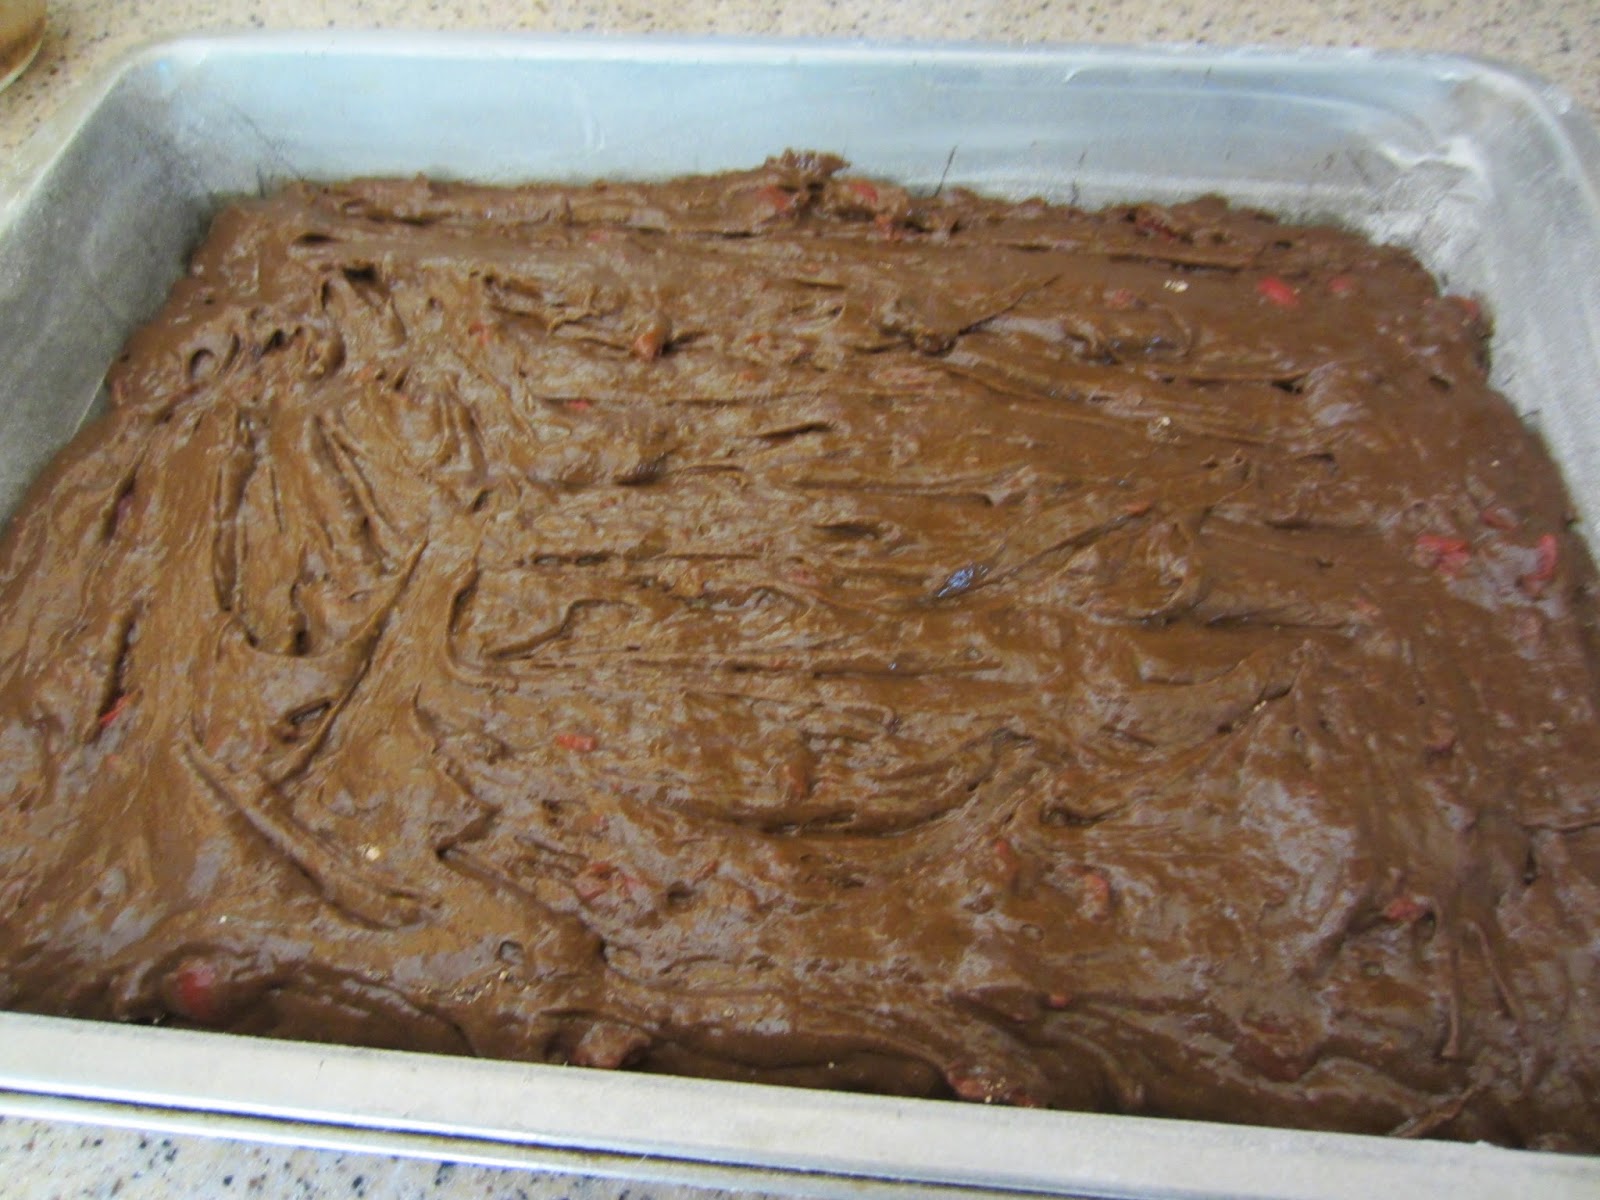
Combine the pineapple, cake mix, and eggs in a large bowl.  Stir well with a wooden spoon.

Spread batter in the pan.

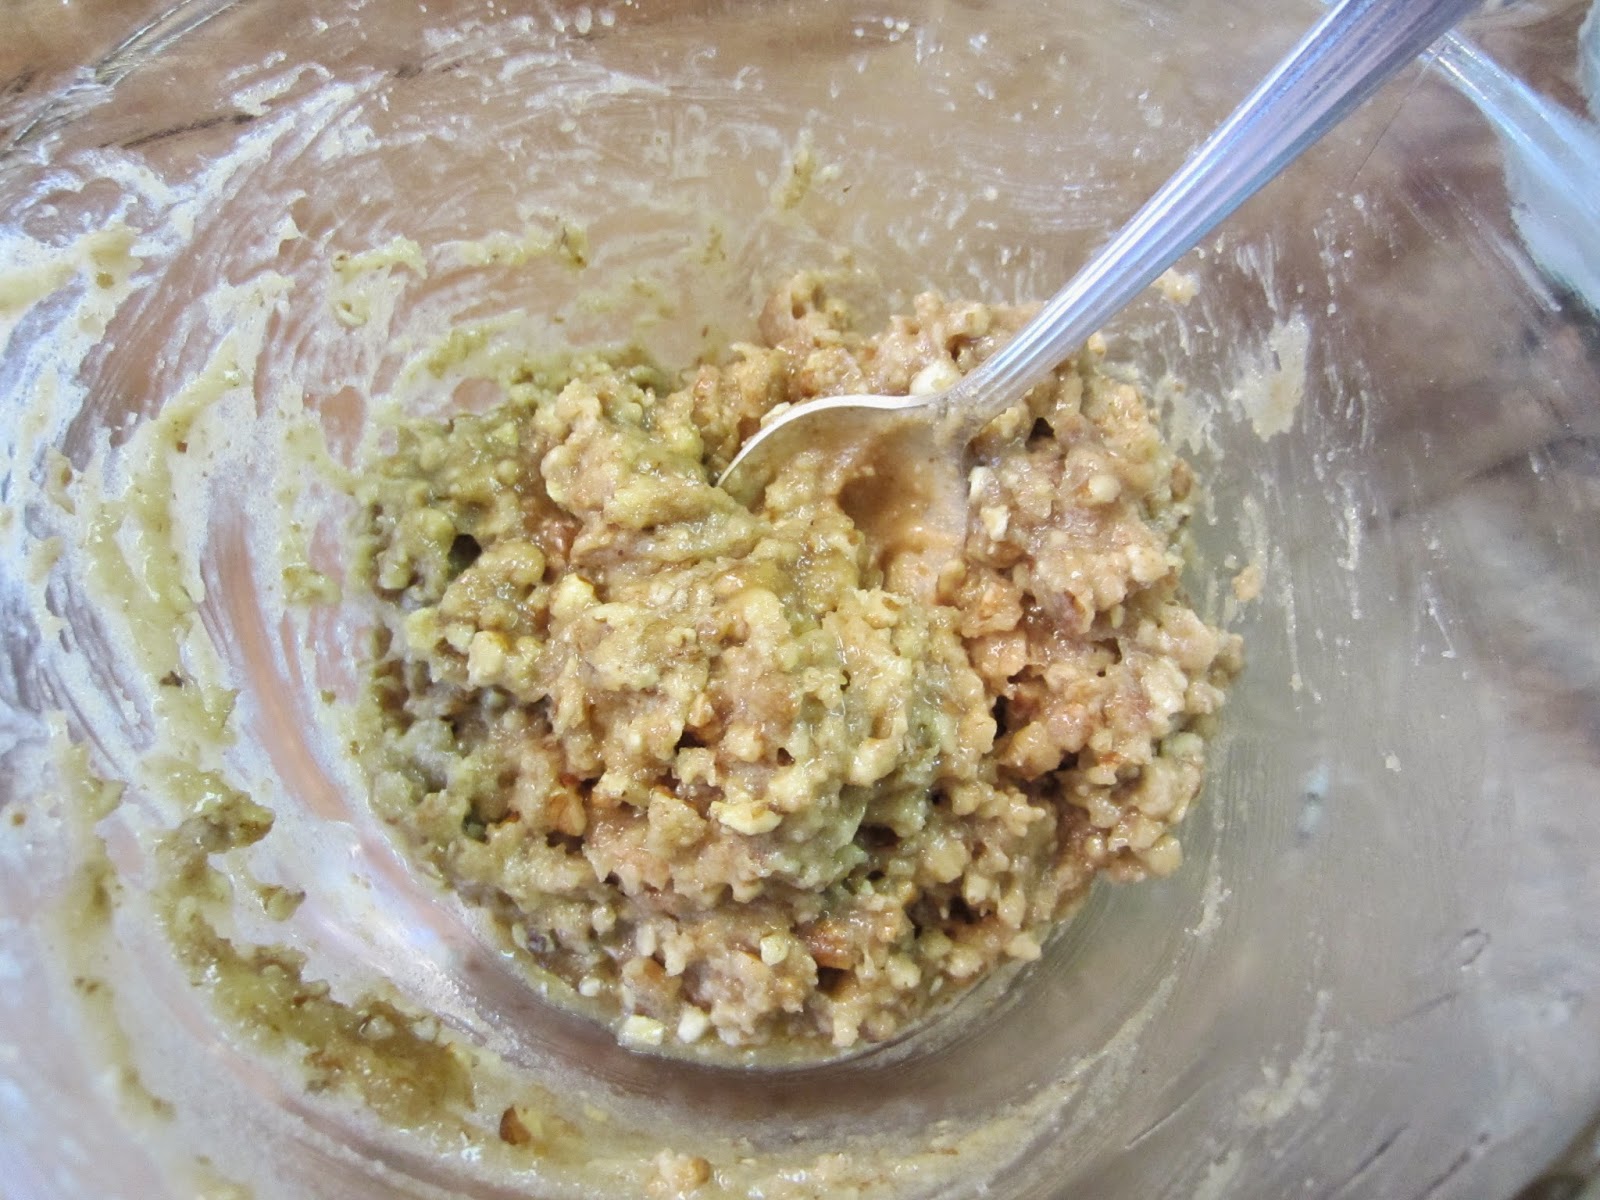
Combine the brown sugar, pecans, and coconut in a smaller bowl.

Sprinkle evenly over the top of the batter.  Do not stir in.

Bake for 30 minutes.

Cool on wire rack.  Cut when cooled.


Tuesday, May 27, 2014

CHERRY CHOCOLATE CAKE

Tuesday is my day to go to Hillcrest Thrift Shop to volunteer.  For a while now, I have made a "treat" to share with the other volunteers that "work" downstairs (where I cashier).  They have come to expect something that is good but that I have reduced the calories . I found this recipe in another cookbook, Colonial Cooks!, that I got at an estate sale.  The "colonial" came from the Colonial Presbyterian Church in Kansas City, MO and Overland Park, KS. It was submitted by Carol Shaw who said the recipe came from her mother-in-law many year ago.  

As I was saying, I usually take something in which I had reduced the calories.  I surprised them by not doing so this time.  I could have though by using a Sugar Free Devil's Food cake mix and no- sugar-added cherry pie filling (which I actually did use). In the frosting you can use either truvia baking blend (1/2 cup) or 1 cup of stevia.  Dark chocolate chips also have less sugar.  The next time I make it I will do these changes.

Remember if you want to print the recipe using the print friendly button at the bottom of this post, it will give you the option to remove the images.


CHERRY CHOCOLATE CAKE


1      box chocolate cake mix (any flavor chocolate)
3      eggs
1      can cherry pie filling

FROSTING;

1      cup sugar
5      tablespoons butter or margarine
1/3   cup milk
1      cup chocolate chips

Preheat oven to 350 degrees F.  Grease and flour a 9 x 13 - inch pan.

Mix the cake mix, eggs, and pie filling well with a spoon or mixer. (I used a wooden spoon and that worked perfectly.)

Pour into prepared pan.

Bake for 35 to 40 minutes.


Frosting:


Combine the sugar, margarine, and milk in a saucepan over medium heat.

Bring the mixture to boil, stirring constantly.

Boil for 1 minute.

Add the chocolate chips 


and stir 


until smooth.

Pour over the cake.

Word of warning.....When you pour the frosting on the cake, don't pour last bit over the center.  The frosting sets up quickly and you won't have a finished smooth top.  Trying to spread it out smoothly with a knife or spoon won't work either.  You can see what I am talking about if you look closely at the center of the cake.  A good idea would probably be to start down one side and just go back and forth across the cake top moving across the cake. 

It doesn't ruin the taste of the cake, it's just my perfectionism. I doubt anybody at Hillcrest even noticed.

Sunday, May 25, 2014

PENUCHE-TOPPED CAKE


We are having an on-again, off-again rainy Memorial Day Weekend.  It was 88 degrees outside until the clouds moved in, followed by rain.  Now it is 67 degrees.  Feel badly for people who were trying to enjoy this weekend camping. (Like our younger son and his family.)  Hope it is a good weekend for you.

This Penuche-Topped Cake is another recipe from the NEW 1953 COOK Book of Pillsbury's 4th Grand National Prize Winning Recipes.  It was a junior winner by Elaine Moehring from East Tawas, Michigan.  What a fine!

I made it to take to Hillcrest Thrift Shop to share with the other volunteers.  Since the recipe said to serve it warm, I decided to go early which meant I could share lunch with them, too. I stopped by Arby's on the way, but it wasn't necessary as they had a big pan of fried chicken.  As always, they were happy to see the dessert. 

Remember the print friendly button at the bottom of the post will allow you to remove the images if you want to print the recipe.


PENUCHE-TOPPED CAKE

2       cups sifted flour
3       teaspoons baking powder
1/2    teaspoon salt
1/2    cup shortening
1/2    cup stevia/sugar blend (or 1 cup sugar)
2       eggs
3/4    cup milk
1       teaspoon vanilla
              *  *  *
1/2    cup firmly packed brown sugar
3/4    cup nuts, chopped
1/4    cup butter or margarine, melted

Preheat oven to 350 degrees F.  Grease and lightly flour a 12 x 8 x 2 - inch pan.


Sift flour


and then measure 2 cups.

Sift again the flour, baking powder, and salt.


Blend together the shortening and sugar, creaming well.


Blend in the eggs, one at a time. 


Beat mixture for 1 minute on medium speed.


Combine the milk and vanilla.

Add the flour and milk mixtures alternately to the creamed mixture starting and ending with the flour. 


(I do this three times with the flour and twice with the milk.) Blend thoroughly after each addition. (With electric mixer use low speed.  You will also need to scrape the sides of the bowl during this process.)


Spread evenly in the prepared pan.


Combine the brown sugar, nuts, and butter in a small bowl.

Sprinkle over batter. (I love recipes that say to sprinkle because that is impossible with this mixture.  Here's what I do:


Using 2 small teaspoons, I start carefully dropping small amounts on the batter.


Continue doing this over the top...


filling in the spaces

until you have a fairly even spread of "dropping" over the top.


Bake for 35 to 40 minutes. (Since I was using a glass dish, I reduced the oven to 325 degrees and baked it for 40 minutes.)


Cool on wire rack.


Serve warm with whipped cream.

Here is a serving at Hillcrest Thrift Shop where I took it. Don't you just love the paper plates?!


Friday, May 23, 2014

EGGLESS, DAIRYLESS, FLOURLESS, W/NO SUGAR ADDED COOKIES

I don't think a week goes by that I don't have a friend on Facebook that doesn't post a picture and recipe for these eggless, dairyless, flourless, with no sugar added (cookies)? One week I actually wrote down the recipe thinking I might try them sometimes....these no name whatevers.

So I guess you figured out that one day I finally decided to try them ...and you are right again...after seeing them once again on Facebook. This time it was from a website I could read. I still couldn't find a suitable name for them though. I considered calling them Nameless Cookies. After all "less" seems to be an important word in the title. Maybe that's what I should call them - The "Less" Cookies.

They were pretty easy to make. I did make them using skim milk because I didn't have any almond milk. So I guess mine were "one-less Less" cookies.  Okay, this is getting a little too much.  I'll quit and just give you the recipe.


THE "LESS" COOKIES

3       mashed bananas (1-1/2 cups)
1/3    cup natural applesauce (no added sugar)
2       cups old-fashioned oats
1/4    cup almond milk (I used skim milk)
1/2    cup raisins
1       teaspoon vanilla
1       teaspoon cinnamon

Preheat oven to 350 degrees F.


Mash the bananas and add to all of the other ingredients.


Mix well.


Line a cookie sheet with parchment paper. Using a cookie scoop, space the "dough" about 2 inches apart on the sheet. Using the side of the scoop, flatten the cookie. 


Bake for 15 to 20 minutes.
(I know they don't look a whole lot different. They will get a little brown.)


Remove immediately and cool on a wire rack.


After I made the first pan, I decided that they would look better if after I flattened them, I smoothed out the edges to make a more uniform shaped cookie. (Some of the edges burned.) They did look a lot better. 

I stored them in an airtight container in the refrigerator.  My husband loved them.  He ate 3 of them immediately.

Thursday, May 22, 2014

CAROL'S CABBAGE SALAD

Our day started here in KCMO with a little shower and it looks like we might have another little one before the day ends.  There are dark clouds around.  I watered my plants anyway, just in case, when I got home from playing canasta with friends.  (Don't ask.....we lost.)  I decided if I planned on rain to water them, it wouldn't rain.  Now even if it does, it will be okay. 

This is one of the dishes everyone enjoyed the other night at our NNL Dinner Group.  As I said earlier, everyone is a great cook in the group and I am lucky they are willing to share with me their recipes for my blog.  Friend Carol made this delicious Cabbage Salad.


CAROL'S CABBAGE SALAD

1       11 - oz bag chopped cabbage
1       bunch green onions chopped
1       15 - oz bag frozen peas
1       cup dry roasted peanuts
1       cup fat-free poppy seed dressing (Carol uses Otts dressing)
salt and pepper to taste

Mix all of the ingredients together. (As simple as that.)

"It makes 5 GOOD servings," Carol says. There were 18 of us there that night. So it makes plenty.

Tuesday, May 20, 2014

IRISH SODA BREAD

As I mentioned yesterday, Friend Sandi's husband Carey asked me several months ago if I had a recipe for Irish Soda Bread, a favorite of his. He said the problem was he could only find it in the stores around St. Patrick's Day. I didn't have a recipe, but I told him I was sure I could find one. I actually found several and even one online.

Friday night we were going to go to Carey and Sandi's to play cards so I decided I would surprise him with a loaf of Irish Soda Bread. It wasn't quite as easy as I expected because I couldn't find any of the recipes I had found earlier (I forgot to mark them). Fortunately I had repinned the recipe I had seen on Pinterest, but I still looked in a couple cookbooks had purchased at estate sales the last two Fridays. I found one but it was quite different from the one from mess for less. Since I had never made it before I really didn't know which one to go with, but decided to try mess for less. (I was won over by pictures of Vicky's darling daughters mixing and kneading the bread.

My husband and I were the first ones to get to Carey and Sandi's Friday night so I hurried in and showed him the bread. I told him he could try it and if it didn't taste good, he could throw it out before anybody else got there. He assured me it would be fine.  

He cut one piece off and then preceded to cut another slice. He looked at me and said he didn't like the crust. Then he spread some butter on the second slice and pronounced it "GOOD". My husband picked up the first piece and said he liked the crust and ate it. Carey finally cut Sandi and me pieces and we agreed it was very good. Carey said it was really good for breakfast. I think it would be.

Remember if you want to print the recipe using the print friendly button at the bottom of the post, it will allow you to remove the images (to save ink).


IRISH SODA BREAD

4     cups flour (I used 2 cups white whole wheat flour and 2 cups all-purpose flour)
1     teaspoon baking soda
1     tablespoon baking powder
1/3  cup sugar (I used stevia) + 1/2 tablespoon sugar
1/2  teaspoon salt
1/2  cup (1 stick) softened butter (I use a 60% vegetable oil spread stick.)
1     cup buttermilk
1     egg
1/2  cup raisins
1/4  cup melted butter for brushing on top (2 tablespoons is plenty)

Preheat oven to 375 degrees F. Grease baking sheet.


Combine the flour, baking soda, baking powder, sugar, salt.


melt butter in the microwave.


Add the melted butter to the dry ingredients.


Beat the egg in the buttermilk.


Add to the flour mixture.


Stir til dough starts to form.


Add the raisins.


I always end up using my fingers.


Work in with fingers.


When most of the flour has been worked in, dump dough onto a floured surface.  Don't worry if some of the flour hasn't been worked in, you can use it when dough becomes sticky as you knead it.


Don't be afraid of "kneading".  It is a simple process of bring on side over to the center.


Then rotate the dough a quarter turn and then bring the top side down to the center. 
Keep rotating quarter turns and then bringing the top side down to the center until the dough is "smooth". Be prepared to spread a little more flour if necessary to keep the dough from sticking to the surface....I didn't have to though with this recipe. (I didn't notice the time when I started kneading, but the process was less than 5 minutes.)


Brush the top with the additional melted butter. (I didn't have a brush so I just covered the top using a spoon.)


Sprinkle the top with the additional sugar.


Using a sharp knife cut an X in the top.

I probably cut an inch deep.


Place loaf on baking sheet 


and bake one hour or til done. Check doneness by inserting a toothpick in the center.  It will come out clean when done. (I also tapped on the top and it sounded hollow....that's what you do when you make other bread.)

Slice to serve. Carey says it tastes best with butter spread on the slice. (It was good either way.)


After the others arrived, Carey cut more slices and shared it with others. They all raved about it also.


I can't thank Carey enough for asking me to make him some. If he hadn't, I might never had tried it and discovered what a fantastic bread Irish Soda Bread is.