Wednesday, July 31, 2013

TRIPLE CHOCOLATE QUICK BREAD

Recently I needed something to take to Hillcrest Thrift Shop to share with my fellow volunteers. And I needed something that would be quick to make. I guess the word "quick" caught my eye in the title of this recipe.  

And who doesn't like chocolate.....so triple chocolate sounded really great. I found myself looking for the triple chocolate and really couldn't find it. The only thing "triple" about the chocolate is that it is used 3 different ways in the recipe. 

Whatever....it doesn't really matter. They LOVED it. When I left after my 3-hour "shift" at the cash register, it was all gone. Doesn't that just look heavenly?


TRIPLE CHOCOLATE QUICK BREAD

1-1/2     cup miniature semi - sweet chocolate chips, divided
1/2        cup margarine, softened (I used a light margarine.)
2/3        cup brown sugar, packed
2           eggs
1-1/2     cup unsweetened applesauce
2           teaspoons vanilla
2-1/2     cups flour (I used soft wheat flour)
1           teaspoon baking powder
1           teaspoon baking soda
1           teaspoon salt

GLAZE:

1/2        cup chocolate chips
1           tablespoon margarine
3 - 4      tablespoons milk or half & half
1/2        cup powdered sugar
1/4        teaspoon vanilla
pinch of salt

Preheat oven to 350 degrees F. Spray four mini loaf pans (5-3/4" x 3" x 2") with cooking spray. I used my three Pyrex mini loaf pans. They are a little over 6" long and about 4" wide.


In the microwave, melt 1 cup of the mini chocolate chips. Heat for 1 minute on high. 


Stir the chips....


til smooth.


In a large mixing bowl, cream margarine and brown sugar until light and fluffy.


Add eggs and melted chocolate. Mix well scraping the sides of the bowl as necessary.


Add applesauce and vanilla. Set aside.


Combine the flour, baking powder, baking soda, and salt with a whisk. ( I sifted the baking soda to get rid of the lump that are always in mine.)


Add the flour, etc to the creamed mixture, mix well. Scrape the sides of the bowl as necessary.


Stir in the rest of the chips. (1/2 cup)


Divide the batter evenly between the loaf pans.


Bake for 35 - 40 minutes. 
Check doneness by inserting a toothpick in the center.  It should come out clean.


While the bread is cooking, prepare the glaze:


In a heavy saucepan, melt the chips and margarine.  


Add the milk and stir til smooth. Remove from heat.


Sift the powdered sugar and add it the mixture along with the vanilla and salt. Stir til smooth.


Cool the bread 10 minutes after removing the loaves from the oven.


Drizzle the glaze over the bread.  (There is actually enough glaze that you could cover the whole top with an icing.)


Tuesday, July 30, 2013

GARLIC CHEESE DROP BISCUITS

I love the garlic cheese biscuits at Ruby Tuesday. They bring you a plate of four to enjoy while you are waiting for your dinner. They are fresh out of the oven and are oh so good.

The other day I was looking through a cookbook, The Ultimate Southern Living Cookbook that I got at Hillcrest Thrift Shop. I found several recipes that sounded like something I would enjoy. Instead of marking their spots with pieces of paper, I just decided to write the titles with the page number on a card with the title of the cookbook at the top. I filled up one side and half the back with titles.

Last night I decided to make one of them....Hot Cheese Drop Biscuits. The recipe called for ground red pepper.  The problem is I can't take hot stuff. If my husband tries something and says it has just a little "kick", I know it will be too hot for me.  

But I was intrigued by the recipe and immediately thought about the garlic cheese biscuits I love at Ruby Tuesday's. I decided the recipe would probably work with garlic instead of the red pepper.

Well, I made them and by the time I had left the table I had eaten 3 of them  I substituted the same amount of garlic powder for the ground red pepper, but I think it could use more garlic. There was only a hint of garlic with 1/2 teaspoon of garlic powder. You might want to experiment and see how much you think is good.

My husband took a bite of one (before I got a chance to) and said he thought I would be wanting to make them again.  You know what....he is so right.


GARLIC CHEESE DROP BISCUITS


2          cups soft wheat pastry flour or all - purpose flour
2          teaspoons baking powder
1/2       teaspoon salt
3/4 - 1 teaspoon garlic powder
1           cup (4 - ounces) shredded sharp Cheddar cheese
1/4       cup shortening
1           cup buttermilk

Preheat oven to 450 degrees F.  Grease a large cookie sheet

Combine the flour, baking powder, salt, and garlic powder in a large bowl. Sift the ingredients together once.

Cut in the cheese and shortening with a pastry cutter until mixture is crumbly.  (I use my fingers.)


Add the buttermilk, stirring just until dry ingredients are moistened.


Drop by heaping tablespoonfuls onto the greased cookie sheet.


Bake for 9 - 11 minutes or until golden.


Monday, July 29, 2013

YMCA OF THE ROCKIES, ESTES PARK CENTER

I am finally getting around to our family vacation at the YMCA of the Rockies, Estes Park Center that we took with our son Jeffrey and his family earlier this month.  

It is a rainy day here, but that's okay.  We really need the rain.  The temperature is only 67 degrees at 11:30 in the morning.  "Crazy" as my dil Sara would say.

I went to our local YMCA for water fitness this am at 8.  Driving home, I decided this would be a perfect day to blog about our family vacation.  I have been "putting it off" because I know it will take a while since I have so many pictures.

I just finished reviewing the pictures and I do have a LOT.  It is hard deciding which ones to show.  So I have decided I will break it down into several posts.  That way I can share many of them with you.

To begin I thought I would just talk and share about the camp.

YMCA of the Rockies, Estes Park Center is a beautiful place and there is so much to do.  It is a perfect place to vacation in the Rockies if you have a family.  My husband is anxious to go back and include our other son Patrick and his family too.  We stayed 3 nights and could have enjoyed ourselves longer. The pool pump wasn't working and so the pool was closed until it could be replaced.  That was really disappointing as the pool was one of the main reasons we chose the Y, but we stayed busy the whole time we were there.  Actually if the pool had been opened, we would not have had time to do the things we did.

It was back in 1907 that the YMCA decided to purchased the Wind River Lodge and adjoining 334 acres in Estes Park to use as a training center for national and international YMCA staff.
Over the next 20 years, family lodgings were built and family programs were started.  In the 60s it expanded its accommodations and programs.  It now contains 860 acres. Year-round and seasonal employees come from almost 40 counties.


This is a picture of the entrance from Highway 66.


Along with cabins there are a number of lodges that you can stay in. We stayed in the Longs Peak Lodge that is perfectly placed close to the dining room, the administration building, the pool, and other activities.  The lodge was built in 2009 and contains 100 "motel-like" rooms that contain two queen-size beds and private bath.


This was the view from the front of our lodge.


Other views around the camp....
Some of the smaller cabins.  We also enjoyed the view of the mountains in the background while we were in the Rocky Mountain National Park.  This picture was taken from the front of the dining hall which was directly behind our lodge.


Panned back from the previous site.  You can see some of the MANY youth there also enjoying the many activities.


Kids were playing on an athletic field.  Beyond it were 3 tennis courts and a 9 - hole and 18 - hole miniature golf course


We were at the golf courses/tennis courts area looking back at the AD building on the left.  The building in the middle is the dining room, auditorium, and assembly hall.


The grandkids had a blast with the crafts.  Colby tie-dyed a t-shirt, Hallie made a mosaic top for a wooden box, and Sadie painted a princess bank.  They also played pool, ping pong, and foosh ball. We "rented" board games to play at night since we didn't think to take any.  (There are no televisions.)  We could have taken hikes, participated in nature classes and archery, gone fishing.....soooo much available that we just didn't have time to do.


I love hanging baskets and these were two different ones hanging under the eves of our lodge.


Another pretty one.


As I said, earlier, if you are looking for a place to enjoy with your family, the Estes Center of the YMCA of the Rockies is a perfect place for you to stay.  You don't have to be members of a YMCA but if you are, you do receive a discount on your lodging and get the "day pass" for all the activities included in your cost.  We also received two free breakfasts for each morning we were there at the "All-you-can-eat" dining room.  One night we ordered pizza from the pizza kitchen there.  It was excellent.  A 16 - inch pizza was only $9.  I would certainly recommend that for one of your meals.

I think I'm looking forward to that vacation my husband is planning with both of our sons and their families, too.


Saturday, July 27, 2013

SMOKIN' GOOD RIBS & PULLED PORK

Back in May we had friends over for the NNL Dinner Club. We host this group once a year and for the main course, my husband likes to grill or barbecue some meat. This year he decided he wanted to smoke some ribs and a pork shoulder to "pull apart" for pulled pork. 

Our son Patrick has two good friends who often enter BBQ contests preparing brisket, pork, and chicken. Whenever B. K. is busy, Sterling will ask Patrick to help him out. So we went to experts to get our directions.  

Well, everything turned out great. I was so busy that I never "blogged" about it.  But one of the couples who came, has kept asking us for the recipe. They are hosting the Dinner Club in August so I thought I should get my act together and get the instructions written down. (I had to call Patrick because we couldn't remember precisely all the instructions.)  But anyway here they are.  Remember we are preparing meat for 10 - 15 people.  


We smoked one pork butt, a.k.a Boston butt roast or pork shoulder--bone in and 3 racks of baby back ribs. (This picture was taken when we first put the meat on to smoke.)


For the roast Patrick prefers to go directly to the butcher in the grocery store and ask for a whole roast. He says the vacuum sealed one are picnic roasts - half size. You want to get a 6 - 7 lb roast. He smokes 2 at a time and then just freezes the meat after he pulls it. He says, "Since you have gone to all the work getting everything in the smoker (charcoal and wood chunks), you want to make the most of it."

He prefers Baby Back Ribs for the ribs.

The night before:

If smoking ribs, pull the membrane from the back side of the ribs. It is hard to eat and it prevents the rub from soaking into the meat on that side. 

If smoking a roast, inject a 6 - 7 lb pork shoulder roast with about 1-1/2 cups of an injection marinade. He said to just keep injecting it until the roast was full. He couldn't share their recipe, but gave me this one...


Injection Marinade

3/4   cup apple juice
1/2   cup water
1/2   cup sugar
1/4   cup salt
2   tablespoons Worcestershire sauce

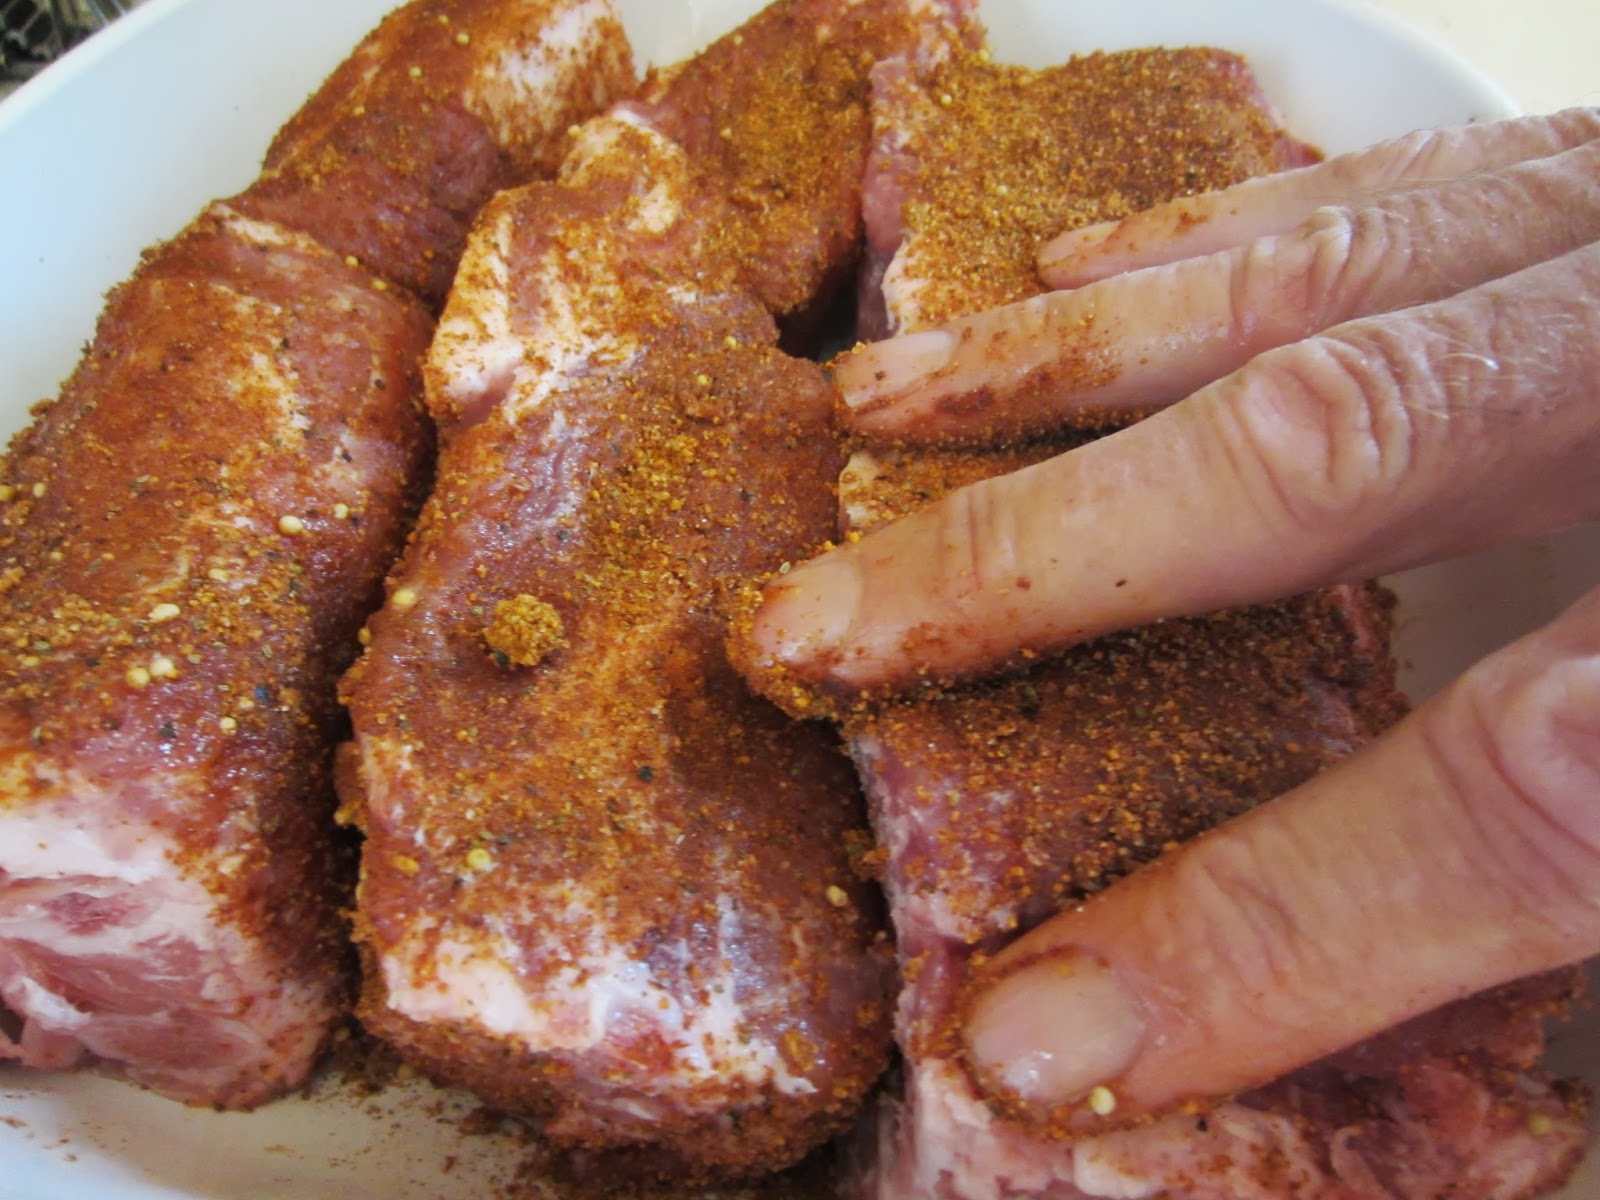
Sprinkle with your favorite rub (Patrick gave us some of the rub they use in the competitions but would not share the recipe---understandable) on both sides of the ribs and roasts using a fair amount.


Important thing to know:  It is called a "Rub" but you do NOT rub it into the meat....you sprinkle it on and just lightly pat it down.  (These are country ribs in this picture)


He places the meat in UNSCENTED garbage bags, ties them with a knot, and places in the refrigerator overnight.

The next day:

Place charcoal briquettes in the firebox, cover with lighter fluid or paper to ignite the charcoal.  Burn until the lighter fluid has burned off and the coals are hot. Add the wood chunks (Patrick prefers apple wood chunks) to the coals and then place the meat on the grill. Roasts -- fatty side down; Ribs -- bone down. You don't have to turn the meat as it smokes.


(If you are smoking quite a bit of meat, you will probably want to use rib racks that will hold the ribs up and free the grill surface for your other meat.)


You will need to use plenty of wood chunks in the early hours. The wood burns faster than the charcoal, but still add some charcoal too when needed.  


You want to keep the temperature between 225 degrees F and 275 degrees F. Check at least every hour. When the temperature drops to 225 degrees or the wood is dying down, add 2 - 3 chunks of woods and at least 5 - 10 briquettes of charcoal to the firebox.

Continue to smoke until roast temperature reaches 160 degrees F or the bone will start protruding in the ribs. When you lift the ribs with tongs, you will see the bones turning black. Baby back ribs will usually take 3 - 4 hours to reach this point.

You are now ready to continue smoking the meat using foil. You will no longer be adding any wood chunks to the firebox, just charcoal.

Roast:  Spread about 1/2 - 1 cup of brown sugar on a large sheet of aluminum foil. Place the roast on top of the brown sugar. Then add another handful of brown sugar on top of the roast. (Butter is optional)  Close up the foil ends and return to grill until the meat reaches a temperature of 190 degrees F. It will take about 1 to 1-1/2 hrs / lb for the pork shoulder to smoke. Patrick says a good size roast will take up to 10 total hrs. to smoke.

Another good bit of information: The temperature is what is important when cooking roasts. The meat will look pink in the middle because it was smoked.  

It is then ready to pull. If you aren't ready to eat, wrap the foiled-wrapped meat in a towel and you can place it in a cooler and keep it warm for 1 - 2 hrs. 

Ribs:  After about 3 - 4 hours (read above), remove the ribs. Using a big sheet of foil, first sprinkle the ribs with brown sugar. Cover the brown sugar with margarine. Use either 1 stick of margarine / rack (cut into small tabs) or Patrick says he uses one squeeze bottle of I Can't Believe It's Not Butter / 2 racks of ribs. The latter certainly is easier to do. 

Close up the ends of the foil and return to smoker for 2 - 3 more hours. As with the roasts, if the ribs are ready before you are ready to eat, you can wrap the "foil-wrapped" ribs in a towel, and place in a cooler for 1 - 2 hrs. If the time is longer, place the foil-wrapped meat in the oven set at a real low temperature until ready to eat. (I'm talking the lowest your oven will go....you don't want to dry the meat out.)

FYI -- when ribs are being judged, you don't want the meat to be "falling off the bones". It should come off easily but when you bite it off with your teeth.


Our finished ribs.

Thursday, July 25, 2013

BUCKEYE BROWNIES


On Monday the Northland New Neighbors League Farkle group met.  Our hostess Sue outdid herself with the snack offerings.  I LOVED it! 

I loved it because they were all so good, but also because I love being able to share goodies that my friends make.  I will be sharing her recipes with you over the next week.  

The first one I want to share was the dessert she had. Have you ever made the candy known as Ohio Buckeyes? It is so good. Well, that is what this dessert taste like. Sue said she got the recipe on Pinterest.

It was so-o-o-o-o good. I only ate one piece, but I could have eaten another one. 

When I make these, I will use a sugar free brownie mix. Then I won't feel quite so bad because of the calories.  If you have never tried it, it makes a really good boxed brownie!


Buckeye Brownies

19 1/2 oz. pkg. brownie mix
2 c. powdered sugar
1/2 c. plus 6 T. butter, softened and divided
8 oz. jar creamy peanut butter
6 oz. semi-sweet chocolate chips

Prepare and bake brownie mix in greased 9" x 13" baking pan according to pkg. directions. Let cool.

Mix powdered sugar, 1/2 c. butter, and peanut butter in a bowl.

Mix well (I used electric mixer) and spread over cooled brownies. 

Chill for 1 hour. 

Melt together chocolate chips and remaining butter in a saucepan over low heat, stirring occasionally. 

Spread over brownies.

Let cool; cut into squares. 

Makes 2-3 dozen.


Tuesday, July 23, 2013

WESTWOOD COOKS' SUGAR COOKIES

In the late 70s and early 80s I taught school at Westwood Elementary School. The teachers didn't have a separate dining room but had to eat at the tables with the students.  Most of the time I took my lunch, but whenever the cooks made these sugar cookies, I always managed to get one.  

One day I finally asked them for the recipe. They were more than willing to do so. The recipe I am sharing only makes about 4 dozen cookies. I halved it from my original recipe from the cooks. If you want more cookies, just double the recipe.

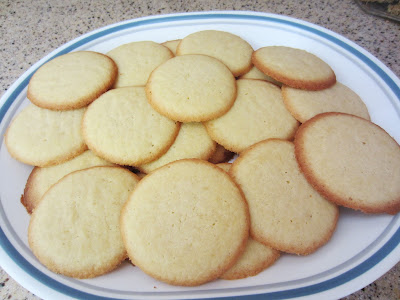
I think of them as "Melt - in - your - Mouth Sugar Cookies" because that is what they do. You don't need to chew them at all.

I also like that you don't have to roll them out and cut with cookie cutters. You flatten them with a fork, but the dough is soft enough that the cookies end up flat and don't look like peanut butter cookies.


WESTWOOD COOKS' SUGAR COOKIES


1/2     cup sugar ( I used 1/4 cup truvia baking blend.)
1/2     cup margarine (1 stick), room temperature or slightly softened
1/2     cup powdered sugar
1         egg
1/2     teaspoon salt
1/2     teaspoon baking soda
1/2     teaspoon cream of tartar
2        cups + 1 tablespoon flour
1/2     teaspoon vanilla
1/2     cup canola oil

Preheat oven to 325 degrees F. Lightly grease cookie sheets.

Cream sugars and margarine til smooth.


Add the egg, and beat til smooth. Scraping sides of bowl as necessary.


In a small bowl, combine the dry ingredients - salt, baking soda, cream of tartar and flour.

Add the dry ingredients and mix on low til smooth. Scrape the sides of the bowl as necessary.


Add the vanilla and beat til smooth.


Add the oil last. Combine on low til thoroughly combined.


Using a 1 - inch scoop, space the cookies about 2 inches apart. (My large cookie sheets holds 12 this way.) Lightly flatten with a fork. (Cookies will bake smooth.)


Bake for 10 minutes - 12 minutes. Edges will be brown. Leave the cookies on the cookie sheet 2 minutes before removing to a wire rack to finish cooling.