Sunday, September 30, 2012

AUTUMN LEAVES -- PLACEMATS & COASTERS

In the fall, I enjoy looking out my windows and seeing the beautiful fall colors on the trees in my yard and down the street.  I also enjoy seeing them in my house.  Now they aren't real like the ones outside but I have a real vivid imagination.


I made my first autumn leaves (quilted coasters) over 25 years ago.  That sounds like an eternity to me when I say it.  Hard to believe.  Seems just like yesterday.  We were living in Fayetteville, AR on 2 acres.  There were a lot of different trees around us.  I wanted to make some coasters but I wanted to be precise so I walked around trying to find a perfectly shaped leaf from the different trees.  Then I traced the outline on a piece of paper even marking the veins.  I collected some scraps of fabric (had to have enough to make the front and back) that looked like fall colors and carefully traced the pattern on the right side of one of the pieces of the fabric.  I layered the two pieces with a thin, thin batting in between.  I pinned the three layers together with large safety pins.  Then with my machine set on a really close zigzag stitch, I carefully stitched around the leaf on the line that I had drawn until I got back to where I had started. 
Then I had to stitch in the leaf for the veins.  I stitched the main vein first and then worked from the main vein out. (I know this picture is not from the coasters but one of the placemats below.)  After I had all my sewing done, then I cut around the outside of the leaf as close as I could to my stitching.


Here is a close-up picture of each one of the coasters.


Two years ago I decided I wanted to make some placemats using the same technique that I had used on the coasters.  I'm embarrassed to tell you how long I looked for realistic BIG leaves.  I tried to find paper placemats in the shape of leaves, but couldn't.  I looked for felt ones in some of the fabric stores, but couldn't find any.  I did find one in a shop but they wanted more money than I was willing to pay just for "perfection".  I took the coaster and made scale drawings of them and enlarged them.  That generally worked.  I took real leaves and tried to enlarge them.  Let me tell you, in case you aren't a perfectionist, IT CAN DRIVE YOU CRAZY AT TIMES.

This is what I finally ended up with.  Because they are larger, I used many large safety pins to hold the three layers together while I was sewing them.  I don't really remember for sure if I did, but I would recommend starting with the main vein and working out thus doing the outline of the leaf last.  This will help keep the work smooth.  The last thing I did was to trim away the excess as closely as I could to the zigzag stitch.  I have given the dimensions (widest points) of each placemat below the picture.
18-1/2"  x  15"

20-1/4"  x  13-1/2"

20"  x  17-1/4"

21"  x  14"

I will share some pictures of my real leaves in a later post.  

Sunday, September 23, 2012

LIFE'S LITTLE INSTRUCTIONS

I receive a monthly newsletter from the group that manages the health benefits for the employees in the school district that I retired from. I often enjoy the articles presented in the newsletter. One page in this month's issue was dealing with your emotional health.  They attributed the list of "Life's Little Instructions" to William Snell.  While I could have made a similar list, why "reinvent the wheel".  So while I didn't talk to William Snell, I give him full credit.

Life's Little Instructions

  • Become the most positive and enthusiastic person you know.
  • Never waste an opportunity to tell people you love them.
  • Don't be afraid to say, "I made a mistake" or "I don't know".
  • Leave everything a little better than you found it.
  • Take responsibility for every area of your life.
  • Commit yourself to constant improvement.
  • Never underestimate the power of love.
  • Compliment even small improvements.
  • Keep your promises no matter what.
  • Strive for excellence, not perfection.
  • Remember other people's birthdays.
  • Be there when people need you.
  • Be forgiving of yourself and others.
  • Say "please" and "thank you" a lot.
  • Return all things you borrow.
  • Don't expect life to be fair.
  • Learn three clean jokes.
  • Avoid negative people.
  • Have a firm handshake.
  • Look people in the eye.
  • Be the first to say "hello".
  • Marry only for love.
  • Keep it simple.
              and

  • Count your blessings.  (He saved the best for last, as far as I am concerned.) 
I hope you are having a good day. 

Thursday, September 20, 2012

WHITE CHOCOLATE CRANBERRY MACADAMIA NUT COOKIES


These cookies that my friend Dee served at Mexican Train the other day were so good.  The butter flavored Crisco that she used made them taste so good....so buttery.  I asked her if they had a lot of butter in them because they were so good.  She laughed and said, "Yeah, butter flavored Crisco."  The white chocolate chips, dried cranberries, and macadamia nuts are a perfect combination.  

Thanks, Dee, for sharing the recipe with me for my blog.  You have to give these a try.  You won't be sorry.

WHITE CHOCOLATE CRANBERRY MACADAMIA NUT COOKIES

3  cups all-purpose flour
3/4 teaspoon salt
1   teaspoon baking soda

1   cup butter-flavored Crisco shortening

3/4 cup sugar
1  cup brown sugar

2  large eggs
1  Tablespoon vanilla

6 oz (1 1/2 cups) dried cranberries
8-1/2 oz (1 1/2 cups) white chocolate chips
1  cup (4-1/2 oz) coarsely chopped, roasted, salted macadamia nuts


Preheat oven to 350 degrees.

Sift flour, soda, salt. Set aside.

Cream shortening until fluffy.  Add both sugars; beat until blended. 

Beat in eggs one at at time; then vanilla.  

Add dry ingredients; beat until just blended.  

Stir in cranberries, chips  and nuts.

Drop by heaping teaspoon onto parchment lined cookie sheets, 1- 1/2 inches apart.


Bake about 12-14 minutes until just golden.  


Cool on cookie sheets.


Tuesday, September 18, 2012

HOW TO FREEZE FRESH PEACHES

I bought these beautiful peaches earlier this week. I brought them home and put them in a paper sack, like I always do, for them to ripen.  A couple of days later, they were starting to smell like peaches. I have had them in the frig for a couple of days and today I finally got around to freezing them.


The peaches should be ripe if you want to freeze them. First wash and peel themSo that they would generally be the same size, I cut the peach in half to remove the pit.  Then I cut each each half -- in half. Then I cut this "half" in thirds. 


I had prepared a mixture of water and lemon juice in a large bowl to put the slices in immediately. I had 4 cups of water and 3 tablespoons of lemon juice.  This is to keep the peach slices from darkening.


After I had peeled two or three peaches and let them soak in the lemon/water, I took a slotted spoon and put the slices in a colander to drain.


Then it was time to start arranging them in a single layer on a cookie sheet.  I placed them as close as I could without them touching.  


Then I placed them in the freezer to freeze til firm...I allowed about 2 hours.


After I took them out of the freezer, I used a plastic spatula to loosen them.


See how nice they looked. Such a beautiful color.


I placed them in a quart-size freezer bag to store in the freezer.


They will keep 6 to 8 months in the freezer. To thaw, allow to stand in the refrigerator overnight and serve while still slightly icy or use in your favorite recipes.  The frozen peaches will work great in smoothies or pies, other desserts using peaches.

You can check out a fast and easy way to peel peaches when doing a bunch HERE.

Sunday, September 16, 2012

FALL QUILTED PLACEMATS


I mentioned earlier in a post for my Sew & Quilt-In-One Placemats that I would have to make me some using fall prints.  Since then I remembered....I already have some placemats for fall that I made last year.  I thought I would share them with you as they are different from the ones I made for Christmas/Winter and Spring/Summer.  In case you missed the tutorial for making them, you can see it HERE.


Material you will need to make 4 (6) placemats:

Print A  --  4  (6) fat quarters, or 7/8 (1-1/4) yards - 42 inch wide
Print B  --  1  (1) fat quarter
Print C  --  1  (1) fat quarter
Print D  --  1  (1) fat quarter
Backing --  7/8 (1-1/4) yards - 42 inches wide
Binding  -- 1/2 (3/4) yards - 42 inches wide
Batting  --  7/8 ( 1-1/4) yards 

I used six different prints for these placemats.....the four for the top, a different one for the back, and then another one for the binding.  The large print A contains all of the colors of the other prints.

I started by cutting the backing and the thin batting - 14 x 18 inches wide. (I cut 2 strips across the width of the material, 14 inches wide. Then from the strip, I measured 18 inches and then cut.  That gave me two backings from the strip.  The leftover 6 - 7 inches went in my scrap box. I repeated with the second strip to have backing for 4 placemats.) 

For the front, print A is cut 14 x 14 inches,  print B is cut 2 x 14 inches, print C is cut 1-1/2 x 14 inches, and print D is cut 2 x 14 inches.  Fat quarters work well for these.

 1) To begin, lay the backing "face down". 

 2) Lay the batting on top of that.  

 3) Starting with piece A, lay it "face up" matching the edges on the right side of the placemat.  The fabric should hold to the batting.  If you like, you can pin the top and bottom corners  and the middle on the RIGHT END with large safety pins and then again about half way across.

 4)  Lay piece B "face down" along the LEFT END SIDE of panel A matching top, bottom, and raw edges on the side.  I don't, but if you like, you can pin this strip down with straight pins.  If you have a "walking-foot" attachment for your sewing machine, use it here.  It helps to keep the top fabric from stretching as you sew.  Since you will be trimming the placemat before you sew on the binding, if the strips do stretch by the time you get to the bottom, it won't matter.

 5)  Sew strip B to A through all layers with a quarter-inch seam.

 6) Open out the seam and PRESS it. Once again, don't worry if strip B ends up being longer than the backing and strip A.

 7)  Lay strip C "face down" along the left side of strip B again matching top, left hand side, and bottom.  Pin to secure, if you like.


 8)  Sew strip C to strip B through all layers with a quarter-inch seam.

 9)  Open out the seam and PRESS it.

10) Lay strip D "face down" on strip C matching top, left hand side, and bottom.  Pin if you like.

11)  Sew through all layers with a quarter-inch seam.  

12)  Open out the seam and PRESS it.

13)  You will notice that the end with the narrow strips is "finished" (quilted).  You will need to sew "lines" through the panel A through all layers.  I drew lines every 1-1/2 inches apart measuring from the left side with a fine line washable marker.  Secure the panel with more large safety pins if needed. You can move them as you are sewing the "lines" if they are in the way.

14)  Stitch along these drawn lines working from the center toward the right.

15)  Do not trim the place mats until you have all of them made.  This way you can trim them all to the same size.  (I trim mine to a finished 17-1/2 x 13-1/2 inches measuring from the left side.  In other words, excess on width should be cut from the right side so that strip D will be the same width for all of the placemats.)
 
Once you have all of your placemats  sewed together, you will cut the binding. You will need to cut at least 7 (10) strips across the width of the material. I cut my strips 2 inches wide instead of the common 2-1/2 inches.  I do this so that the binding is the same width on both the front and back.  When it is folded lengthwise and pressed, you will be sewing a 1-inch wide binding to the raw edges of the placemats with a quarter-inch seam. It will fold over the edge and have a tight finished narrow binding when you slip stitch it down on the back side.

In this picture of the back of the placemat, you can see the "machine quilting".  The right side of the picture is where the prints B, C, and D are on the front side.  You can see the distance of the quilting varies as the width of the strips varied.


How to get a perfect mitered corner on your binding....You can check out my tutorial for this HERE.

You can also see a different method for making the diagonal seam when you join the beginning and the end of the binding in that tutorial.

I hope you can follow my written directions.  I made those placemats last year before I started my blog and so didn't think about taking pictures as I went along.

If you have any questions, leave them in a comment and I will get back to you with an answer.

Friday, September 14, 2012

LIME BREAD

This recipe is so good. I changed the name to Lime Bread from Lemon Bread because today when I made it, I used fresh lime juice. I love it with fresh lemon juice, but I really love it with fresh lime juice.  

We bought the limes at a roadside market in CO on the way home after visiting our son and his family recently. I wanted to use them but I keep forgetting to use them in my iced tea. This morning I decided I would just squeeze the juice from them and store the juice in the frig. (Don't miss the tips below for getting the juice from fresh lemons and limes.)

As I said, I used lime juice instead of lemon juice. Feel free to use lemon juice if you want a lemon flavor. If you decide to use lemon juice instead of the lime juice, also add 1-1/2 teaspoon lemon peel. I made 2 generous mini-loaves instead of a large single loaf. I will freeze one for later and enjoy one now.


LIME LOAF

1/2  cup light margarine (1 stick)
1  cup sugar (or 1/2  cup truvia blend)
2  eggs
1-2/3 cup all-purpose flour
3/4  cup buttermilk
1/2  teaspoon baking soda
1/4  teaspoon salt
1/3  cup chopped nuts
3   tablespoons lime juice
1  tablespoon sugar

Spray two mini-loaf pans or one 8 x 4 x 2-inch loaf pan.

Preheat oven to 350 degrees F.

In a large mixer bowl, beat butter on medium speed about 30 seconds or til softened.

Add 1 cup of sugar; beat about 3 - 5 minutes or til light and fluffy.

Add eggs, one at a time, beating after each til combined.

Blend flour, baking soda, and salt with whisk in a small bowl.

Add dry mixture and buttermilk; beat til moistened.

Stir in nuts.

Pour batter in pans.

Bake for 40 minutes or til a toothpick inserted near center comes out clean.

Remove from oven and set on wire racks.  

Mix the lime juice and tablespoon of sugar and stir to dissolve sugar.

Poke holes in the bread while in the pans with a meat fork or ice pick, etc.

Spoon the lime/sugar mixture over the bread in the pans.

Cool for 10 minutes on wire racks.

Remove from pans and continue to cool on wire racks.


TIP ALERT!

I had had the limes in the refrigerator for a week and I wanted to make sure that I got all of juice from them.  

I was familiar with two different methods and decided to try both.  

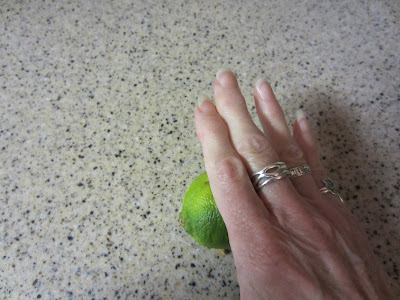
One thing you can do if the limes or lemons are at room temperature, is roll them along the counter to soften it.  

If the limes or lemons are cold (as mine were), place them in the microwave and heat for 20-30 seconds to warm them slightly.

After I took them out, I rolled them on the counter, too, to soften.

The next thing I did was new to me (I did some research). Cut across the fruit from end-to-end instead of around the middle.


Then I squeezed the half with my hands over the measuring cup 

 And then I used my glass juicer-thing.

I was really pleased....from the six limes, I squeezed a cup of lime juice.
 

Thursday, September 13, 2012

MOLASSES BANANA BREAD

If you like the taste of molasses, you have to try this recipe! It smells so good cooking and taste as great, especially warm.  

Once again I made it in 3 mini-loaf pans instead of one large loaf. That way I can freeze two and eat one now. Actually I took one loaf to Leon, my friend Janice's husband. Janice and I went shopping while Leon stayed home to participate in their neighborhood garage sales. I figured he would get hungry sitting there all day. So I only have one to freeze while we eat the other one.  

Oh, btw, Leon loved the bread!


MOLASSES BANANA BREAD

1/2   cup softened light margarine/butter
3   large bananas
1   cup molasses* (see tip below)
1   egg
1   cup whole wheat pastry flour
3/4   cup all-purpose flour
1/2   cup chopped walnuts
2   teaspoons baking soda
1/2   teaspoon salt
1/2   teaspoon finely grated orange peel (optional)
1/2   teaspoon ground nutmeg (optional)

Preheat oven to 350 degrees F. Spray three mini-loaf pans or one 9 x 5-inch loaf pan with cooking spray.

Beat butter in large mixing bowl until smooth.
Beat in bananas, molasses and egg.

Combine flours, baking soda, and salt in a small bowl with a whisk. Mix with other ingredients in large mixing bowl until blended

Pour batter into prepared pans.

Bake for 45 minutes for mini-loaves and 50 - 60 minutes for larger loaf.

Cool on wire rack for 10 minutes.

Remove and continue cooling on wire rack.


TIP ALERT:

Time saving techniques I use:

This tip shows you how to measure and then easily pour molasses.

To begin, I sprayed the measuring cup with cooking spray.


Then after measuring the amount of molasses in the cup, I poured it in the mixing bowl.


Notice how completely the molasses came out of the measuring cup. I love it.....no waste, no repeated scraping with a spoon to get it all. I know....I watch chefs cook on TV and they leave so much of the ingredients in the measuring cup. It drives me crazy. If it were okay to use less ingredients, the recipe would call for less.  

Sorry.....I feel better now.

Another thing I do since so many of my recipes use two different kinds of flour....

I have several (3 actually) handy-dandy dry/liquid measuring thingies that makes this so easy to do.  I pull up the outside tube to the total amount called for.  I measure one amount to desired level and then top off with second flour. I don't worry about the exact amount of each as long as the total amount is correct. (Oh dear....I just noticed when I looked at the picture that I used 1/4 cup less all-purpose flour than the recipe called for.....the bread taste really good though.)