Saturday, August 31, 2013

PAT'S RHUBARD-RED RASPBERRY PIE

My husband and I (and a few other friends) really enjoyed Pat's homemade Rhubarb - Red Raspberry Pie recently at her house.  I have to stress homemade because she not only made the crust, she and her husband George grew the rhubarb and picked the red raspberries from her yard too.  Wish I could say that, but I can't.  I am just thankful that I get to enjoy the "fruits" of others'  labors.


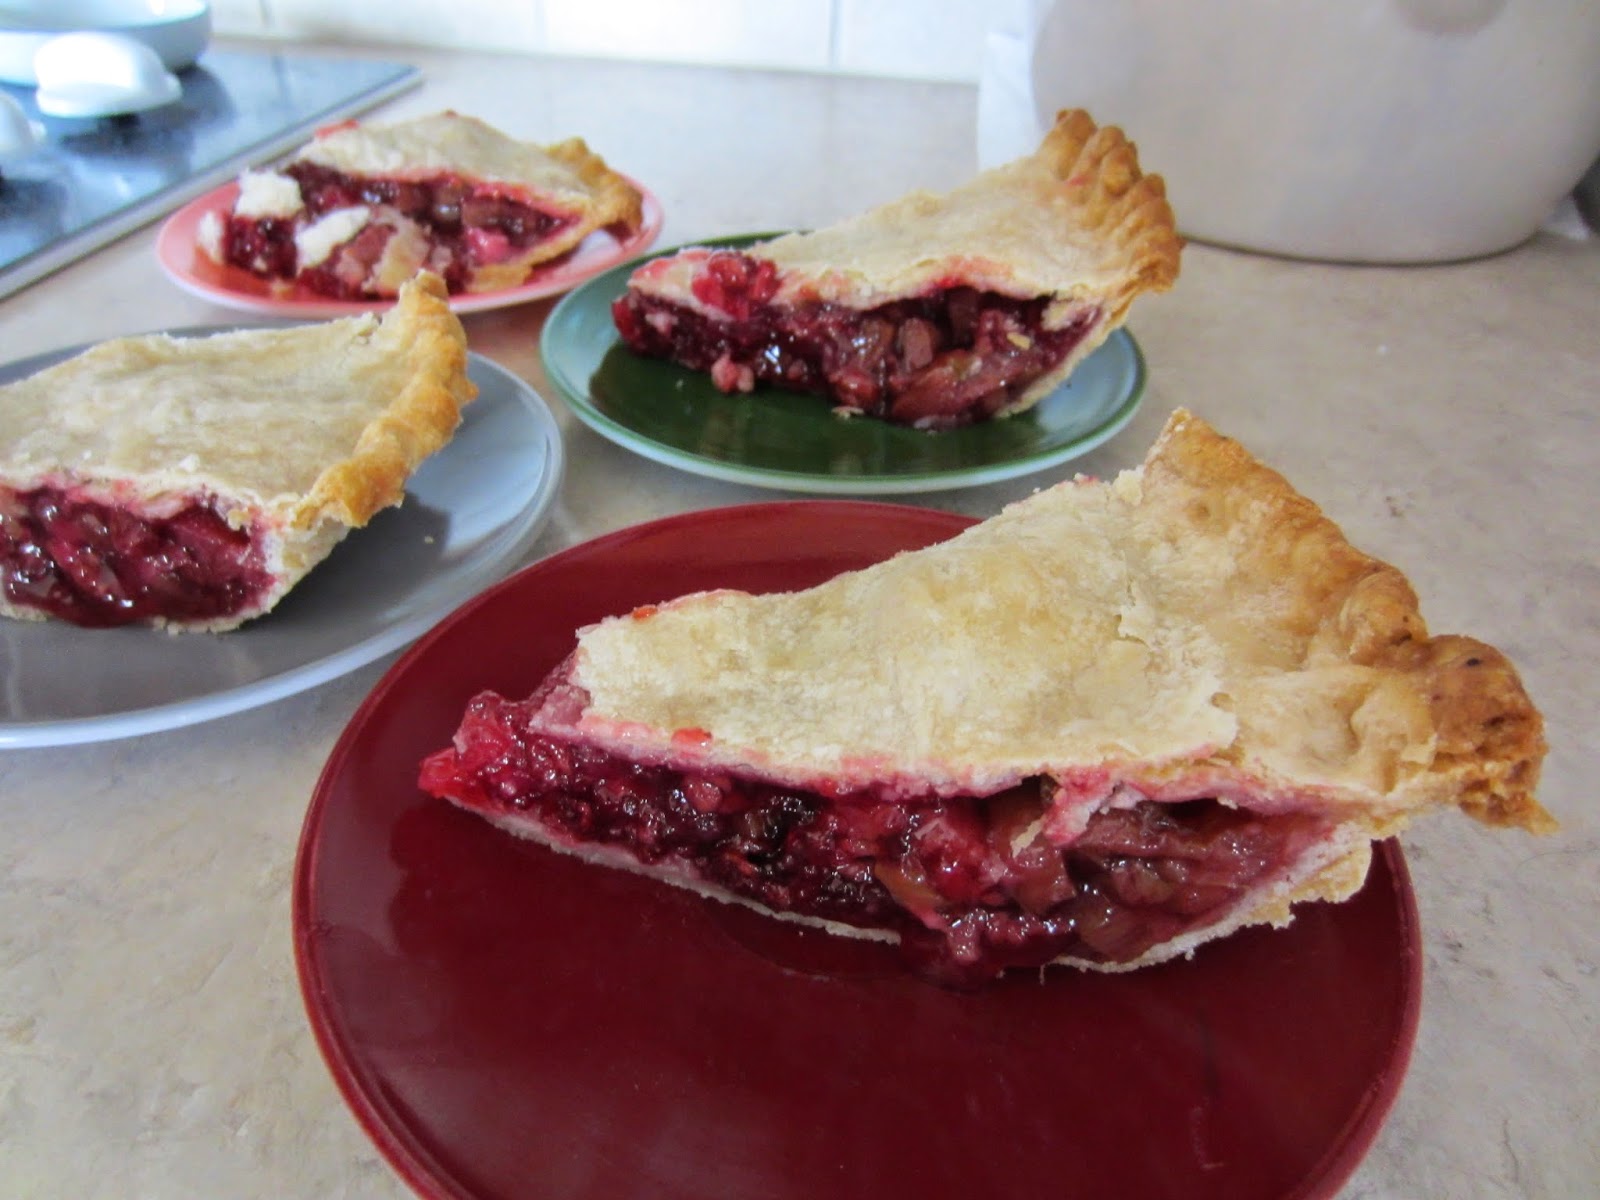
RHUBARB - RED RASPBERRY PIE

2-1/2    cup rhubarb, cut into1/2 inch dices
1-1/2     cup red raspberries
1           cup sugar
3           tablespoons Minute tapioca
2           9 - inch unbaked pie crusts (see recipe below that Pat uses)

Preheat oven to 400 degrees F.

Combine all of the ingredients and let set for 15 minutes in a large bowl.

Pour into crust.

Add top crust, crimp together the edges, and vent the top.  (cut a few slits in the top)

Bake 15 minutes and then reduce the oven temperature to 350 degrees and bake 40 - 45 more minutes or until crust is golden brown and filling is bubbling.


PIE CRUST

2-1/2     cups unsifted flour
1/2        teaspoon salt
1/2        teaspoon baking powder
1            cup shortening
1/2        cup cold water

Mix all but the water well using a pastry blender.

Gradually add the water and mix well.

Chill in refrigerator at least 15 minutes.

Roll out dough on lightly floured surface to fit pie plate.

Pat always uses this recipe when she makes pie crusts.  It came from a recipe book called Get Smakelijk.  It is one of those great collection type recipes books from the Jr. Welfare League of Holland, Michigan.  The recipe was contributed by Mrs. Tom Vander Kuy.


Pat served it

with ice cream....


and without...
UPDATE:  Pat served it again at Mexican Train last week but didn't remember that she had shared the recipe with me before.  We didn't have any ice cream this time, but it was enjoyed by everyone at the gathering. I thought I would share the pictures....they are better quality.


Friday, August 30, 2013

STRAWBERRY ANGEL DESSERT

The other afternoon a few of us gathered at Janice's for an afternoon of cards. It was a perfect afternoon with temps in the low 80s to do just about anything with friends, but cards won out.  

When we get together, we don't want to spend the afternoon eating, so snacks are usually light.  One thing that may or may not be light is dessert. We always have dessert.

That afternoon was no different.  Janice had it hiding in the refrigerator so we were a little surprised when she asked us if we were ready for dessert. Always prepared with my camera in my purse, I was ready to take some pictures of it as Janice served it.  (Everyone has gotten used to my taking several pictures before we eat)

After we finished playing cards, (Did I mention that Fran and I won?) I got Janice to tell me the recipe so she wouldn't have to give it to me later.  She knows it by memory since it is a favorite of hers.  She said she likes to make her own angel food cake, but didn't this time.  She also said sugar - free and fat - free products work well but sweetened the frozen strawberries if they are unsweetened.


STRAWBERRY ANGEL DESSERT


1/2     Angel Food Cake
1        large package instant vanilla pudding (sugar - free works)
2        cups milk(skim works)
1        pint vanilla ice cream, softened (sugar - free and/or fat free works)
1        small box strawberry banana jello (sugar - free works)
1        16 - oz bag frozen sweetened sliced strawberries (freeze them if using fresh strawberries)
1        cup boiling water
Cool Whip

Using a 9 x 13 - inch pan, break half of the Angel Food cake into pieces and spread them in the bottom of the pan.

Mix the pudding with the milk and stir til it thickens.  Then stir in the softened ice cream.

Pour the pudding/ice cream mixture over the cake pieces.  

Place in the refrigerator for 15 - 20 minutes.

In a large bowl, stir the box of jello with the boiling water til the jello dissolves.  Then add the frozen strawberries, stirring quickly to thicken.

Pour over the top of the pudding/ice cream mixture.

Top with a layer of Cool Whip.  Store in the refrigerator overnight or most of the day.


Thursday, August 29, 2013

UNBELIEVABLE BROWNIES

Looks like we are finally going to have some temps in the 90s before the summer is over.  It has really been a mild summer here in KC.  My husband has enjoyed it.  Unfortunately my garden, or I should say, my attempt at gardening this summer has not enjoyed it.  

I didn't even get my tomato plants in the ground until the beginning of June. I also planted one pepper plant in a big pot on our deck.  The little pepper that was starting is maybe twice the size it was when I planted it.  No more blooms though.  The only thing growing in the garden area is weeds.  The tomato plants have grown but that is all.  No tomatoes.  Just wasn't hot enough.

I guess I am fortunate that my friend Kay's garden has done well.  She has generously given me several zucchinis from her garden.  My husband has really enjoyed the squash she has given us.  She gave me this really BIG zucchini.  (She didn't see it on the plant.) I think it was 14 inches long and 11 inches around at biggest end. Well, I made ZUCCHINI MEATLOAF, sweet zucchini butter bread, ROBIN'S ZUCCHINI BREAD,and finally these zucchini brownies from it.  


I found this cake-like brownie from Sparks recipes back earlier in the summer. I only made a few changes from the original recipe but they are so fabulous tasting, I can't believe my changes made any difference. I, at least, feel less guilty eating them.


LOW FAT, REDUCED SUGAR ZUCCHINI BROWNIES


1       4-oz single serving unsweetened applesauce (or 1/2 cup)
1/2    cup mashed bananas (1 large banana)
3/4    cup stevia/sugar blend (or 1-1/2 cups sugar)
2       teaspoon vanilla
1/2    cup special dark cocoa powder
1-1/2 teaspoon baking soda
1/2    teaspoon salt
2       cups finely shredded zucchini
2       cups soft wheat pastry flour (or all-purpose flour)
1/2    cups chopped pecans or walnuts

Preheat oven to 350 degrees F. Grease and flour a 9 x 13 - inch pan.

Mix together the applesauce, mashed banana, and sugar. 

Add the vanilla and cocoa.  Mix well.

Add the baking soda, salt, and zucchini.

Add the flour and nuts.

Pour batter into prepared pan 


and bake 25 minutes or until the center springs back when touched gently in the center.


Cool in pan on wire rack completely before cutting.


Wednesday, August 28, 2013

DIJON HONEY CHOPS

This recipe was in Mr. Food Cooks Like Mama cookbook that I got at an estate sale a couple of months ago.  Cookbooks have become my weakness.  I have a hard time passing them up.  Last Friday, I actually managed to talk myself out of buying one that I wanted because there were a couple of recipes that looked good.  

This morning I decided I would have pork chops for dinner tonight.  But I wanted to try a new recipe.  I found one, but it needed to be marinated overnight.   I will have to try that one another time.  

I decided to check out "pork chops" in some of the Mr. Food cookbooks that I got at an estate sale.  The first one had the recipe that needed to be marinated.  So I picked up the second one.  That's where I found the recipe for Dijon honey chops.  It looked easy and I had all of the ingredients.  I just used 2 pork chops though instead of 4.

Mr. Food says, "These are as fine, fancy-tasting, and mouth-watering as any pork chops I've ever had.  And we can end up looking that fine and fancy in just minutes--WOW!!  This one will become one of your standards that they'll always be looking for.  It's probably my favorite "new way" with "old-way" pork chops."

The next time I make them I will use Emeril's Essense as the seasoning salt for my husband's.  He likes dishes with a more kick.  I would recommend your using your favorite seasoning.


DIJON HONEY CHOPS

1-1/4 to 1-1/2 pounds pork loin chops, 3/4 inch thick

Seasoned salt for sprinkling

1        tablespoon vegetable oil

1/3     cup orange juice

1-1/2  tablespoon Dijon mustard

1        tablespoon honey

2        teaspoons cornstarch


Sprinkle both sides of chops liberally with your favorite seasoning salt.


In a large skillet, heat oil; brown chops, two minutes per side.


In a small bowl, combine remaining ingredients.


Pour mixture over chops.


Cover skillet and reduce heat to low, and simmer for 20 minutes 


or til done.


Pour sauce in small bowl


to spoon over chops when ready to eat.


Tuesday, August 27, 2013

MY SUDOKU LAP QUILT (PART 1)

I love doing Sudoku puzzles.  Well, the hardest one, at least.  Last year I saw somewhere, sorry I just don't remember where, the idea for making a quilt using a Sudoku puzzle.  I immediately realized this was a perfect answer for my problem with randomness and quilt making.  I took the idea to Blankets of Hope (formerly United Methodist Women's Hope Circle Quilters) and we made a number of lap throws using the idea. Most of us at Blankets of Hope have trouble with randomness also.

Recently I have been wanting to make a new lap quilt for myself and immediately thought of the Sudoku puzzle idea.  I also thought it would be a good idea to share here on my blog.  Especially since lately I have just been baking.  I knew I wanted to use batiks but the scraps I had left from making my grandson Colby's batik quilt were not big enough for the Sudoku quilt.


You're familiar with Sudoku puzzles, aren't you?  The puzzle is a 9 x 9 grid square and uses the digits 1 - 9. Each set of digits appear only once in a row and in a column.  The grid is also divided into 9 sets of 3 x 3 squares in which the 9 digits are only used once. In the puzzle these are shaded or not to show more easily.  This is the puzzle I decided to use for my quilt...


after I solved it.


This pattern is so unbelievably fast and easy.

What you need:

a finished Sudoku puzzle (you don't have to be able to complete one...did you notice the finished puzzle from the day before above the puzzle?)

3/8 yards of 9  different prints  
material for binding, batting and backing

The size you cut your squares will determine the finished size.  

Ex:  Finished 5 inch squares will produce a 45 - inch square quilt.
      Finished 5-1/2 inch squares will produce a 49-1/2 - inch square quilt.
      Finished 6 inch squares will produce a 54 - inch square quilt.

I decided to make mine a finished 49-1/2 inch square quilt, so I cut my squares 6 inches.


First I washed and ironed my nine prints.


Using a rotary cutter, mat board, and ruler, fold the material in half matching the selvages.  You need to get a clean cut on one "end".  To do this, lay the ruler so that the fold of the material is in line with one of the lines on the ruler. (see bottom of the picture.)


Then cut the excess off.


I always cut with the fold closest to me. 

There is an easy way to do this next cut without moving the material, but to be honest, I don't usually do it unless I am working with thicker material that might not stay together. Here is how to do it....place a ruler measuring the width you want to cut the strip along the trimmed edge.  Then place another one that is as long as the material is wide up against the first ruler making sure you don't move it and make sure it is lining up with the fold.  Then remove the first ruler.  You are ready to cut for the strip.  I show this method HERE.

I simply turned my material over so that the trimmed edge was on the left.  I matched up the fold on the ruler line at the bottom of the picture and lined up the edge of the material on the left along the 6 - inch line on the ruler since I am cutting my squares 6 - inches.  Then I cut along the right side of the ruler with my rotary cutter and had the first strip cut.  I repeated this step matching the 6 - inch line on the ruler and the fold on the botttom line and cut a second strip.


When you are cutting squares using this strip method, you always want to start cutting from the selvage ends. First refold the strip if you need to bring the open ends closer together and then cut the selvage ends off. (I separated the two pieces so you could see this better in the picture.)


You always want to start cutting from the ends instead of the fold because sometimes you can get an extra square cut from opening the fold. 

I was able to get 7 squares cut from the first strip so I only needed 2 more for my 9.  Since the material is folded, I only had to cut "one" square.


Once I had done this with all nine prints, I had nine stacks of cut squares ready to go to a bigger area so I could "lay" the whole quilt top out.  So off to the family room I went.


Using post-its, I wrote the numbers 1 - 9 and placed one on each pile.  It doesn't really matter how you arrange the prints.  But different arrangements will produce different looking quilts.


With my finished puzzle in hand, I started placing the squares in the first row, matching the numbered print with the order that the numbers were in the first row of the puzzle. (7, 8, 5, 9, 6, 4, 3, 1, 2)  I just took the square from the bottom of the pile so I didn't have to move the post-it each time.


Continue this process for each row until you have used all your squares and have done the last row of the Sudoku puzzle.  Remember you don't move any squares because you think they will look better in a different location.  That is why I said this pattern works well with my problem of being random.  The numbers on the bottom row are the numbers used for the puzzle.


When I was finished, I moved the numbers into sequential order to number the rows.


Then I wanted to stack the rows to return to my sewing room to sew them. As long as you are consistent, your method doesn't matter.  I always work left to right by placing the first square on the left of the row on top of the second square.  Then I pick up both of those squares and place them on the third square.  I continue this until I am at the end of the row.


When I have all the rows stacked, my piles look like this.


Since I usually start sewing the first row first, I then stack the piles so that row one will be on top when I am finished.  (In this picture I have stacked row 8 on top of row 9.)  I have never had a problem with the rows/piles separating so I have never clipped the pile together.  You always know the end of the row when you are sewing because the first square of the next row will have the number on it.


Ready to go to my sewing room.


When I got the stack in my sewing room, I remembered this cute idea I saw somewhere several years ago for "marking" a row.  I decided to use it so I could show you.  The post-its don't always stay stuck and I knew this method would work better.  (For Blankets of Hope, we always tear off a small piece of masking tape that we have numbered and place it on the top square of each row.  Then we don't have to worry about it coming off when we are sewing the strips to make the quilt top.)  Using a small safety pin and the small lettered or numbered beads, pin the bead on the square.  I use the letters and place them in alphabetical order.  I removed the post-it after I pinned the bead on the square.


Once I had done all rows, I was ready to start sewing the rows into strips. Since you are working left to right, you will place the top square down on your surface with right side up.  Take the second square in the pile and place it right side down matching the edges.  (Since I was using batiks and they have no right or wrong side, I didn't have to worry about this.)


Sew the two squares together on the right with a quarter inch seam and then open the seam out with the right sides up.  Don't worry about pressing the seams now.  You will do all of that when you have all 9 rows sewn.


Take the next square in the pile and place it like you did the second one with the right sides together


and sew them together in a quarter inch seam.  I have this nifty little attachment that has a thin metal piece that you can place the row edge of the fabric next to and you always have a 1/4 inch seam.


Continue this process until you have all 9 rows/strips sewn.


Now you are ready to press the rows so you can sew these strips together to finish the quilt top.


The first thing you want to do is "set the seam".  To do this you simple press the iron down on the seam made.  Refold the strip so that you can have each seam flat to press.


When you have gone all the way across the row, you are now ready to press the seams all going the same way. I usually press the first row with the seams going toward the open ends.


Then the second row/strip is pressed just the opposite -  with the seams going away from the left end.  The third strip will be pressed like the first one and the fourth strip like the second one and so forth.


With all of the strips pressed, you are now ready to sew the strips together. The reason you press the seams in opposite directions is so the seams will "nest" together (feel nice and flat) when you are pinning the strips together. Experience will make this process easier.


Pin on one side of the seam.  It is not necessary to pin anymore.


When you open the seam up, if the seams have "nested", you will have perfectly joined seams.


Once you have sewn all 9 strips together you are ready to go back to the ironing board to "set" and then press the seams.  This time it doesn't matter whether you press them up or down, just press them all the same way.
The back of your quilt top will look 


as nice as the front. (Well, you know what I mean.)


Here is the upper left hand corner of the quilt that shows the 9 different prints (before I sewed them).


Next I will be layering the quilt top with the backing and the batting so I can start the machine quilting.  You can see that process in the Part 2 HERE.