Monday, February 28, 2022

BLOCK 6: PATIENCE CORNERS

 After accidentally losing about four hours of work Friday morning, I took a break from my tutorials for the blocks I am making in a 30-Block Exchange Group. I have been writing up the tutorial as soon as I finish the block since my actions are fresh on my mind, but now I have three tutorials to write to catch up. 

The other exciting thing that happened was receiving my first block in the mail on Saturday. Several of the members had messaged that they had mailed their thirty blocks, but I hadn’t received any. It is so pretty and I can’t wait to receive another one. Until then I will just plod along finding new blocks to make and writing the tutorials for them.


Today I am sharing the pattern I found online at Quilts to be Stitched called Patience Corner. The block went together especially quickly because one of the quilts I am working on for Blankets of Hope, our quilting group at church, right now is one using this pattern. I did need to change the dimensions because my square was bigger than 12.5” for the Blanket of Hope. 


I find many  quilt patterns aren’t as difficult as they sometimes look if you can break it down into parts. If you think of this block as four smaller blocks with two rectangles and a square in each AND simply rotate them around, you can see how quickly it will go together. The other great thing about this pattern is there is only one time that you have to match two seams and that’s right at the end. I actually enjoy “nesting” or butting up seams together. It feels so good when you can “feel” that the seams are meeting and then when you open the piece up and see that the seams met, it’s a great feeling. Puts a smile on your face. 

When I made the blanket and this block, I only used two colors for each of the small blocks. You could use two different prints for the two rectangles in each block if you preferred. I used the same print for each rectangle.


HOW TO MAKE A PATIENCE CORNER QUILT BLOCK

      (12.5” or 12” finished block and using a ¼” seam)


CUT  four 4.5” squares from different prints (can use a charm pack and trim down)

               Four rectangles 2.5” x 6.5” from Print #1

               Four rectangles 2.5” x 4.5” from Print #1 or Print #2


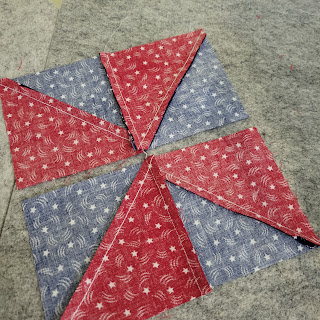
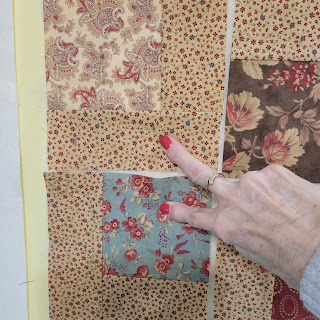
ARRANGE the squares and rectangles using the picture as your reference. 
I have some spaces so you can see the four smaller blocks.

The first thing to do is to stitch these two pieces together (the square and the short rectangle) using the ¼” stitch.

PRESS the seam away from the square or toward the strip each time on the wrong side and then on the right side making sure that you are pressing close to the seam on the latter.

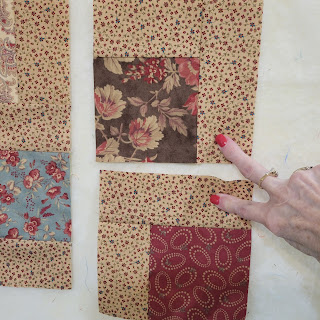
Return the piece to the pattern on your design wall or table and join these two pieces together.

PRESS the seams away from the center or toward the strip and return to the pattern. You have made the first of the four smaller blocks and will repeat the process with the other three smaller blocks. Remember to repeat each step. Once you have the four smaller blocks sewed and back on your design wall or table

you will need to SQUARE each small block to 6.5” square. This is an important step so that you produce a nice, flat block.

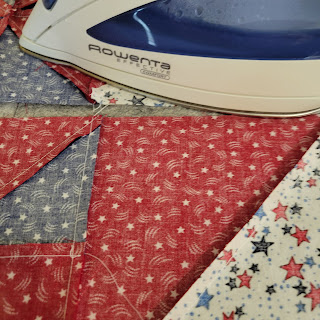
PRESSING is also important. This is what the back of each of the four smaller squares looks like.

RETURNING the trimmed blocks to the design wall, you will SEW these two blocks together. Remember there are no seams to match. Always pin the ends of the strips together and secure the two strips together at the seams with a pin. After you have sewed two of the smaller blocks together, PRESS the seam in one direction, wrong side and then right side. RETURN to its place on the design wall and

repeat with the last two smaller blocks. The only thing different is this time PRESS the seam in the opposite direction. Return to place in pattern.    


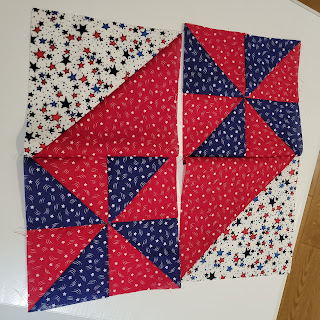
You are now ready to SEW the two blocks together now to make the 12.5” block.

This is the only time you have two seams to “nest”. This picture shows how pressing the last two sets in different directions is so important. (I do not have a picture of nesting and pinning these two halves but do that first and pin the seams. Then bring the ends together pinning them and finally secure in-between with pins making it smooth.)

This is what you want to see when you open out the block and PRESS on both sides.


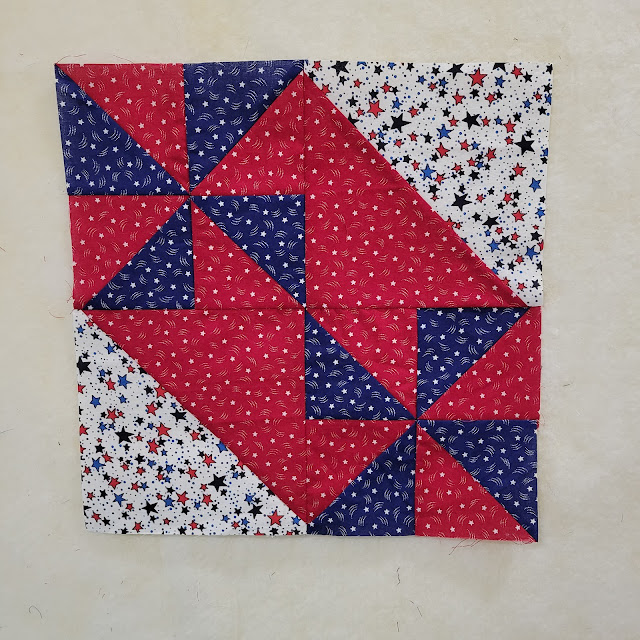
One more thing to do and your block is finished. Square it up with a 12.5” square ruler. You shouldn't have much to trim but check it anyway.


Finished block.


Here is a picture of the pattern in a Blanket of Hope I am working on. I plan to add a border around the top to close in all of the squares, but you can see how it looks with many blocks.


Some other blocks you may be interested in checking out:


Thursday, February 24, 2022

CHOCOLATE COCONUT PIE (SF)

 Most of my time lately has been spent in my sewing room and what a joy that has been! It is winter afteral and finally looks like it the last half of February. The seven inches of snow we got last Thursday has taken its time in melting. At least the snowplow crew worked quickly and by Friday the road were passable. 

Since I have been quilting most of the day along with writing up the tutorials, I haven't spent much time in the kitchen. Friday though I couldn't wait another minute or put off making this delicious sugar-free (except for a small amount of added sugar in the graham cracker crust) any longer. It probably did help that I made the cookies to give to Emmett, a neighbors' son, for clearing our long driveway of snow. It was so nice waking up Saturday morning to a dry driveway.

I am considering this pie is sugar-free even though mine wasn't quite sugar-free. I did use a purchased graham cracker crust that has an added 5 g of sugar. If you make your own crust and use a sugar substitute for the sugar OR if you made a homemade crust and baked it first, it would be truly sugar-free.

I've never had a chocolate coconut pie, but we really liked it. The recipe actually called for English toffee candy bars chopped, but I didn't have them and besides I wanted it to be SF. Next time I will use Chocolate Fudge SF instant pudding so it will be richer tasting.


CHOCOLATE COCONUT PIE (SF)

2     cups cold milk (I used skim milk)

2     pkg. (4-serving size each) chocolate flavor instant pudding & pie filling (SF) or chocolate fudge flavor (SF)

1     tub (8 oz) whipped topping, thawed, divided

1/2 - 1 cup of unsweetened coconut

1     pie crust - baked first or homemade graham cracker crust for SF or purchased graham cracker crust for low sugar


Pour milk into large bowl. Add dry pudding mixes.

Beat with a wire whisk for 2 minutes, or until well blended. The mixture will be thick.


Gently fold in 1-1/2 cups of the whipped topping. (Stirring deflates the whipped topping.)

Make sure you completely combine the pudding mixture and the whipped topping.


Add about 3/4ths of the coconut; saving the rest of sprinkling on top of the pie. 

Fold in the coconut.


Spoon the pie filling into the crust.

Top with the remaining whipped topping and then sprinkle the rest of the coconut on top. Cover and refrigerate until ready to serve.


Wednesday, February 23, 2022

BLOCK 5: DOUBLE PINWHEEL BLOCK SQUARE!

 I don't know about you but when I look at this block, I feel happy. I feel like everything's right with the world. 

It is surprising how quickly it goes together. You cut squares, then cut them in half to make triangles, mix them up, and sew them back together to make squares again. Doesn't that sound like fun? You also can sew them using a method called chain piecing. It saves time and thread. I usually don't worry about either since I am retired and my machine cuts the thread, but I have friends who like to sew quilt pieces together using this method.

The finished 12" block uses three colors. I chose one print in two different colors and then a print that had all the colors in it.


HOW TO MAKE A DOUBLE PINWHEEL BLOCK SQUARE

(1/4" SEAMS AND THREE PRINTS)

CUT one 7" square from prints #1 & #3 and then cut each diagonally

CUT four 4" squares from prints #1 & #2 and then cut each diagonally

PAIR up the two colors of the smaller rectangles with right sides facing and pair up the larger rectangles with right sides facing.

The next step is to SEW down the diagonal sides to make a square. The difference with chain piecing is you will not stop and cut the thread after sewing the each one. Instead you will feed the next one through leaving several stitches in between. You can sew all ten of the triangle pairs together and then cut the thread. You will have a connected "chain" with your triangle pairs. CUT the connecting thread with scissors.

PRESS each pair open first on the underside (wrong side) and then on the top side (right side).TRIM or square up the large half-square triangles (HST) down to 6.5" square using the diagonal line on your square ruler as a guide. TRIM or square up the smaller HST to 3.5" square. This is an important step which is made easy because you cut the original square a full inch bigger.

PLACE the pieces on your design wall or table in the arrangement for the pattern.


Since the large HSTs are finished, begin sewing the smaller HSTs together to make the pinwheels. Once again you will use the chain piecing method. SEW two HSTs together by sewing down one side making sure you match up the diagonal seam. You won't cut the thread until you have sewn all of four of them.
 It is very important to make sure you are sewing using a 1/4" seam.

When you have the chain made only CUT between the second and third ones. This will keep the two that you will sew together to make the pinwheel together.


When you PRESS the seams, it is important to press them alternate directions.

This will allow you to "nest" the seams together when you sew these two halves of the pinwheel. The thread you didn't cut helps keep the two halves together.


Another tip you might find helpful...you want the seam two cross the center triangle seam to the points will meet evening on the top side, stick a pin in the point on one side and

see if it comes out on the other piece at the same point. (When I zoom in on the last two pictures, I can see the pin, but realize it is hard to see on my laptop.


PRESS the seam going in either direction. It doesn't match up with any other seam so it doesn't matter and I didn't take a picture of mine.


Return the four pieces to the design wall or table in the arrangement of the pattern so you can make sure you have done everything correctly so far. You are almost finished.


SEW each pinwheel block with one of the HSTs. Once again you can use the chain piecing method. (Oops! Didn't mean to confuse you. In my haste, I arranged them the opposite directions. It's okay.)


PRESS the seams in the opposite direction on the underside and the topside.

One more seam and the block is finished. Once again match the center points and you are finished. Just as when you finished each pinwheel, sew slowly and carefully. If you are not happy with the way your points looks on the topside, you can unsew (rip out) a small area and rematch and resew.

on the left and Block 5 on the right.


Tuesday, February 22, 2022

CRANBERRY QUICK COOKIES

 For once the weather forecasters were correct for us. They said we could get 2 - 7 inches of snow and we did. Seven inches. It's been a while since we had that much snow. Our only other snow, so far this year, was about 3 inches. 

I was surprised that we got so much snow. I had gotten up at 3:30 and could see puddles on our neighbors driveway and it was not snowing at all. But by 8:30 when I got up we had a good 3 inches. 

It continued to snow most of morning, but it was a fine blowing snow. I wonder how much we would have gotten if the snow had been big flakes? No matter it was not a surprise when I heard a snow blower outside. What did surprise me when I looked out the window was it was in front of our house. Emmett, our neighbor two doors down, was out clearing our driveway and sidewalk. He won't ever take money from us so I knew I would be taking a break from sewing to make something for him. He does like sweets!


CRANBERRY QUICK COOKIES

1      (15.6-oz) pkg. Pillsbury Cranberry Quick Bread & Muffin Mix

3/4   cup quick-cooking rolled oats

1/2   cup coconut

1/2   cup sweetened dried cranberries. 

1/2   teaspoon grated orange peel (I used dried orange peel)

1/2   cup oil

1      tablespoon water

2      eggs

Preheat oven to 350 degrees F.


In a large bowl, combine the quick bread mix, oats, coconut, cranberries and orange peel.

Mix well.

Add the oil, water, and eggs.

Mix well. (Make sure you mix until all of the dry ingredients are moist.)

Drop by heaping teaspoonfuls 2 inches apart onto ungreased cookie sheets. I used my tablespoon cookie scoop so my cookies were a little bigger than what the recipe called for. The second pan I flattened the cookie dough slightly.


Bake for 10 to 13 minutes, or until bottoms are golden brown. I cooked mine the full 13 minutes.

Remove cookies from cookie sheets to cool on a wire rack.
LINK FOR JUST THE RECIPE HERE.

Here are some pictures of our snowblower, Emmett, and then the yard.


I didn't take a picture after he was finished... this is just half of the width of the driveway. He removed the snow in the forefront of this picture.

When it was snowing...


Our neighbor's back yard..


The birds eating in the snow...Our gold finches are more green than yellow right now.