I'm really not sure how I expected I would be spending my time after I retired from 25 + years teaching. I mean, I figured we would travel (doesn't everyone?), spend time with our grandchildren (again - doesn't everyone?), read, do or make things I enjoy, etc. And I am doing all of those things. One thing I never in a million years thought I would be doing was blogging.
I've said before here that the reason I started blogging was that I felt a void in my life when I retired. I was used to being asked for my opinion and help while teaching school and I realized that wasn't happening anymore. I felt like no one cared for what I thought.
It wasn't my first post basically because it took a while writing it, but I wanted to instruct how to easily make a rag quilt. That's what I had been doing before we left CA - making rag quilts. I know some quilters cringe when people talk about quilting and making rag quilts in the same breath. But making rag quilts is what I was doing and loving it. And some of my rag quilts incorporated quilting ideas - at least quilting block patterns. So I could easily talk about quilting and rag quilting in the same breath.
Because I had so many things I wanted to "teach" in my blog, I decided to name the blog, My Patchwork Quilt. I really wanted My Patchwork Life but it was already taken. And to some degree even my recipes I share, which are a lot, are tutorials also. Because I am such a visual learner also, I include lots and lots of pictures. (I didn't right at first, especially with my recipes, but it didn't take long before I was taking pictures of every thing I was doing.)
I really do not like to visit blogs and have pop-up ads, etc interfering with reading the post. I do realize they are making a living from their blog and I'm not. So I have one ad that shows in the right margin if you are looking at the web version and one ad that appears at the end of the post. They make a very small amount of money for me but as I said, that wasn't my purpose. I love when people leave comments at the bottom of the post and/or ask questions. I have designed rag quilts for viewers and told them how much fabric they need to buy, etc.
I currently belong to a spam-free group on Facebook for free quilt patterns. It is fun to see quilts and patterns from other people. Recently I was invited to join a 30 - Block Exchange group. I have to make 30 different blocks, but I'm really excited to receive 30 different block and make a Friendship Quilt with them.
While making my first block to share, I decided to take notes and pictures so I could make tutorials on each block. This block is Block 31 because a lady in the 2021 group has health reasons preventing her from participating this year. Members in last year's group decided to make an extra block and send to her and hopefully she would be able to sew the blocks together for a 2022 Friendship Quilt. I spent a couple months before Christmas making a queen size quilt for my husband's cousin's wife for Christmas. She liked the Log Cabin pattern in a design. I had a little fabric left over and since that pattern was fresher on my mind, I thought I would try it first. I thought I made finished 12" blocks but after I got it finished, I realized it was a finished 10" block. The blocks everyone is making are to be a finished 12" block so I had to add an inch border to the block.
This tutorial shows how to make a finished 10" Log Cabin Quilt Block. I used a red block for the center to represent the middle of the cabin or the hearth. All of the strips or "logs" are cut 2.5 inches wide in varying lengths. All seams are a scant 1/4 inch. You can't help but lose a little when you press a seam open. So if I want to make sure my finished blocks are an exact size, I always sew a scant 1/4 inch seam. I also check the size of the block after adding the two strips of the same print and trim off any excess I have. This excess, small as it is, really shows up when you sew the blocks together to make the top. I did this on the quilt I made and the quilter complimented me on how perfectly flat my quilt top was; something she isn't accustomed to seeing. I told her I was constantly checking and trimming the block as I made it.
Original log cabin quilts were probably "scrappy" quilts because if money was scarce, they would have been using cut up clothes, etc to make their quilts. You can still see scrappy log cabin quilts because it is such an easy way to use up your scraps, but now people often make quilts with pretty designs by the arrangement of the blocks and their use of colors for the strips or logs. I chose to make one half of my block with the same light color print for all of the light colored strips. I also made 32 of the blocks (half of the blocks I was making for the quilt) with one blue print and the other 32 (half) with a different blue print. That is just information if you are considering making a log cabin quilt instead of a sampler quilt as we are doing in our 30 - Block Exchange group.

HOW TO MAKE A 10 - INCH LOG CABIN QUILT BLOCK (using a scant 1/4" seam and all strips cut 2-1/2" wide)
You will need three different prints for half of the block and a light color for the other half. (I used the same light color print for my block, but you can use three different light color prints if you prefer.)
CUT ---
- two 2.5" squares - one red and one from the light color
- two 3.5" strips - one from print #1 and one from the light color
- two 5" strips - one from print #1 and one from the light color
- two 6.5" strips - one from print #2 and one from the light color
- two 8" strips - one from print #2 and one from the light color
- two 9.5" strips - one from print #3 and one from the light color
- one 11" strip from print #3
Keep your iron on because you will be using it after every seam is made. Seams are pressed toward the added strip pressing first on the backside and then on the top. After sewing the two strips that are the same size on and pressing them flat, check the size of the block and trim to the size of the strip length you added. Don't worry if the square is slightly "short" you can fix it when you add the next strip. The key word is slightly. Remember you are taking up a scant 1/4" seam. Pictures below. I think I have said everything I needed/wanted so I will start the picture tutorial now showing each step.

All of the pieces cut and arranged on my design wall:
Step 1 : sewing the red center with the two smallest light color squares.

First sew the 2.5" light one to the red one and then the one that is 3.5" long. I pressed the first seam toward the red, but after this all seams are pressed toward the added strip.

Then the 3.5" light print is added below the first two - Sew and Press seam open toward the added strip, and then

Check and Trim, if necessary, the square to 3.5". It isn't much trimmed off, but it is important.
Step 2: Adding the next two strips cut from print #1 (one is 3.5" and the other one is 5"). Remember to Sew and Press strip toward the added strip before adding the second strip.

(Tip) Lay the strip you are adding beside the partial block so you will sew it on the correct side.

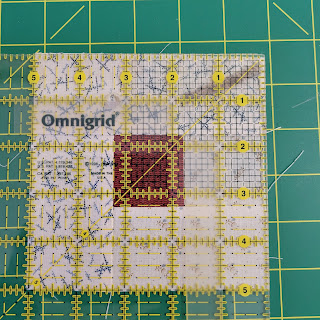
When you Check it to Trim, make sure you are centering the red square. It should measure 5" square.

This time the light color 2.5" square didn't meet up with the print #1 strip but it will be okay when you add the next strip.
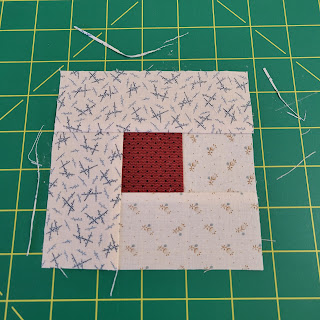
Step 3: Adding the next two light color strips.

Sew and press the 5" strip toward the added strip and then add the 6.5" light color strip... remembering to "model" first where the strip is going and Press toward the added strip.
I stress again modeling (laying the strip down along the side you are sewing it to.) This is the reason. I wasn't doing that initially and this is what I ended up with. Oops! I was trying to do too many things at once - sewing, talking on the phone, and reading messages.

Had to do some unsewing (aka ripping out) to get it right. Don't forget to Check and Trim to 6.5" . Mine was perfect that time.
Step 4: Adding Print #2 strips - 6.5" and 8".

Strip 6.5".

Sewed, Pressed to outer strip and ready to add 8" strip.

It looked good,

but I got out my favorite 12.5" square for larger squares to check. It is a must in your sewing supplies but since it might be bigger than the block you are measuring, you might have to trim two sides and then replace it on the block to trim the other two sides. Two of the sides (under the ruler) were ok even though the bottom side was a little short, so I only had to trim the other two sides. I will make sure I allow for the short side when I add the next strip there.
Step 5: Add the next two light colored strips - 8" and 9.5"

The first one - 8" . Sew and Press strip toward added strip.

Remember the bottom strip is short so I used another ruler to check my distance to make it even.

Sewed and Pressed toward the added strip. The shortness has been corrected.

Add the 10.5" light strip.

Sewed and

Pressed toward the added strip.

Don't forget to press also on the top of the block.

Check and Trim to 9.5".

Step 5: Add 9.5" strip from print #3.

Sew and Press strip toward added strip and

then add 11" strip from print #3. Sew and Press toward added strip.

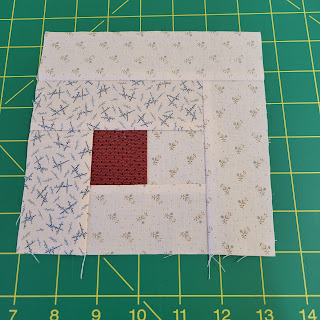
This is how the block will look on the underside and

on the right side. Finished! 10" Log Cabin Quilt Block. (I did Check and Trim to make sure it was 10.5")

Since my Exchange Group requires a 12.5" square and my block was 10.5", I had to add a small 1" border all the way around. (Cut 1.5" wide)

I started on the right side and worked my way around the block. Since I was using some scraps leftover from the quilt I made, I just made sure the strips were at least 1.5" wide and

then trimmed the block down to 12.5"

Oh. Here are some added pictures of the quilt I made...I started in the center so here were the first four blocks I made (The blocks were not sewed together here. I waited until I had a row before I connected any of the blocks.)

adding to it...


Added two strips, a narrow one using print #1 and then a wider one using a new print #4 that wasn't used in the blocks.(This is what I used to frame the Exchange block to make it 12.5".)

The backing chosen...

and then off to the quilters who quilted it in two days. Can't see the border but the quilting shows up nicely.
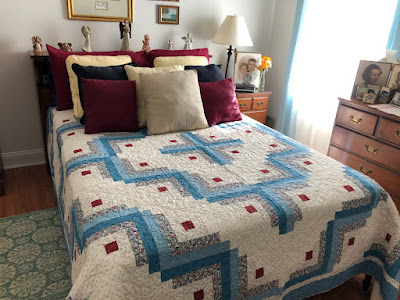
Here it is in its new home on a regular size bed so the quilt goes to the floor.
Block 1 tutorial shouldn't be this long so I hope you will come back and check it out.
As always with my tutorials, if you have any questions, please ask in the comment section below.
Beautiful quilt Patricia and the tutorial was thorough and easy to understand.
ReplyDeleteThanks, Dianne. I hope you looked at the web version on your computer. Patricia
Delete