I love the 30s prints. I have made a quilted shower curtain (didn't actually quilt it, just lined the quilt top) and six reversible placemats. This block is really a scrappy quilt block as it was made completely from scraps I had saved from those projects. I saw a picture of the unnamed block online and drew it off to fit the required dimensions for the 30-Block Exchange Group I am participating in. My Blanket of Hope quilting group from the church helped me name it. This exchange group just might be the most fun activity I have done since this Covid pandemic started.

HOW TO MAKE TIME IN THE GARDEN QUILT BLOCK
(using a 1/4" seam and strips 2-1/2" X 8-1/2", press to darker strip)

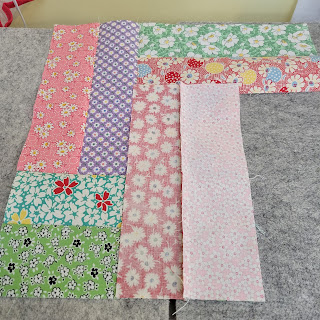
CUT eight strips from eight different prints 2.5" X 8.5".
ARRANGE them in this pattern on your design wall or table - two 1strips side by side in a wrap-around fashion.

CUT one 5.5" square from two different prints that look good together. I used the same print just not the same color. It doesn't have to be that way. I just lucked out with my scraps.

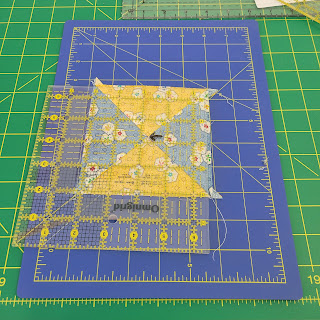
PLACE the two squares on top of each other with the right sides facing making sure the two are stacked together. Line a ruler from one corner to the opposite corner and draw a line.

Making sure you keep them together, SEW the two squares together 1/4" down each side of the line.

Placing the squares on your cutting mat, line your ruler through the other points on the top square making sure you are through the points,

CUT the squares into.

Then CUT along the line you drew giving you four smaller (quarters) triangles.

PRESS each one on the backside and the topside.

Using two of them match them up so that you have the same prints across from each other.

TIP: You need the four quarters to get this arrangement. So fold the quarters back up and arrange them as they were before you cut. Use opposite quarters for the pattern.

"Nest" the two seams together and SEW the two halves together. The flat feel will let you know the seams are "nested" but you can separate them slightly to make sure. OPEN the square out

and PRESS both sides, top and underside.

TRIM the square down to 4.5" The center of the square will be 2-1/4" from the edge. So that is the measurement you will use to square up the square. Use the other markings on the ruler should match up with the seams.

Will have to rotate the map around to trim the other two sides.


PLACE the center in your design you made with the strips and check to see if you are happy with the arrangement.

I changed mine and even "unsewed" some of the strips because I didn't like what I saw. So that you don't have to do that, I would wait to sew the strips together until now.

SEW the two strips together, PRESS on both sides, ARRANGE back in your pattern on design wall or table.
SEWING the block together has one hitch.

Whichever strip pair you start with, you will match one end with the edge of the center block, pin together at the start and then about 1 inch before the other end of the center block. You have to sew a "partial seam".

SEW and stop at the 1-inch mark.

PRESS both sides, top and underside.

MATCH the strip pair on the left with what you have sewed along the entire length of the strip.

PRESS both sides, top and underside away from the center block.

Repeat with the next strip pair.
Now you will add the last strip pair.

If it helps you can pin back the unsewed part of the first strip pair to keep it out of the way. The last strip pair will match up perfectly end to end. PRESS both sides, top and underside. Remove the pin if you used one, and

take the unsewed end and

match up the unsewed part of the first strip to the last strip.

PIN down seams and

SEW the strip down and PRESS both sides, top and underside.

All that is left to do is CHECK with your 12.5" square ruler, if you have one and TRIM off any excess. You shouldn't have much.

The block is finished.
No comments:
Post a Comment