It was exciting this morning to start my first block for the 30-Block Exchange Group. This is my first ever experience making a Friendship Quilt from blocks I have received from 29 new friends from the US and Canada. I thought it would be fun to share my blocks as I make them with tutorials for others who might be interested in making the blocks. Blocks can be made many different sizes depending on what your need is for your project. In this particular group the blocks are to be 12.5". Then when everyone sews the blocks together for the blanket, the block will be a finished 12".
There are so many different block patterns out there. All that is required is an imagination and some skill to create a block that you like. You may even find the same block but with different names. I usually don't worry about what the name is for a block and therefore if I create a new pattern, I don't name it. People are getting so creative now a days that they take a common block, dice it up, and come up with a totally different look. That's what has happened with my Block #1.
I may have seen it when I was exploring different pattern online. If I did, I couldn't find it this morning so I just created one that someone else has already thought of or one of my own imagination. It really doesn't matter. It is a pattern in the category of "disappearing" blocks because the pattern you start with disappears by the time you are finished. It is also a more elaborate block that looks like you did a lot of tedious work but different. Another added plus is you can learn to make two blocks from one tutorial. Always good.
How to make a Disappearing Nine-Patch Block
(All seams are made using a scant 1/4" seam.)
For the most colorful block, use nine different 5" blocks from nine different prints. Arrange them with 3 blocks on each of three rows. This is a Nine-Patch Block when finished. (Sorry but I forgot to take a picture of this. Don't worry. I have plenty more to share.)

To start you can sew the squares together as rows (across) or as columns (up and down). I usually make rows that I also call strips.
Before you sew these three rows together you need to press the three rows. Since this project is small, I laid the three strips face down. It is important to press the seams in a direction so that when you sew two strips together, you will be able to "nest" the old seams together so the seams match up nicely.

I took the middle strip and

pressed the two seams the same direction. I start with the backside and then

flip it over and press again on the frontside.
TIP: We "press" not "iron". Ironing may stretch the fabric which you don't want. I slide into the seam and then press the iron down and count to seven in my mind.

Then I will press the top and bottom strip seams the other direction.

It doesn't matter whether you stop with the top two or the bottom two, but you will "nest" the seams together closely and pin one side to sew.

You can feel that the two strips are flat but you can also look to make sure.


Check the backside of your seam and make sure you didn't sew the seam backwards from the way you sewed it. It helps if you lift your strips as you are sewing them together just before the seam to make sure it is laying the direction you pressed it.
Easy fix though using a seam ripper, and

resew the area so that the block lays flat.

Once you have the three strips sewn together, it is time to press the last seams you made. It doesn't matter which way you press them.

Don't forget to press on the right side also.

You have now made a Nine-Patch Block. This was the first quilt block I ever made as a child. At this point, you can stop and use the block as-is. But if you want to use some magic and make those nine blocks disappear, keep reading.

At this point, you will need to use a quilter's ruler that is longer than 12". Since this nine-patch block is bigger than 12.5", I will measure from the center and not the outer edge. Using other reference points on the block and my ruler, I measured 2" from the center edge and

cleanly cut the excess of the block off. I turned the main piece around since I am cutting right handed, measured 2" from the center and cut that excess off cleanly.

Here are the pieces turned around correctly so you can see what I did.

Now I turn the center section around again since I am cutting right handed, and measure 2" from the center and make a clean cut.
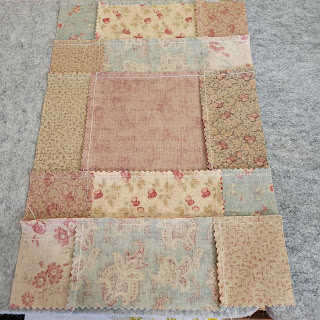
Do this also with the other end of the middle section. If you are still with me, this is what your original nine-patch will look like.
We are almost through, we just need to sew these "slices" back onto the block. Move the longer side strips out of the way because we are going to sew the short strips to the top and bottom of the narrow center section.

But first we have to do a little MAGIC. Can you look at the picture and see what I did? I simply traded the top and bottom short strips with each other. Now the top (outer strip) is on the bottom and the bottom (outer strip) is at the top. And that is how you are going to sew them to the bigger center.

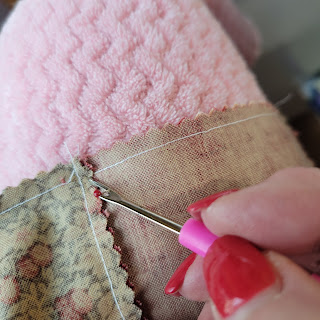
Nest the seams, pin on one side so that the seams won't move on you as you sew. If you like you can pin the middle of the square to make sure there is no excess there. If there is, work it out and pin as needed so you don't have a tuck on the right side. No picture because my strip matched perfectly with the center section.
Once you have sewn both the new top and new bottom on, you need to press the seams going in the same direction.

The last sewing we need to do is attach the long sides to the block. These strips will be longer than the piece so you will be matching the seams together.

I had to repress the long strips pressing the seams in the other direction so I could nest the seams. Since you pressed them before in a direction, it might take a longer hold (count to 10) to get the seams to lay flat.

The other difference you will find when you prepare the long strips for sewing them to the center section, there is another seam on the back strip that doesn't match up with one on the top strip. You can add an extra pin to make sure you sew it going the way you pressed it.

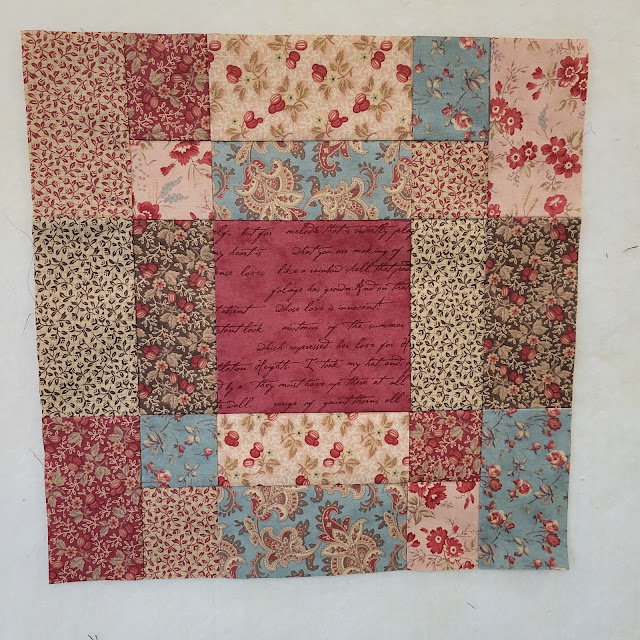
This is what the block will look like after you sew the first long strip. Don't try to match the ends together. Allow the long strip to extend out longer.

Both sewed and press on. It doesn't matter which way you press the seam. Can you still see your nine-patch? Me either.

If you plan to quilt much, I strongly recommend that you find a 12.5" square ruler. It comes in handy for all sizes of blocks. If you squaring up a block smaller than 12.5", you can only cut on two sides, but just lift it up and turn it around if the other two sides need trimming.

I centered the center square and matched up seams with other lines on the ruler and trimmed my block down to a 12.5" square, just what I needed. (I just rotated my cutting mat so I didn't have to lift the ruler off. If it does move, just reposition it correctly before cutting.)
I have tried to make this tutorial as simply as I can but if you have anything you don't understand, please ask me in the comment section below. I will answer you as soon as I can.

If you missed my previous tutorial for a 10.5" Log Cabin Block (12.5" block with a border), you can check it out HERE

No comments:
Post a Comment