I dreamed about this latest Blanket of Hope for several months before I finally was able to make it. Maybe you have done this or not. I don't know. But I "saw" the general pattern for the block and couldn't get it out of my mind.
It's not a new creation. The block is a common one that has been around, but I knew how I wanted to utilize it in a quilt. I didn't see the actual fabric, that would be really weird. I just knew how I wanted to use my fabric with the pattern. Finally the material was another interesting happening though.
At our first meeting of 2023, we had decided at our December end-of-the year celebration brunch that we would start the year off by getting our closet and cabinets in the room we use at the church reorganized. We had added quite a bit of material to our stash the last several month of 2022 and everything was looking very messy.
A couple of us were doing other things that afternoon though and I didn't go down and look at the hall closet like I should have. The four who worked on it worked for almost 2 hours and deserved a show of appreciation from the three of us working on future things. One Sunday in January my Sunday school class was serving with the Hospitality Team and during a downtime I went upstairs and decided to take a look at the closet. That is when I saw the material in a nice little stack. I knew immediately that that was the perfect material I needed for my "dream" quilt. I took the three different coordinating prints home with me.
The next day I cut out all of the pieces, decided to use a new technique for me -- chain stitching the pieces together to make the blocks and then chain stitching what I could of the blocks together to make the quilt top. I was finished with the top within a couple of hours. (I did have to do a little math and a whole lot of pressing during that time also.)
We try to make our Blankets of Hope 42" x 48 ". This was the measurement we were given especially good for use with a wheel chair, but also if the blankets/quilts are only 42 inches wide we don't have to have a seam in the backing. Since traditionally the blocks for the blankets are cut 6-1/2" squares, that makes the blanket pattern 7 x 8 blocks or 56 total blocks.
I started with a 6-1/2" block but added the two strips down two sides. I cut them 2-1/2" wide so that gave me an 8-1/2" block and a finished quilt of 40 x 48 " or a pattern of 5 x 6 blocks or 30 total blocks.
I chose the larger print for the 6-1/2" square. I needed thirty (30) of them or five (5) strips cut the width of the fabric and 6-1/2" wide. That will produce exactly 30 squares. I considered using a strip from each of the other prints with the 6-1/2" square, but that isn't how I had pictured it in my "dream". One of the first quilts I ever made was a Rail Fence Quilt. I guess that pattern is always in my mind. Since the quilt will be thirty (30) blocks and following a rail fence style, half of them will include one of the small prints and half will be the other small print.
Time for a little math ... 15 x 2.5 = 37.5 . Cutting a strip the width of the fabric and 8-1/2" wide, then cut fifteen (15) 2-1/2" wide. From the remaining strip, cut one strip 6" x 2-1/2". Cut a second strip the width of the fabric and 6-1/2" wide. Cut 14 strips 2-1/2" wide. Save the rest for your scrap bag.
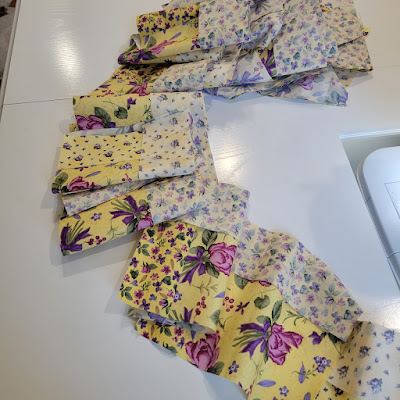
With chain stitching, I had my thirty (30) squares and the fifteen (15) strips of each print. (Yes, I have two sets of strips for each print, but I just worked with one size at a time.)
I continued until I had finished sewing on the shorter (6-1/2") strips of one print and
continued with the other print of the same length.
Before I could sew the longer strip on I had to get up and press the seams open that I had just sewed.
but this time on the left side of the block.
Important Note. This time when you are pressing the long strip, you will not be pressing them the same way. Press one of the prints toward the square and the other print toward the strip. Then when you sew the blocks together the seam will nest (fit together smoothly) in the one place that you have two seams together. (where the longer strips meet at the top of one square and the bottom of the above square.)
This was the challenge for me with the chain stitching, but since the quilt had six (6) rows and five (5) columns, I could start at the upper left top corner and sew the two blocks together going down the column.
And then stitched the two beneath and finally the bottom two in the first column on the left. (Notice I did pin the ends and where there was a seam and then in-between.)
Once I had the three pairs of the first column, I could just move to the second column and so on until I had the whole top in pairs.
I cut them apart and
then sewed the first two-block pairs together. At this point I had to stop my chain stitching because I only had one block pair left for the first column.
I sewed the last block pair onto the four blocks and had the first column sewed.
I placed each column on my design wall to make sure I wasn't messing up the pattern.
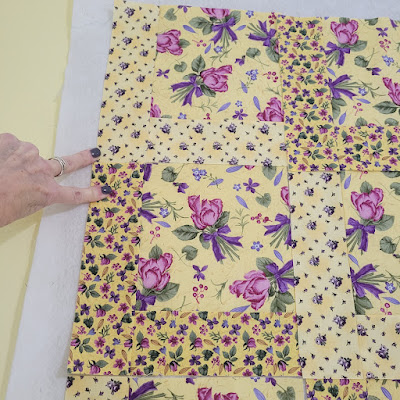
I sewed the first two columns together from the left, then the next two, leaving a single column on the right. Then I just sewed the three "sets" together to have my finished top.
Here is a close up so you can see the prints all together. This has to be just about my all-time favorite quilt I have made. I just love how all of the prints and colors went together.
If you would like to view my tutorial on making the binding, you can check out this POST.
I cut the strips 2-1/4 inches wide for the binding (five of them), made one long strip that I folded in half lengthwise and pressed the fold. I sewed it to the quilt top a quarter inch from the edges.
I fold the binding to the back and secure it down with clips.
I blindstitched it down on the back side.


You are truly an amazing example of how God wants us to use the gifts he has blessed us with.
ReplyDeleteYou are generous with your time (and patience) in teaching us how to enjoy and share along side you 💖💖💖💖💖💖💖💖💖💖💖
Thank you Charlotte for your kind words. I can't imagine being any other way. I hope the Lord blesses me with many more years to share the blessings and talents that he has given me. Patricia
Delete