When I first started looking for different patterns, I found many variations on a star. Patterns will look different with the use of different colors. To prove my point I made two patterns - one I called Sara's Choice and the other one was called Peace. It was a day or two after I finished the latter that I noticed they were the same pattern. I was looking at the blocks with their name in mind and not the pieces involved.
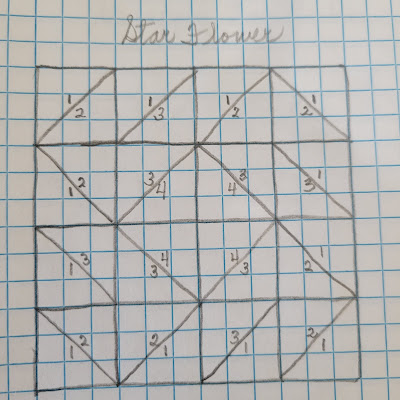
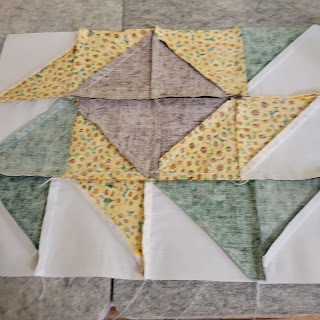
This pattern was called Star Flower. I don't really see the Star at all except for the fact that the center is a square-on-point or a diamond. I had the Ukraine on my mind quite heavily and thought about a sunflower. It may not look like a sunflower to you, so I used the small sunflower print to make sure people knew it was supposed to be a sunflower. Like the Yankee Puzzle Block I made earlier, it is nothing more than 16 half-square-triangles (HST) and then arranging them so that it looks like the pattern. Of course, the prints help you out so it doesn't take too long to arrange them in the pattern.
Remember that all seams are 1/4" and for the most part seams are pressed to the darker prints. All HSTs are 3" finished so the blocks will be cut 4" square to make two HSTs. You will use four different colors. Maybe you will chose colors and prints so you don't even make a flower. Interesting
HOW TO MAKE A SUNFLOWER STAR FLOWER
Four colors/prints
#1 white
#2 medium/dark green
#3 yellow print
#4 dark brown
CUT (ALL SQUARES 4") :
Print #1 - six (6)
Print #2 - four (4)
Print #3 - four (4)
Print #4 - two (2)
MAKING the HSTs...
1) MATCH the pairs that will make two HSTs needed for the pattern.
2) DRAW a diagonal line on the back of the lighter square in each pair.
3) PLACE the pairs together with right sides facing and all corners even.
4) SEW 1/4" inch away from the drawn line on both sides on each square pair.
5) CUT on the drawn line to make two triangles from each square pair.
7) TRIM each HST to 3.5" (Sorry no picture)
8) ARRANGE HSTs to make the pattern look like this...
Print #1 - white
Print #2 - green
Print #3 - yellow print
Print #4 - brown
The first two pairs look like a pattern called Flying Geese. Can you see the formation of flying geese? Remember I told you there would be three HSTs that would need to be repressed so that the seams will "nest" or butt together.
Just pin the side back and repress it when you press the seams together for the row.
This is what the seam will look like on the right side if you nest the seams well. (Practice makes better.)
The pairs for the bottom row. Notice I haven't pressed the two seams yet. I will sew these two pairs together and
returned them to the design wall in their "place". Wrong side of the first bottom row. Once I had the first row done, I just worked up the block and finished the second row and joined it to the row beneath.
I thought it would be easier for pressing the seams with the row before. But you have to have the seams pressed the correct way so you will have an easier time matching the seams and flatter seams.
After the third row was added...
and finally the fourth row. With one more thing to do you will be finished.
SQUARE UP the block and TRIM off the excess. Probably won't be much, but your block isn't finished until you do this.
Peace
OTHER BLOCK PATTERNS YOU MIGHT BE INTERESTED IN:
Block #31 Log Cabin Quilt Block
Block #1 Disappearing Nine-Patch Quilt Block
Block # 10 HEATHER'S PENNSYLVANIA
BLOCK #12 SUZETTE'S INDIANA PUZZLE


No comments:
Post a Comment