I don't really consider myself a knitter or crocheter, but I do like to attempt small easy projects. The scarves I knitted my CO grandchildren for Christmas this past year were a big hit.
I come from a family (mother, grandmother, and aunts) who enjoyed crocheting. They did some truly beautiful pieces. Every time I tried to learn, I gave up due to frustration with getting the chains the same length. (I just wasn't ready to learn.)
One summer when my parents came to visit us in CA, I told my mother I wanted her to teach me how to crochet. Everyone else could do it but me. I guess I was really ready this time, because I "picked it up" quickly. In fact she was surprised I learned so quickly.
I am still not very advanced...with either knitting or crocheting, but when I see something that looks like I could do, I try it. I saw this knitted washcloth and was attracted to the unique design....not your normal square washcloth. Simply Notable called it "the almost lost washcloth pattern". She told her interesting story here.
The pattern reminded me of some of my mother's recipes when she just said "cook til done". There were a lot of questions that people asked and I read almost all of them. Someone really interested asked if she could do a tutorial because she was having difficulty fully understanding the pattern. One comment tried to explain the pattern which helped me a lot. Anyway I decided I would give it a try.
I wanted to use cotton yarn and actually "undid" a washcloth I had started but didn't finish quite a while ago. I think it worked out okay. My finished "center circle" isn't a perfect circle, but maybe it will look better when I make another one. Once it is wet I probably won't be able to tell it doesn't have a "perfect center circle". (I really need to work on this problem I have with perfectionism.)
Anyway I have lots of pictures but it shows how to make what I am calling a "sunburst" 14-point washcloth. I should add that I finished it in an evening....I think I can do it in a couple of hours when I am not having to stop to take pictures.
Here is the pattern as Simply Notable presented it:
# 8 knitting needles (U.S.) ((I used #9 needles))
Cast on 14 stitches and knit across
1. Knit 4, yarn over, knit, leaving 2 stitches and knit back
2. Knit 4, yarn over, knit, leaving 4 stitches and knit back
3. Knit 4, yarn over, knit, leaving 6 stitches and knit back
4 Knit 4, yarn over, knit, leaving 8 stitches and knit back
Cast off 4 and knit to end (should be 14 stitches on needle)
Repeat for 14 points
Leave enough yarn to sew sides together and go around circle and draw circle together. Tie ends in a double knot.
****You have to include the initial "knit across" after casting on the 14 stitches here in the repeat so that you will be back on the right side for the next point. Her numbers 1 - 4 was confusing for me as that implied the pattern to me. In my pattern I made it row 11 to better follow the pattern. See below with my pictures.
Here is my tutorial. Hopefully it will help if you are like me and need a little bit more directions. I have included my directions beside the pictures. If you have any questions, please ask. I will get back to you as soon as possible.
"SUNBURST" - 14 - POINT KNITTED WASHCLOTH PATTERN

Cast on 14 stitches

Row 1 - Knit across the 14 stitches

Row 2 - Knit 4, then yarn over (bring yarn from back over front of right needle and then insert the right needle into next stitch on left needle to knit)

Knit the next 8 stitches, leaving the last two stitches on the left needle (end of row 2)

Row 3 - Turn, bringing the yarn to the back for knitting

Knit across to finish Row 3 - now 15 stitches

Row 4 - Knit 4, yarn over, knit across leaving the last 4 stitches on the left needle.

Row 5 - Turn, move the yarn to the back and knit across the row - now 16 stitches.

Row 6 - Knit 4, yarn over, knit across leaving the last 6 stitches on the left needle.

Row 7 - Turn, moving the yarn to the back to knit

Knit across - Row 7 is finished with 17 stitches
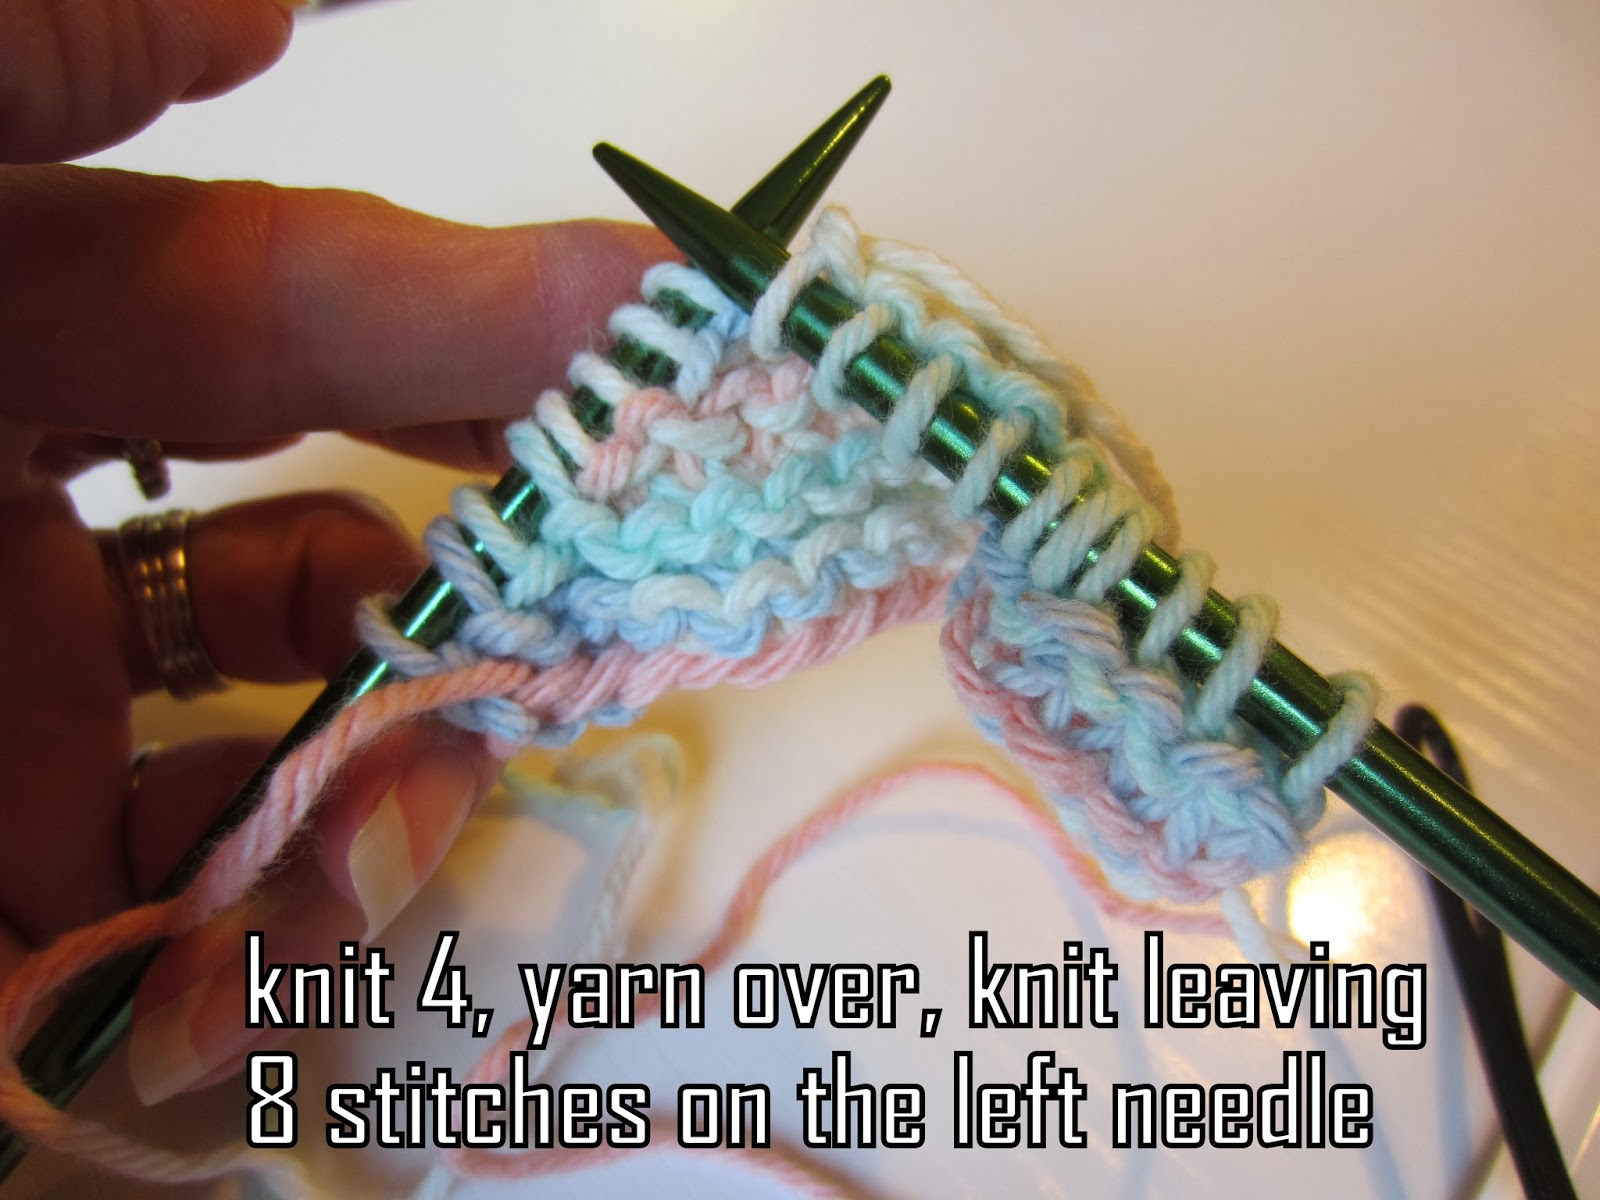
Row 8 - Knit 4, yarn over, knit across leaving the last 8 stitches on the left needle

Row 9 - Turn, move yarn to the back to knit across the row - now 18 stitches on the needle

Row 10 - Bind off the first 4 stitches

(you now have 14 stitches on the two needles)

Knit across to end - Row 10 finished

***Row 11 - Knit across. First point finished. (She doesn't include this row but it puts you back on the right side.)

Row 12... - Repeat Rows 2 thru 11 thirteen more times to make 14 points.
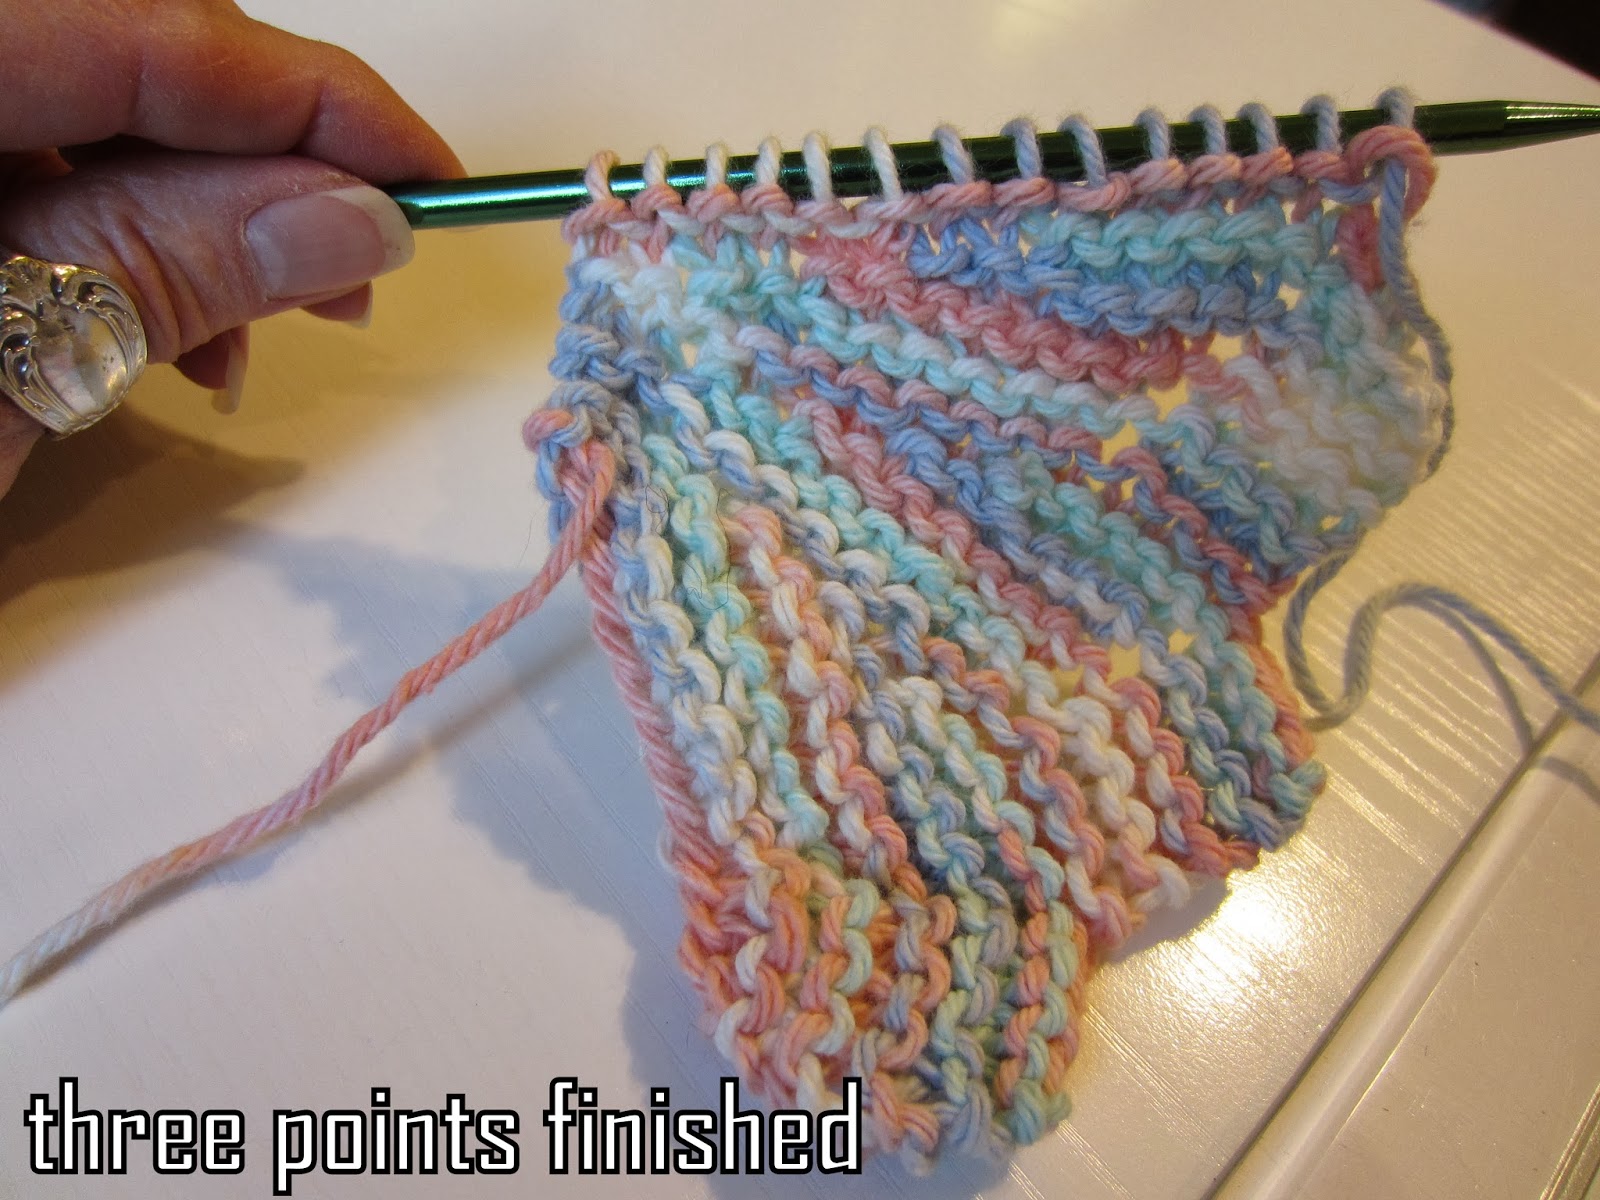
(Third point finished)

and fourth point finished (You get the idea)

Fourteen points finished.

To finish the washcloth....
-cut the end of the yarn...for the desired length, measure 4 times the length of the 14 (bound) stitches for weaving the ends

- tie the two ends together in a double knot to make a closed circle

- thread a tapestry needle with the cut yarn and insert the needle in the (cast on) stitch on the left

and then the top loop of the (bound) stitch on the right

all the way down - (the 14 cast-on stitches should match up with the 14 bound stitches)

The other end (from casting on the stitches) can be woven on the wrong side in the same manner.
Totally finished....

I come from a family (mother, grandmother, and aunts) who enjoyed crocheting. They did some truly beautiful pieces. Every time I tried to learn, I gave up due to frustration with getting the chains the same length. (I just wasn't ready to learn.)
One summer when my parents came to visit us in CA, I told my mother I wanted her to teach me how to crochet. Everyone else could do it but me. I guess I was really ready this time, because I "picked it up" quickly. In fact she was surprised I learned so quickly.
I am still not very advanced...with either knitting or crocheting, but when I see something that looks like I could do, I try it. I saw this knitted washcloth and was attracted to the unique design....not your normal square washcloth. Simply Notable called it "the almost lost washcloth pattern". She told her interesting story here.
The pattern reminded me of some of my mother's recipes when she just said "cook til done". There were a lot of questions that people asked and I read almost all of them. Someone really interested asked if she could do a tutorial because she was having difficulty fully understanding the pattern. One comment tried to explain the pattern which helped me a lot. Anyway I decided I would give it a try.
I wanted to use cotton yarn and actually "undid" a washcloth I had started but didn't finish quite a while ago. I think it worked out okay. My finished "center circle" isn't a perfect circle, but maybe it will look better when I make another one. Once it is wet I probably won't be able to tell it doesn't have a "perfect center circle". (I really need to work on this problem I have with perfectionism.)
Anyway I have lots of pictures but it shows how to make what I am calling a "sunburst" 14-point washcloth. I should add that I finished it in an evening....I think I can do it in a couple of hours when I am not having to stop to take pictures.
Here is the pattern as Simply Notable presented it:
# 8 knitting needles (U.S.) ((I used #9 needles))
Cast on 14 stitches and knit across
1. Knit 4, yarn over, knit, leaving 2 stitches and knit back
2. Knit 4, yarn over, knit, leaving 4 stitches and knit back
3. Knit 4, yarn over, knit, leaving 6 stitches and knit back
4 Knit 4, yarn over, knit, leaving 8 stitches and knit back
Cast off 4 and knit to end (should be 14 stitches on needle)
Repeat for 14 points
Leave enough yarn to sew sides together and go around circle and draw circle together. Tie ends in a double knot.
****You have to include the initial "knit across" after casting on the 14 stitches here in the repeat so that you will be back on the right side for the next point. Her numbers 1 - 4 was confusing for me as that implied the pattern to me. In my pattern I made it row 11 to better follow the pattern. See below with my pictures.
Here is my tutorial. Hopefully it will help if you are like me and need a little bit more directions. I have included my directions beside the pictures. If you have any questions, please ask. I will get back to you as soon as possible.
"SUNBURST" - 14 - POINT KNITTED WASHCLOTH PATTERN
Cast on 14 stitches
Row 1 - Knit across the 14 stitches
Row 2 - Knit 4, then yarn over (bring yarn from back over front of right needle and then insert the right needle into next stitch on left needle to knit)
Knit the next 8 stitches, leaving the last two stitches on the left needle (end of row 2)
Row 3 - Turn, bringing the yarn to the back for knitting
Knit across to finish Row 3 - now 15 stitches
Row 4 - Knit 4, yarn over, knit across leaving the last 4 stitches on the left needle.
Row 5 - Turn, move the yarn to the back and knit across the row - now 16 stitches.
Row 6 - Knit 4, yarn over, knit across leaving the last 6 stitches on the left needle.
Row 7 - Turn, moving the yarn to the back to knit
Knit across - Row 7 is finished with 17 stitches
Row 8 - Knit 4, yarn over, knit across leaving the last 8 stitches on the left needle
Row 9 - Turn, move yarn to the back to knit across the row - now 18 stitches on the needle
Row 10 - Bind off the first 4 stitches
(you now have 14 stitches on the two needles)
Knit across to end - Row 10 finished
***Row 11 - Knit across. First point finished. (She doesn't include this row but it puts you back on the right side.)
Row 12... - Repeat Rows 2 thru 11 thirteen more times to make 14 points.
(Third point finished)
and fourth point finished (You get the idea)
Fourteen points finished.
To finish the washcloth....
-cut the end of the yarn...for the desired length, measure 4 times the length of the 14 (bound) stitches for weaving the ends
- tie the two ends together in a double knot to make a closed circle
- thread a tapestry needle with the cut yarn and insert the needle in the (cast on) stitch on the left
and then the top loop of the (bound) stitch on the right
all the way down - (the 14 cast-on stitches should match up with the 14 bound stitches)
The other end (from casting on the stitches) can be woven on the wrong side in the same manner.
Totally finished....
Thank you so much for the great tutorial! I found it last night and just finished my first one, just have to sew it together. I will try to post a pic.
ReplyDeleteThanks Jodi. Would love to see your picture.
Deletethanks for the step by step, easy language. I did two points but they didn't come close to starting to be circular, not sure what I did wrong, but will take out and start over with your great instructions.
ReplyDeleteHope they will help. I had trouble at the beginning when I tried to do it. Let me know how it turns out. Thanks.
DeleteWill the point be on the right or left of the needle when I'm ready to start the next point?
ReplyDeleteI hope I understand your question. When you finish row 11 (the first point) as pictured on the left side of the post, the point is on the left (toward the tapered end of the needle) and the center is toward the blunt end (I don't know what you call the other end). Then when you turn the needles so that your work is on the needle in your left hand, the point will be on the right end of your work ready to start row 12 (the beginning of the second point). Looking back at my tutorial, I noticed a few mistakes (leaving out the word "row" a couple of times). It might have been helpful if I had identified each picture also with the row #. Just remember that the written directions are to the side of the picture not below it. That might cause some problems with some people. As you are working around the washcloth though the center will be on the left and the point will be on the right - when you are looking at the "right side". Please let me know if it is clear for you now. Thanks for your question.
DeleteOK... I finally got it! I'm on my 6th point and lookin good
ReplyDeleteOh good! Thanks for letting me know.
DeleteI'm not sure what I'm doing wrong! There are several really large loose stitches periodically. It looks as if I have messed up or missed a stitch. I've taken it out several times and still they appear each time I try. Ugh! I don't like how sloppy it makes it look. Not sure what I'm doing wrong!!!
ReplyDeleteOh dear. That is frustrating, l'm sure. Is it at point you knit across but turn it before you knit all the way? This creates a space. If you are up for one more attempt, I would suggest going slowly watching closely at your result. Assuming you do it again, stop as soon as you see the loose spot and see if you can figure out what you were doing at that point. Hope you can figure out what you are doing. Keep me posted. Thanks.
DeleteI can't thank you enough! Thank you!
ReplyDeleteThank you KPurlz. Glad I was a help.
DeleteI found this pattern on a website and have ripped it apart at least 5 times and after seeing yours it makes perfect sense. I was just being silly with the way I was reading the pattern. I am so glad you posted this. Thanks so much.
ReplyDeleteI'm so glad my post helped you. I was suffering like you when I found the limited directions and kept ripping out until I finally figured out what I needed to do. Thanks for you kind words.
DeleteThank you so much for making a picture tutorial of this pattern. I've been wanting to make one but couldn't get my head around the other pattern. I needed pictures.
ReplyDeleteThanks, Dixie. I am glad the pictures helped. It wasn't easy taking them when I really needed both hands on my work, but I am a visual person also, so I know how helpful they are to me. Thanks for stopping by and leaving your kind words.
DeleteThank-you so much. The row 11 changed everything for me. After following a previous pattern somewhere else I had a total of 14 points ....that went up each side :-( I was starting on the wrong end each time by not knitting across that extra time. I've begun again now and it is making SO MUCH MORE SENSE!!!
ReplyDeleteI am glad my tutorial was able to help you Melody. It does make a beautiful piece. Thanks for letting me know I helped you.
DeleteOMG thankgod I found this Tutorial. doing the 11th row definatley helps. now on track to actually completing a wash cloth for my daughter. thanks Jacqui
ReplyDeleteSo glad I helped you understand the pattern, Jacqui. I am sure your daughter will love it.
DeleteHow would I increase to make it a 16" diameter?
ReplyDeleteHello. My first thought was to use bigger needles. If you do this, you might also want to use thicker yarn. Let me know what you choose and your results. Patricia
DeleteAfter turning on short rows & putting yarn to back to finish knitting the row, won’t I get a “hole” & then continue? Thanks for great pictures!!
ReplyDeleteHi. You can get a small hole whenever you move the yarn from one side or the other. Make sure you are pulling the yarn up. I think if you finish the whole piece, you will be happy with it
DeleteThank you SO much for getting back to me so quickly with great help-I’m working on one now & it is going good-your pictures & tuitorial are the greatest help-thank you again.
ReplyDeleteBest news ever!!! Patricia
Delete