When we were visiting in COS, the Sunflower grocery store had apricots on sale for $1.77/lb. Knowing this was a really good price, I decided to get some to bring back home so I could make some apricot jam. One thing I miss from living in Ventura, CA is all the fruit trees we had in our yard. We had one each: peach, lemon, plum, apple, orange, tangerine, fig, and apricot. I would spend a considerable amount of my summer "off" (teacher) making jam. But that was ok as we love the homemade taste of jam. Since we were growing all the fruit, the cost was affordable. Even though I have to buy the fruit here, I don't mind. I know what is in the jam and as I said, WE LOVE THE TASTE OF HOMEMADE JAM.
This morning as I made my jam, I decided to take pictures (as best as I could considering I was stirring with one hand and trying to take the picture with my other one) showing the process in case anyone wanted to try it. I use Sure Jell premium fruit pectin and pretty much follow their directions until the "canning" directions in step 9. I sometimes use the No Sugar Needed Sure Jell and use less sugar or Splenda. The "look" of the jam is different (not as pretty) and the jam has a different consistency, but my husband prefers the less sugar idea and says he doesn't care. So I do some for him.

The first thing I do is get EVERYTHING ready and set out before I start preparing the fruit. Once you start cooking the jam, you don't have time to get things measured etc, as you need to be stirring constantly. The large glass bowl has the 7 cups of sugar and behind it in the smaller measuring glass is the 1/4 cup of lemon juice. I did forget to get the tongs out ahead of time so they aren't in the picture. The larger measuring cup in the picture is used to measure the prepared fruit. The jars are washing in the dishwasher so they will be ready and hot when the jam is ready to be poured. It is important to have the jars HOT when you pour the jam in them to seal.
The recipe for apricot jam calls for 3.5 lbs of apricots or 5 cups of prepared fruit. It took only about 3 lbs for me to have 5 cups, but you don't want to come up short.
I cut the apricots in half to remove the pit. Do not peel the fruit. I put 5 apricots at a time in the blender and pulse to chop. Too many will make it harder to just chop the apricot. You don't want to puree them. It may be necessary to stir them up in the blender if they aren't being chopped. Here is a picture showing the consistency of the chopped fruit.
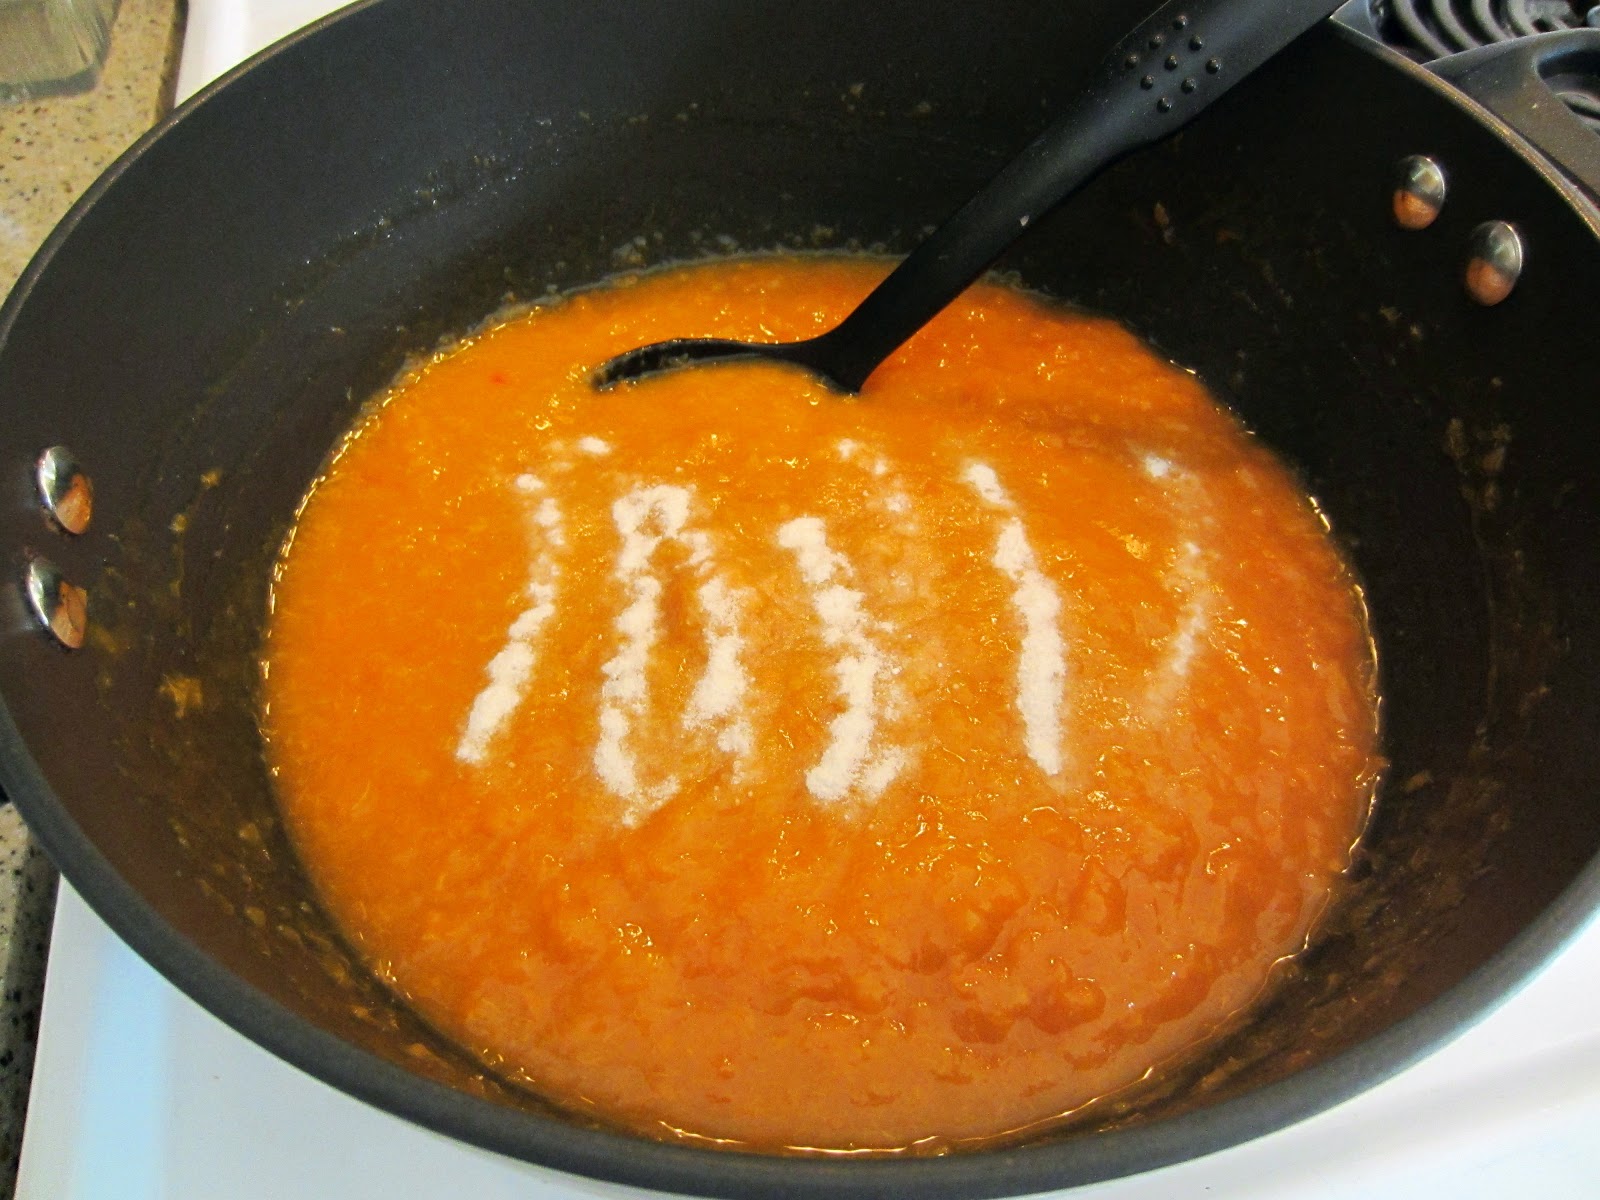
When you have the 5 cups prepared fruit, pour into a 6 - 8 quart saucepot (
I use my dutch oven pot.) and add the lemon juice. I SLOWLY add the Sure Jell and stir in between to make sure there is no lumping of the pectin (
upper picture) and then add 1 teaspoon of butter. The recipe calls for 1/2 teaspoon, but I have always put a whole teaspoon. The butter will keep down the foam that forms as the jam cooks. (
I had none with this batch. Sometimes I have a little, but it is easy to lightly spoon it out as there won't be very much.)
To me, the next two parts are the hardest because you have to judge a "full rolling boil". Cook the mixture over medium high heat until the mixture comes to a full rolling boil (
a boil that doesn't stop bubbling when stirred) stirring constantly. I also keep scraping the sides of the pan to keep all the fruit being used. I think I rushed this step this morning because the mixture was "popping" out and burning my hand. It was boiling though.
Then dump the 7 cups of sugar all in at once and stir making sure all lumps are dissolved.
You can see how the looks and consistency has changed since you added the sugar. If you have some large pieces of fruit at this stage, you can spoon them up to the side and "cut up" with the edge of the spoon, if you like.
Return the mixture to a full rolling boil remembering to stir constantly and scrape sides of pan. Then set the timer for 1 minute and continue to boil the mixture stirring constantly. Remove from heat when the timer goes off.
The lids have been boiling slowly in a pan while you have cooking the jam. I actually boiled some water and poured over the lids in the pan when I started. I turned the burner on to bring the water back to a boil about the time I added the sugar to the mixture.
I place a towel on the counter to work on as everything is hot that you are dealing with. Using a hot plate, place pan with prepared jam, along with the jars from the dishwasher. I also have a cup that I use to dip the mixture out into the jars and a wide mouth funnel. Also place your lids still in water along with tongs for lifting the lids out. The directions with the Sure Jell always made me feel like I had to ladle the jam into the prepared jars almost before I took the mixture off the stove, but I have learned that I can take a minute or two to get the jars out of the dishwasher (
that way they are still HOT) and get everything else that I need. (
Remember I got everything out before I started so it is just a matter of gathering them together on my towel.)
Placing the jar as close to the pan as I can, and inserting the funnel, I carefully ladle the jam into the jars using the cup.
I fill the jar with the jam up to the bottom of the funnel - looking down in the jar.
Remove the funnel and place in another empty jar and rest the cup in it, while you wipe the top of the jar to make sure there isn't any jam on it. Remove a lid with the tongs and place on the jar and then tighten on the ring. Continue until you have used all the jam. The recipe says it makes 9 cups. That means it will make 4 pints and a half pint. I always wash 5 pint jars and several different sizes that I have of half-pint jars---just in case. That means I also heat on extra lid. You can save it if you don't need it and use it the next time. The seal hasn't been damaged by the heat. Just to make sure this last statement is clear, a lid that has been heated in water is safe to reheat and use later. You should NOT reuse a lid that you had previously used to seal a jar. You can see the impression on the rubber seal of a used lid.
When all the mixture has been poured (
and if you are lucky, you may have a little extra left in the pan that you can just spoon into a custard dish and enjoy when it cools), make sure all the rings are on tight. Use a wet towel to hold the jar as you tighten the ring, because the jar will be really hot to touch. Also wipe off jar to clean away any jam that might have gotten on the jar as you were filling the jars. THEN turn the jars upside down on the towel and set the timer for 5 minutes. This method is called the Inversion Method. Turning the jars upside down for 5 minutes seals the jars and it is not necessary to water bath the jars.
After the timer goes off, turn jars right side up using the wet towel again and wait to hear that wonderful POP that indicates the jar has sealed. IF a jar doesn't seal, don't worry, simply put that jar in the refrigerator and enjoy it now.

Note, sometimes a lid will end up sealing when you press on it--no POP. That is ok. As long as the lid stays "down", it is sealed. As the jam is cooling in the jars, I will check a couple of times to make sure the lid has sealed by pressing down the center of the lid.
I hope if you have always wanted to make your own homemade jam, but were afraid to try it, that this tutorial will help you. I would love your comments on your efforts or any questions you might have.
You can check out making peach jam
HERE and strawberry jam
HERE.


Thank you so much for this tutorial. I made jam for the first time and I could not have done it without these photos!
ReplyDeleteThat is so exciting for me to hear Nina. You have made my day! So glad I helped you be successful. You will have to try my strawberry and peach jam.
DeleteWhy do you turn the jars upside down ?
ReplyDeleteHi Sharelyn, I turn the jars over for 5 minutes for the lids to seal and then I don't have to water bath them. Thanks for your question. Patricia
DeleteMost state and federal canning regulations state that using the upside-down method is not effective in heating the jams through and creating a shelf-stable product. In order to be safe for consumption, a high-acid food needs to be canned in a water-bath canner for a specific length of time. Before canning, make sure to read all of the safety regulations.
ReplyDeleteIf I were canning high-acid foods I would certainly water bath them. Once 30+ years ago I canned tomato juice and tomato sauce. I definitely water bathed them.
DeleteI have never water bathed jams. The time (probably 10 minutes, at least) that you are cooking the mixture to have it come to a boil (twice) and then boiling hard for 1 minute, trust me the mixture is hot. My mother always used this inversion method and probably her mother, too, when making jam. As I said, if the jar lid doesn't seal, place it in the refrigerator and use then. When you go to use a jar, and the lid isn't sealed, throw it out. I would certainly not instruct doing something that I didn't think was safe.
Are you using fresh lemon juice that you squeeze? Or are you using lemon juice in the bottle?
ReplyDeleteI use the 100% lemon juice from concentrate in the bottle. Thanks for your question. I am making some strawberry jam this morning. Enjoy your jam.
DeleteGreat instructions. I'm trying the inversion method for the first time.
ReplyDeleteHi Raylene, glad my tutorial was helpful. So far this summer I have only made strawberry jam for my daughter-in-love. Good luck. Patricia
Delete