During this Coronavirus Pandemic PPEs (Personal Protective Equipment) have been a big part of the discussion because they are invaluable to the nurses, doctors, and first responders who have been the heroes during this time to keeping them safe.
Within a week of the growing concern for COVID-19 in the United States, people were talking about making cloth face masks for protection because of the lack of PPE. Directions for making a simple two - layer one came out and Friend Linda reached out to me and Friend Dianne to start making them. Linda and Dianne are also members of Blankets of Hope, the quilting group at church that I lead. Of course we both were eager to do our part and so on March 23 I made my first five face masks.
We were going to be making them for North Kansas City Hospital, but in the meanwhile DIL Lori had asked me to make some for her. She is a physical therapist who has never stopped seeing patients. To be honest my first day was very frustrating and I was exhausted by the end of it. Have you ever had one of those days that nothing seemed to go right and you should have just stopped and picked it up another day? Well that was just the kind of day I was having. BUT I had told her I would have her some for the next day and I wanted to keep my word. (As it turned out during the day she received an email from her director saying he didn't want them to wear the homemade face masks yet so she didn't need them, but I didn't know that.)
You see when they first came out, there was so much uncertainty about them - whether they would actually protect anyone, how many layers should the masks be, elastic or ties, etc. I actually didn't make any more for several days because new instructions kept coming out and I wasn't sure if they were actually being used by the people we were making them for. Then one day Friend Fran told me her daughter Sheila was trying to make some for the nurses and staff at a nursing home/rehab center where she works as the Activities Director. They wanted 300 and didn't care how they were made. Finally I felt like I had found a place that I believed the masks would definitely be used. We ended up making a little over 100 by the first pattern that came out for them and they were so appreciative.
They masks are the first thing I have been involved with since starting this blog eight years ago that I didn't immediately think about creating a tutorial for. I think it was probably because there were so many tutorials out there and I was just focused on making the masks. I think it was after watching an absolutely humorous You Tube video by Kay Pruitt that as I was starting my morning off early making a few that I decided to take some pictures of the process as I was going along.
The directions were simple enough to make the two layer face mask. Friend Sandi who ended up joining the group eliminated one of the seams by cutting the material larger and just folding it in half. The ones I made for Lori I cut the front and back out of the same material, but by the time I started making them again, the "word" came out to make them with two different pieces of fabric so the workers would know which side they had had against their face. So Linda went to the church and got a couple of sheets that we had in our closet to use as the backings on Blankets of Hope we made and we started using sheets for the "backing" for the masks.
As it is, I am sure, with all sewers as I continue to make the masks, I incorporate ways to make them a little easier. One of the things Kay Pruitt kept saying in her video as she continued to make mistakes was, "Remember! We are not aiming for perfection. We are aiming for protection." As a personal perfectionist, I laugh and repeat that as I make the masks.
Following are my pictures and a few hints along the way to making homemade face masks. I hope you might find them useful.

First, you will cut two pieces of material 9 x 6 inches. If you have a rotary cutter and cutting mat, cut strips 6 inches wide across the width of the fabric and then cut pieces 9 inches long.

You will need two strips of 1/4 inch elastic cut into 7 - inch lengths.

You will be sewing using quarter inch seams (although I have a tendency to make the seam a tad wider on the side I am leaving the open space for turning the masks. It seems to be easier to iron the side and have the open area "fall into place" if the seam is a little bit bigger.)

 When you start sewing the two pieces together with right sides facing each other, pick a starting point on one of the long sides and stitch in place several times before proceeding around the edges. When you get back around - stop about 2 inches from where you started and again stitch-in-place several times.
 You may have to look closely at the picture to see where I stopped and sewed around the edges leaving about 2 inches open (unsewed) so that you can then pull the masks through the opening to the right sides outside. It doesn't have to be exact.
But I'm getting a little ahead of myself because before you sew back around almost to where you started, you have to insert those pieces of elastic into the ends to hold the mask over the person's ears. Remember you are aiming for protection not perfection so the only thing I feel you want to get right is keeping the elastic flat and not twisted. You can feel with your fingers so it isn't as hard as you it sounds. I found using my seam ripper to help me hold the elastic as I tried to get it close to the corner helped a lot.
 You have to lift up the top piece of material to insert the end of the elastic at the corner.
 Lower the material and keeping smooth, sew the seam and sew over the end of the elastic.
 About half way down, feel and make sure the elastic hasn't twisted and
 bring the other end of it down about seam width from the other end. and smoothing out the material again, sew to the corner. You will do the same thing on the other end.
In my early years I took a sewing class from Singer so my clothes wouldn't look "homemade". Two of the things I learned was how to reduce bulk in the seam and how to make pointed collars. Even though we aren't going for perfection but for protection, I started doing those things (to some degree). You might want to remember them when you are doing some other sewing.

 To have a pointed corner, you can make one or two stitches (it sorta depends on how long you are making your stitches) across the corner instead of sewing and then making an imediate 90 degrees turn.To reduce the bulk at the corner, after you have finished sewing all the way around the mask, cut the corner edge off.

 Now you are ready to turn the mask to the right sides by inserting one end through the opening. You can find the elastic inside and pull it if you like to help you.


You want to "clean up" the corners (I use my seam ripper.) and kinda "hand press" the edges down before taking it to the ironing board


and pressing it on both side.
To be honest when I am making the masks, I usually have a number I am making "at the same time". That means I usually wait to press them until I have the number finished to this point. That way I don't keep my iron on when I am not using it.
The pleats or tucks, whatever you want to call them were my most frustrating part of this project, but as I have made more and more masks, I came up with this way that seems to work best for me.

 After I press the mask with the iron, I lay the mask down on my table and fold down the top side to about a fourth of the way down and then back up and pinning it in the center. (I took the picture before I had folded it down completely. For this one, I might not have folded it down a fourth, but that is what I do now.) I tried measuring as some tutorials would show, but for whatever reason, it didn't want to work for me. So after watching Kay and remembering her "you are not working for perfection, you are working for protection", this method worked for me.
 Here is a side view... to show the pleat.

 Then I fold down to the bottom to make the middle pleat, fold back up, and pin in the center again.

 Now I have two of the three pleats formed, so I just make the third one work in what is left of the mask. I had turned the mask around in the second picture to the other end when I took the picture. Remember you are going for protection, not perfection!
Once the pleats are formed and pinned, it is time to sew around the mask and thereby sewing down the pleats and sealing the opening also that you pressed in place. This took a little effort also until I realized my machine didn't want to feed easily if I sewed the pleats down toward the edge of the pleat. (Hope you understand what I mean.) The picture above show the pleats two different ways. The bulk from the pleats when you sew toward it makes it hard for the pressure foot on the machine to "climb it". If you sew with the pleat (from behind) as in the picture on the left, it is easier.

 I think of the mask as the way I started forming the pleats as the top so I start on the top left side and sew across the top close to the edge until I get to the other end, turn and sew across the end and then across the top to the other side and stop. Remove the pins as you need to.
 Then I turn the mask around and sew from the opposite side to sew the last pleats down.
 You will need to sew once more down over the pleats but not over the top and bottom.
And guess what! You are finished. I like to press the pleats down so the mask looks a little prettier, but that's it! Protection not perfection!

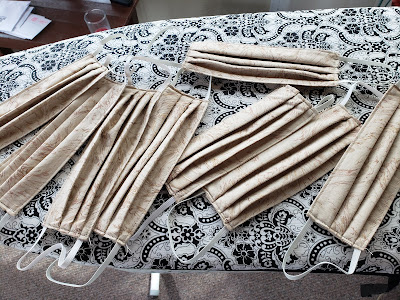
 Here are some pictures of some of the finished ones I have made. I love all the different prints.


 These are the first ones I made for Lori and one at the top for the grandkids to see if it fit. She wanted to encase the elastic so maybe it would last longer. I made another blue one for me to use (without the casement).
Here I am modeling one. Wayne kept one of them and then asked me to make him one from a bandana hankerchief. (I didn't take a picture of it the latter.)

You can see by the picture, that it really doesn't matter how perfectly the pleats are made afterall. They just expand and give you the excess material you need to cover your face.
CORONAVIRUS PANDEMIC - 5/1/2020
UNITED STATES
CONFIRMED CASES 1,070,032
DEATHS 63,019
GLOBAL
CONFIRMED CASES 3,274,747
DEATHS 233,792
Day 52 and counting...
Within a week of the growing concern for COVID-19 in the United States, people were talking about making cloth face masks for protection because of the lack of PPE. Directions for making a simple two - layer one came out and Friend Linda reached out to me and Friend Dianne to start making them. Linda and Dianne are also members of Blankets of Hope, the quilting group at church that I lead. Of course we both were eager to do our part and so on March 23 I made my first five face masks.
We were going to be making them for North Kansas City Hospital, but in the meanwhile DIL Lori had asked me to make some for her. She is a physical therapist who has never stopped seeing patients. To be honest my first day was very frustrating and I was exhausted by the end of it. Have you ever had one of those days that nothing seemed to go right and you should have just stopped and picked it up another day? Well that was just the kind of day I was having. BUT I had told her I would have her some for the next day and I wanted to keep my word. (As it turned out during the day she received an email from her director saying he didn't want them to wear the homemade face masks yet so she didn't need them, but I didn't know that.)
You see when they first came out, there was so much uncertainty about them - whether they would actually protect anyone, how many layers should the masks be, elastic or ties, etc. I actually didn't make any more for several days because new instructions kept coming out and I wasn't sure if they were actually being used by the people we were making them for. Then one day Friend Fran told me her daughter Sheila was trying to make some for the nurses and staff at a nursing home/rehab center where she works as the Activities Director. They wanted 300 and didn't care how they were made. Finally I felt like I had found a place that I believed the masks would definitely be used. We ended up making a little over 100 by the first pattern that came out for them and they were so appreciative.
They masks are the first thing I have been involved with since starting this blog eight years ago that I didn't immediately think about creating a tutorial for. I think it was probably because there were so many tutorials out there and I was just focused on making the masks. I think it was after watching an absolutely humorous You Tube video by Kay Pruitt that as I was starting my morning off early making a few that I decided to take some pictures of the process as I was going along.
The directions were simple enough to make the two layer face mask. Friend Sandi who ended up joining the group eliminated one of the seams by cutting the material larger and just folding it in half. The ones I made for Lori I cut the front and back out of the same material, but by the time I started making them again, the "word" came out to make them with two different pieces of fabric so the workers would know which side they had had against their face. So Linda went to the church and got a couple of sheets that we had in our closet to use as the backings on Blankets of Hope we made and we started using sheets for the "backing" for the masks.
As it is, I am sure, with all sewers as I continue to make the masks, I incorporate ways to make them a little easier. One of the things Kay Pruitt kept saying in her video as she continued to make mistakes was, "Remember! We are not aiming for perfection. We are aiming for protection." As a personal perfectionist, I laugh and repeat that as I make the masks.
Following are my pictures and a few hints along the way to making homemade face masks. I hope you might find them useful.

First, you will cut two pieces of material 9 x 6 inches. If you have a rotary cutter and cutting mat, cut strips 6 inches wide across the width of the fabric and then cut pieces 9 inches long.

You will need two strips of 1/4 inch elastic cut into 7 - inch lengths.

You will be sewing using quarter inch seams (although I have a tendency to make the seam a tad wider on the side I am leaving the open space for turning the masks. It seems to be easier to iron the side and have the open area "fall into place" if the seam is a little bit bigger.)

 When you start sewing the two pieces together with right sides facing each other, pick a starting point on one of the long sides and stitch in place several times before proceeding around the edges. When you get back around - stop about 2 inches from where you started and again stitch-in-place several times.
But I'm getting a little ahead of myself because before you sew back around almost to where you started, you have to insert those pieces of elastic into the ends to hold the mask over the person's ears. Remember you are aiming for protection not perfection so the only thing I feel you want to get right is keeping the elastic flat and not twisted. You can feel with your fingers so it isn't as hard as you it sounds. I found using my seam ripper to help me hold the elastic as I tried to get it close to the corner helped a lot.


In my early years I took a sewing class from Singer so my clothes wouldn't look "homemade". Two of the things I learned was how to reduce bulk in the seam and how to make pointed collars. Even though we aren't going for perfection but for protection, I started doing those things (to some degree). You might want to remember them when you are doing some other sewing.

 To have a pointed corner, you can make one or two stitches (it sorta depends on how long you are making your stitches) across the corner instead of sewing and then making an imediate 90 degrees turn.To reduce the bulk at the corner, after you have finished sewing all the way around the mask, cut the corner edge off.
 Now you are ready to turn the mask to the right sides by inserting one end through the opening. You can find the elastic inside and pull it if you like to help you.


You want to "clean up" the corners (I use my seam ripper.) and kinda "hand press" the edges down before taking it to the ironing board


and pressing it on both side.
To be honest when I am making the masks, I usually have a number I am making "at the same time". That means I usually wait to press them until I have the number finished to this point. That way I don't keep my iron on when I am not using it.
The pleats or tucks, whatever you want to call them were my most frustrating part of this project, but as I have made more and more masks, I came up with this way that seems to work best for me.

 After I press the mask with the iron, I lay the mask down on my table and fold down the top side to about a fourth of the way down and then back up and pinning it in the center. (I took the picture before I had folded it down completely. For this one, I might not have folded it down a fourth, but that is what I do now.) I tried measuring as some tutorials would show, but for whatever reason, it didn't want to work for me. So after watching Kay and remembering her "you are not working for perfection, you are working for protection", this method worked for me.

 Then I fold down to the bottom to make the middle pleat, fold back up, and pin in the center again.
 Now I have two of the three pleats formed, so I just make the third one work in what is left of the mask. I had turned the mask around in the second picture to the other end when I took the picture. Remember you are going for protection, not perfection!
Once the pleats are formed and pinned, it is time to sew around the mask and thereby sewing down the pleats and sealing the opening also that you pressed in place. This took a little effort also until I realized my machine didn't want to feed easily if I sewed the pleats down toward the edge of the pleat. (Hope you understand what I mean.) The picture above show the pleats two different ways. The bulk from the pleats when you sew toward it makes it hard for the pressure foot on the machine to "climb it". If you sew with the pleat (from behind) as in the picture on the left, it is easier.

 I think of the mask as the way I started forming the pleats as the top so I start on the top left side and sew across the top close to the edge until I get to the other end, turn and sew across the end and then across the top to the other side and stop. Remove the pins as you need to.

And guess what! You are finished. I like to press the pleats down so the mask looks a little prettier, but that's it! Protection not perfection!


Here I am modeling one. Wayne kept one of them and then asked me to make him one from a bandana hankerchief. (I didn't take a picture of it the latter.)

You can see by the picture, that it really doesn't matter how perfectly the pleats are made afterall. They just expand and give you the excess material you need to cover your face.
CORONAVIRUS PANDEMIC - 5/1/2020
UNITED STATES
CONFIRMED CASES 1,070,032
DEATHS 63,019
GLOBAL
CONFIRMED CASES 3,274,747
DEATHS 233,792
Day 52 and counting...
Are you selling these?
ReplyDeleteI've just been donating them. Patricia
ReplyDelete