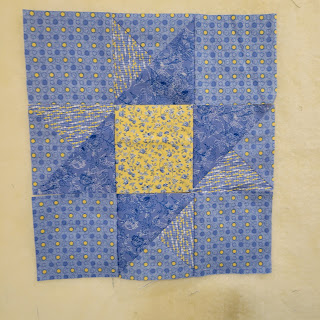
Monday, February 21, 2022

BLOCK 4: TIME IN THE GARDEN BLOCK PATTERN

I love the 30s prints. I have made a quilted shower curtain (didn't actually quilt it, just lined the quilt top) and six reversible placemats. This block is really a scrappy quilt block as it was made completely from scraps I had saved from those projects. I saw a picture of the unnamed block online and drew it off to fit the required dimensions for the 30-Block Exchange Group I am participating in. My Blanket of Hope quilting group from the church helped me name it. This exchange group just might be the most fun activity I have done since this Covid pandemic started.  


HOW TO MAKE TIME IN THE GARDEN QUILT BLOCK

(using a 1/4" seam and strips 2-1/2" X 8-1/2", press to darker strip)


CUT eight strips from eight different prints 2.5" X 8.5".

ARRANGE them in this pattern on your design wall or table - two 1strips side by side in a wrap-around fashion.


CUT one 5.5" square from two different prints that look good together. I used the same print just not the same color. It doesn't have to be that way. I just lucked out with my scraps.


PLACE the two squares on top of each other with the right sides facing making sure the two are stacked together. Line a ruler from one corner to the opposite corner and draw a line.

Making sure you keep them together, SEW the two squares together 1/4" down each side of the line.

Placing the squares on your cutting mat, line your ruler through the other points on the top square making sure you are through the points,

CUT the squares into.

Then CUT along the line you drew giving you four smaller (quarters) triangles.

PRESS each one on the backside and the topside.

Using two of them match them up so that you have the same prints across from each other.

TIP: You need the four quarters to get this arrangement. So fold the quarters back up and arrange them as they were before you cut. Use opposite quarters for the pattern.


"Nest" the two seams together and SEW the two halves together. The flat feel will let you know the seams are "nested" but you can separate them slightly to make sure. OPEN the square out

and  PRESS both sides, top and underside.

TRIM the square down to 4.5" The center of the square will be 2-1/4" from the edge. So that is the measurement you will use to square up the square. Use the other markings on the ruler should match up with the seams.
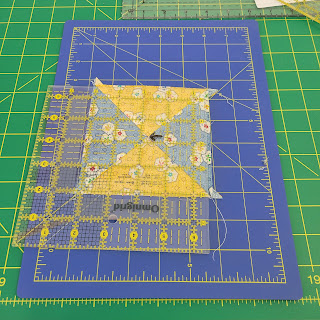

Will have to rotate the map around to trim the other two sides.


PLACE the center in your design you made with the strips and check to see if you are happy with the arrangement.

I changed mine and even "unsewed" some of the strips because I didn't like what I saw. So that you don't have to do that, I would wait to sew the strips together until now.


SEW the two strips together, PRESS on both sides, ARRANGE back in your pattern on design wall or table.

SEWING the block together has one hitch.


Whichever strip pair you start with, you will match one end with the edge of the center block, pin together at the start and then about 1 inch  before the other end of the center block. You have to sew a "partial seam".

SEW and stop at the 1-inch mark.


PRESS both sides, top and underside.

MATCH the strip pair on the left with what you have sewed along the entire length of the strip.

PRESS both sides, top and underside away from the center block.

Repeat with the next strip pair.
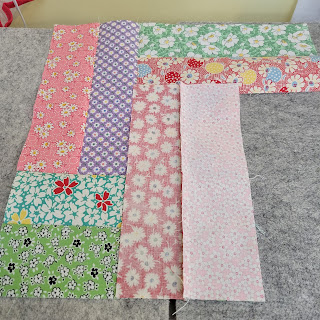
Now you will add the last strip pair.

If it helps you can pin back the unsewed part of the first strip pair to keep it out of the way. The last strip pair will match up perfectly end to end. PRESS both sides, top and underside. Remove the pin if you used one, and


take the unsewed end and

match up the unsewed part of the first strip to the last strip.

PIN down seams and


SEW the strip down and PRESS both sides, top and underside.


All that is left to do is CHECK with your 12.5" square ruler, if you have one and TRIM off any excess. You shouldn't have much.

The block is finished.




Previous block patterns

Friday, February 18, 2022

BLOCK 3: BLUE SKIES BLOCK PATTERN

 I plan to use these four prints often in my 30 - Block Exchange Group. I bought three fat quarters in each blue print close to ten years ago and have never done anything with them. I had the yellow print which matches so well in my stash and thought I would use it if the pattern calls for four prints. Seems like the blues are popular colors with other people, also.

In my tutorials I mention a design wall. If you have the ability to put up one, I would highly recommend it. All it is is a large piece of white felt and a smaller piece I added later. I hung it from the wall close to the ceiling with push pins. They won't leave a big hole. It is so wonderful being able to pat the pieces of material  onto the felt to work with your design and while you are sewing the quilt top together.  

I named the pattern Blue Skies because that's what it reminds me of with the sun in the center when I looked at it. The name it was given where I saw it turned out to be the only site where it was called that name but found a lot more different names for the pattern. I like Blue Skies. If you want to call it something else because you use different colors, that's okay too.


HOW TO MAKE THE BLUE SKIES BLOCK PATTERN

(all seams are 1/4"  and  press all seams in one direction on the underside and the top side)

FABRIC:

You will need four different prints

CUT:

Print # 1  -  one square @ 4.5"

Print # 2  -  four squares @ 4.5" 

Print # 3  -  two squares @ 5.5", then cut in half diagonally

Prints # 2 & 4   -  one square each @ 5.5" 

ARRANGE block pieces on design wall or table using the first five squares you cut.


Make four Quarter - Square Triangles 


Take the two 5.5" squares you CUT one from each print #2 & #4.

PLACE
them with the right sides facing and draw a line diagonally across the block. SEW 1/4" from the line on each side of the line.


Here is the surprising part.

First, CUT on the diagonal across the block from the other points.


Second, CUT along the line on each triangle that you drew.

PRESS seam open toward the darker print on the underside and the right side. 


On your design wall or table MATCH up the quarter - square triangles with the half-square triangles as pictured. If you are a visual learner, this step is important.


SEW the two triangles together to make a square.
         

Step 1. PLACE a half-square triangle (print #4) on your cutting mat, right side up, and place the diagonal cut side along one of the horizonal lines on the mat so that the point of the triangle lines up with a vertical line.


Step 2. PLACE one of the sewed triangle on top, right sides facing, so that the seam line follows along with the vertical line on the mat.

PIN along the seam to keep the two pieces in place. SEW along the vertical line. (You can match up all four pieces and chain sew them if you like. I didn't, so I don't have a picture. Since I can cut the thread with my sewing machine, I don't waste much thread which is why people do the chain stitching.)

PRESS. (both sides)


TRIM the squares down to 4.5". 
(This step is very important to have the half-square triangle seams match up in the block. Other sources will tell you to cut the square to create the half-square triangles 7/8" bigger than the desired size. I always cut mine 1" larger so that allows me to be able to trim the block to make it "perfect". It is also easy to remember 1 " and you don't have a lot of math to do.)

The desired size square is 4.5". Half of that is 2.25". So I MEASURED in 2.25" on my 6.5" square ruler and MARKED the spot with a dry erase marker. MATCH this point along the seam sewing the two together so that the diagonal line on the ruler matches the diagonal seam on the quarter-square triangle.

TRIM where necessary. Lift ruler and rotate the piece and trim off the other two sides.

Now all 9 "squares" match up.

PRESS the seams of the middle row toward the center yellow block and toward the corner blocks with the top and bottom rows. (both sides)

PLACE the pressed rows back on the design wall or table.


SEW the rows together nesting the seams together and pinning where necessary. Make sure you pin the seam on the under piece down so you sew the seam the direction you pressed it.

PRESS the two seams away from the center. (both sides


There is just one more thing to do and that is to TRIM the square down to 12.5". I enlarged the picture so you can see how I matched the lines on the ruler with the seams on the block. Not much needed to be trimmed. 😊

(If you noticed, I did correct my mistake.)

Other block tutorials: