My mother used to make homemade custard ice cream whenever the family got together. (Family here means her family and their kids.) Being an "only child", I didn't have a "brother" or "sister" who shared my last name, but I had lots of cousins who were like brothers and sisters to me. Her ice cream was so delicious. Even though we all knew if we ate it too fast, we would have "brain freeze", we still did. If we waited just a minute or two, it would pass.
When I saw this recipe for orange sorbet in a KitchenAid 3 Speed Classic Blender Instructions and Recipes booklet I got at an estate sale, I thought it sounded so good and wanted to give it a try.
I also had a Mirro aluminum fridge refrigerator container and lid that was long and slender that people used to use when they made ice cream, etc. that I got at an estate sale quite a while back and had never used. This looked like the perfect time to use it.
It was super easy and absolutely delicious! I did use orange juice that had no sugar added and I could tell the difference. It wasn't very sweet but that's what we are used to. If you want sweet, you will probably want to buy frozen orange juice that is sweet.
ORANGE SORBET
1 can (11 ounces) mandarin oranges, drained
1 cup water
1 can (6 ounces) frozen orange juice concentrate (I did use one that had no sugar added)
1/4 cup powdered sugar
1 tablespoon fresh lemon juice
Place all ingredients in blender jar. Cover and blend at LIQUEFY, about 15 to 20 seconds.
Pour into freezer container and freeze until almost set, about 3 to 4 hours. (I did have to leave mine for 4 hours.)
Scrape into blender jar and
blend at LIQUEFY until smooth, about 1 minute.
Pour back into freezer container. Freeze until hard, about 5 to 6 hours. (I made mine the day before and left it overnight +)
Yield 6 servings.
Remember if you want to print the recipe using the print icon below, you will have the option to remove images when the print window opens. If you do not see the print icon, you need to tap/click on the title of this post and it will take you to just this post. Then you will see the print icon with the share buttons. Home will return you to my blog's most recent posts.
I found this recipe on Kevin's Amish 365.com newsletter. I am always looking for casseroles that will make enough that my husband and I will have leftovers so I don't have to worry What's for Dinner? This one sounded perfect.
I made the casserole by the recipe, but next time I will make some changes. We really enjoyed the dish (three or four times) prepared by the recipe, I just think I would enjoy it more with my changes; the meat would be distributed better. I discussed the actual changes below in the recipe.
AMISH CASSEROLE
1 lb. ground beef (I used ground sirloin)
1 (10.75 ounce) can condensed tomato soup
1/4 cup brown sugar (I used 2 tablespoons brown sugar blend)
1/8 teaspoon black pepper
1/4 teaspoon salt
1 (10.75 ounce) can condensed cream of chicken soup
1 (12 ounce) package wide egg noodles or equivalent homemade ( I will not use the whole bag next time but about 3/4 fourths of it. I did use Ronzoni Heathy Harvest all natural 100% whole grain wide noodle style)
10 slices American cheese (I used 2 cups of shredded cheddar cheese)
Preheat oven to 350 degrees F. Grease a 2-1/2 quart casserole dish. (I had a dish I thought would be big enough but it didn't say the size on the bottom. I just filled it with water to see if it would hold that much water.)
Cook the noodles in a large pot of slightly salted boiling water until tender, about 7 minutes.
Drain and return to the pan.
Mix in the cream of chicken soup until noodles are coated.
Meanwhile, cook the ground beef in a large skillet over medium-high heat. Drain the grease (if you have any - I used ground sirloin)
Stir in the tomato soup, brown sugar, pepper, and salt.
(At this point I would combine the meat mixture with the noodle/soup mixture to distribute the meat throughout the noddles. I would place half of the mixture in the dish and then sprinkle a cup of shredded cheese over it. Then top with the rest of the noodle/meat mixture and finally the other cup of cheese.)
Spread half of the meat mixture in the bottom of the casserole dish. (It was a little thin)
Arrange 5 slices of cheese (or sprinkle 1 cup of shredded cheese like I did) over the meat.
Top with half of the noodles.
Repeat the layering by adding the rest of the meat
then the noodles,
and finally the cheese this time.
Bake for 35 minutes until cheese is browned and sauce is bubbly.
Serve
When I have a post with lots of pictures, I like to remind the reader that you can print the recipe using the print icon below and you will have the option to remove images when the print window opens. If you do not see the print icon below, you need to scroll back up to the title for this post (just under the date) and click or tap on it. That will take you to just this post and the print icon will be at the bottom before the share icons. Home will take you back to my blog and the most recent posts. You can also get back there by clicking on my blog title My Patchwork Quilt.
This is the cake I had planned to make a few weeks ago to take to Hillcrest Thrift Shop to share with the volunteers downstairs, but didn't feel like going to all the trouble. Well, it wasn't any trouble at all. It cooks longer than most 9 x 13 - inch cakes do, but that is it. The recipe said to cook for 1 hour or until cake begins to pull away from sides of the pan. I was afraid that an hour was too long so I started watching it after 45 minutes. I did take it out of the oven about 5 minutes early.
I also made the recipe with no sugar added. I used stevia for the sugar. It can't be called sugar free because there is the natural sugar in the dates and of course the chocolate chips even though they are semi-sweet, they do have added sugar. It tasted really good and the volunteers were most appreciative.
Oh, I almost forgot. I found the recipe in my newest cookbook, America Bowman Keeping Room from historic Weston, Missouri.
CHOCOLATE DATE NUT CAKE
1 cup pitted dates, chopped
1 teaspoon baking soda
1-1/2 cups boiling water
3/4 cups butter (1-1/2 sticks)
1 cup sugar (I used stevia)
1 egg
2 cups flour
2 teaspoons baking powder
2 teaspoons salt
1/2 cup sugar (I used stevia)
1/2 cup chopped black walnuts
6 ounces (1 cup) semi-sweet chocolate morsels
Preheat oven to 350 degrees F. Spray or grease a 9 x 13 - inch baking pan.
In a small bowl, combine the dates with the soda and boiling water. Stir and set aside.
In a mixing bowl, cream the butter and first cup of sugar (stevia) till fluffy.
(I heated the butter for 20 seconds in the microwave first to soften it slightly.)
Add the egg and beat until light.
Sift the flour with the baking powder and salt .
Add to the creamed mixture, alternately with the date mixture, starting and ending with the flour mixture - I do flour 3 times and liquid twice)
Pour the batter in the pan.
Combine the 1/2 cup of sugar (stevia) with the black walnuts and chocolate morsels.
Sprinkle the mixture evenly over the top of the cake.
Bake for 1 hour or until cake begins to pull away from the sides of the pan. (I cooked mine about 55 minutes.)
Serve with slightly sweetened whipped cream. (I used sugar - free Cool Whip.)
My husband liked it without the Cool Whip; he just eat it like a bar cookie.
The stevia gave the cake a different look on top. It looked like a dusting of snow. I am sure if you used sugar, the sugar would have settled more in the top of the cake. The taste is still great, but if you prefer to use sugar, that is your choice.
When I have a post with lots of pictures, I like to remind the reader that you can print the recipe using the print icon below and you will have the option to remove images when the print window opens. If you do not see the print icon below, you need to scroll back up to the title for this post (just under the date) and click or tap on it. That will take you to just this post and the print icon will be at the bottom before the share icons. Home will take you back to my blog and the most recent posts. You can also get back there by clicking on my blog title My Patchwork Quilt.
Lunch is such a difficult meal for me. I can't go without eating it, but I get tired of peanut butter sandwiches. I'm trying to control the amount of processed meat I eat so that eliminates ham or turkey sandwiches. Sometimes I eat a grilled cheese sandwich. My friend Carol eats protein "cookies" and muffins just about every day. She has a number of different ways she alters (adds ins) to her couple of recipes so she has some variety. So lately I have been looking for recipes for muffins that have added protein powder so I feel like I am eating better.
This recipe (I don't remember where I saw it...I copied it down on a note pad and didn't include where it came from) was just for banana oatmeal cups with chocolate chips. I decided I could add the protein powder and make them more substantial.
I will freeze most of them and then just get them out when I am ready to eat one. If I am home, I might warm them up for a bit in the microwave and eat them warm. You know you could also eat one for breakfast if you eat breakfast "on the run". Why not include one in your child's lunch?
BANANA OATMEAL PROTEIN CUPS
3 mashed bananas (1 cup)
1 cup milk
2 eggs, beaten
1 tablespoon baking powder
3 tablespoons protein powder
3 cups old fashion oats
1 teaspoon vanilla
3 tablespoons mini chocolate chips
Preheat oven to 375 degrees F. Line 15 - 16 muffin tin cups with paper liners and spray with a non-stick cooking spray.
Combine all ingredients except the chips in a large bowl with a spoon.
Let rest 10 - 15 minutes (while the oven is preheating?).
Add the chips.
Fill the liners ... it bakes up but not a lot.
Bake 15 - 18 minutes. Cups must be firm to touch (in the center) and starting to turn brown.
Cool a bit on wire rack. Remove and continue to cool.
Can freeze to eat at a later date.
Store in an airtight container or in the frig.
Remember you can print the recipe using the print icon below. You will have the option to remove images when the print window opens. If you do not see the print icon below, you need to scroll back up to the title for this post (just under the date) and click or tap on it. That will take you to just this post and the print icon will be at the bottom before the share icons. Home will take you back to my blog and the most recent posts. You can also get back there by clicking on my blog title My Patchwork Quilt.
I wrote the first post for this Chocolate Macaroon Pie last Wednesday night. I spent almost three hours that night. I was almost finished and ready to schedule it for the Friday when I accidentally erased the whole thing. I was in shock, to say the least. I couldn't believe it. I had spent a lot of those hours researching about a restaurant in Weston, MO, a town northwest of Kansas City that dates back to before 1850. I had included several links if you were interested in reading more about it. But in a flash, it was all gone.
I was numb....I felt "sick". I was glad I already had something to share with you on Thursday and a recipe from a friend was easy to write up Thursday night (when I was feeling not quite so numb) to share on Friday. I was regretting buying a new laptop computer the weekend before.
I had had problems a couple of times earlier in the week with my cursor jumping around on me and even accidentally erased a paragraph. I had tried to find a solution for the problems I was having, but not having too much luck. Thursday morning I decided I would call tech support for Dell and see if they could help me. They kept hanging up on me after I "pushed 2". Finally I saw a "help" link and ended up in "settings". After reading options, I decided the best thing for me was to "hook" up a mouse and set the touchpad to be off when the mouse was connected. So far (fingers crossed) my problems appear to be solved. The cursor has jumped around once and I haven't had an area go blue and then be erased. Using the mouse isn't so bad. In many ways I like it better. I have also discovered by experimenting that if you "cut" something, if you go back and right click again you can "undo" it. If I had known that Wednesday night I wouldn't be telling you about this now. But maybe this will help some of you.
The reason I was sharing information with you about America Bowman's Keeping Room in historic Weston, MO is because that is where I found this recipe for Chocolate Macaroon Pie. After researching and not happy with the limited information I was finding online, I found two different places in the cookbook that explained who America Bowman was. I should have looked at the cookbook more thoroughly and I could have saved myself some time and trouble. You can read about historic Weston HERE and HERE. According to the cookbook, America was "born in Kentucky on July 4, 1817. Her Pennsylvania born husband, Joseph Bowman, filed his pre-emption claim on a rich riverfront farm in 1843. Eight years later, with the help of their three children - James, Charles and Susan - the Bowmans built their Weston home high on a hill overlooking the town." "It was this bit of history that the Patrick O'Malleys purchased in the spring of 1972. Five years later, in the spring of 1977, Barbara and Pat, with their children Kathleen, Barbara and Sean opened the America Bowman Keeping Room Restaurant and Bowman Wine Cellars Winery, named inn honor of Joseph and America Bowman."

CHOCOLATE MACAROON PIE
3 squares (ounces) unsweetened chocolate
1/2 cup butter
3 eggs, slightly beaten
3/4 cup sugar (I used stevia)
1/2 cup flour
1 teaspoon vanilla
2/3 cup sweetened condensed milk (I made my homemade recipe)
2-1/2 cups flaked moist coconut
Preheat oven to 350 degrees F. Butter a 9 - inch pie pan.
Melt chocolate and butter over low heat in small saucepan.
Stir til chocolate melts.
Combine eggs, sugar (stevia), flour, and vanilla.
Add the melted chocolate mixture. I did a little at a time.
Mixture will be thick.
Spread into the pie plate using a spoon or your fingers to form the mixture to the edges of the plate. Leave about 1/2 inch around the sides. It looks like you might have pressed a smaller pie plate over the mixture when you are finished.
Combine the milk and coconut.
Spoon over the chocolate just to fill in the "shell".
Bake for 30 minutes.
This is what mine looked like when I first took it out of the oven.
When it had cooled a little,
I took a wet cloth and cleaned up the edges so that it looked nicer.
Serve warm.
I think it taste really good with a scoop of ice cream.
My husband liked it even when it was cold.
When I have a post with lots of pictures, I like to remind you that you can print the recipe using the print icon below and you will have the option to remove images when the print window opens. If you do not see the print icon below, you need to scroll back up to the title for this post (just under the date) and click or tap on it. That will take you to just this post and the print icon will be at the bottom before the share icons. Home will take you back to my blog and the most recent posts. You can also get back there by clicking on my blog title My Patchwork Quilt.

 Place all ingredients in blender jar. Cover and blend at LIQUEFY, about 15 to 20 seconds.
  Pour into freezer container and freeze until almost set, about 3 to 4 hours. (I did have to leave mine for 4 hours.)
 Scrape into blender jar and
  blend at LIQUEFY until smooth, about 1 minute.
 Pour back into freezer container. Freeze until hard, about 5 to 6 hours. (I made mine the day before and left it overnight +)
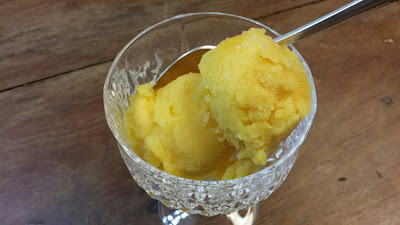 Yield 6 servings.


