Thursday, March 14, 2013

ALL AMERICAN 0VEN-"FRIED" CHICKEN TENDERS

I love chicken tenders. They are just the right amount. I can usually eat a whole chicken breast, but often I either leave part of it uneaten, or worse, I eat it all and then feel stuffed the rest of the day.  

But TWO chicken tenders are just right.

Therefore, I am constantly looking for different recipes for preparing them. "Variety is the spice of life."  Right?  Sometimes I look at recipes for cooking chicken breast to see if I can adapt it for chicken tenders.

This particular recipe by Mr. Food was actually intended for chicken legs.  So I just made a couple of changes -- mostly in how long and at what temperature to cook them.

I make my own bread crumbs.  Sometimes I just use the heels from "week"- old bread (usually a whole grain kind). The last ones I made, I used a loaf of bread from our local Hy-Vee  grocery store.  It was a round loaf of bread called Baking Stone with Sesame seeds. I brought it home from Hillcrest Thrift Shop--left for the volunteers to take home. Instead of eating it, I let it get hard and then with a little difficulty, cut it into hunks that I could put in my blender and grind up. It made super fine bread crumbs that I love. I have almost used them up and I haven't seen any lately at Hillcrest so I guess I will have to go buy a loaf at the store.  

Anyway back to the chicken tenders.  They turned out perfectly!  Definitely a "keeper".


 ALL AMERICAN OVEN-"FRIED" CHICKEN TENDERS


(for 4 - 8 chicken tenders)


1/4 - 1/2 cup of flour (start with 1/4 cup and add more if necessary)
1              egg
1 - 3        tablespoons of milk (I used 2 tablespoons)
1/2          cup fine dry bread crumbs
1/4         teaspoon dried oregano
1/4         teaspoon garlic powder
1/4         teaspoon onion powder
1/4         teaspoon salt
1/4         teaspoon pepper
1/2         teaspoon paprika
1/4         teaspoon dried basil
4 - 8       chicken tenders
3             tablespoons margarine (probably more if making closer to 8 tenders)

Preheat oven to 375 degrees F.

Place the flour in a shallow dish (like a pie plate).

In a second shallow dish, beat the egg with the milk, just til mixed.

In a plastic bag, mix together the bread crumbs and seasonings.

In the flour, coat both sides of a chicken tender.


Then place the tender in the egg mixture turning it over to completely coat it with the mixture.


Then drop the tender in the bag with the seasoned crumbs and shake to cover the tender. Before I took the tender out, I made sure it was completely covered with the crumbs. It won't be a heavy coating.

Place on a plate and continue until you have all the tenders done.


In a shallow baking pan (I used a "brownie" size pan to cook my four.) melt the margarine in the oven.  Leave only long enough to melt the margarine. You will need all of it in the pan.
One at a time, place a tender in the pan to coat one side with the melted margarine. Then turn it over to coat the other side. Continue til all are in the pan. If you are making 8 tenders, you will probably need to use more margarine. You want to have all the tenders coated with the margarine on both sides.


Bake for 10 minutes. Then remove from oven and turn all of the tenders over. Return to oven and cook 10 more minutes or until meat is no longer pink.  (20 minutes was perfect for my 4 tenders.)


So good with some frozen black eyed peas.

Tuesday, March 12, 2013

BANANA-NUT-CHOCOLATE CHIP QUICK BREAD

The other night I couldn't go to sleep so I found myself going through 6 Eating Well magazines I have saved from 2005.  In the October/November issue, they featured an article called "No-Fuss Gifts from the Kitchen"-- festive loaves, mini Bundts and muffins -- all from one basic recipe by Stacy Fraser.  

Stacy offered a recipe for Quick-Bread Dry Mix that could be made ahead and stored in a freezer bag in the freezer for up to 6 months.  Then there were recipes for 6 different Quick Breads using the dry mix as the base.  Several looked interesting.  So far I have made two of them.  I am sharing the Banana-nut-chocolate chip quick bread in this post and will share the Pineapple-pecan quick bread later this week.

I made the 3 mini-loaves....ate one and froze the other two to enjoy later.  Dicing the bananas instead of mashing them gave the bread a different look and taste.  I had never heard of dicing the bananas in a recipe before.  It is like having a "burst" of banana when eating a slice.

I used the whole wheat pastry flour, the egg substitutes, and applesauce.  I try to make my recipes with as many healthy options as I can.


BANANA-NUT-CHOCOLATE CHIP QUICK BREAD

Quick-Bread Dry Mix
1-1/2    cups whole-wheat pastry flour or whole wheat flour
1          cup all-purpose flour
1-1/2    teaspoons baking powder
1          teaspoon ground cinnamon
1/2       teaspoon baking soda
1/4       teaspoon salt
     
     *     *     *     *     *     *
1/4       teaspoon nutmeg
2          large eggs or 1/2 cup egg substitutes
1          cup nonfat buttermilk or 1 cup milk + 1 tablespoon lemon juice
2/3       cup brown sugar
2          tablespoons butter, melted or 2 tablespoons unsweetened applesauce
2          tablespoons canola oil or 2 tablespoons unsweetened applesauce
1          teaspoon vanilla extract
2          cups diced banana
1/2       cup chopped  walnuts
1/2       cup mini chocolate chips

Will make 
     *1 large loaf (9-by-5-inch pan)
     *3 mini loaves (6-by-3-inch pan, 2-cup capacity)
     *6 mini Bundt cakes (6-cup mini Bundt pan, scant 1-cup capacity per cake
     *12 muffins (standard 12-cup, 2-1/2-inch muffin pan)

Preheat oven to 400 degrees for muffins, mini loaves and mini Bundts or 375 degrees for a large loaf.  Coat pan(s) with cooking spray.

Prepare (Whisk together in mixing bowl) Quick-Bread Dry Mix, adding nutmeg to it.

Whisk, eggs or egg substitute, buttermilk, brown sugar, butter, oil, (or applesauce if substituting for butter and oil) and vanilla in a separate bowl.  


Make a well in the center of the dry ingredients, 


pour in the wet ingredients and stir until just combined.


Dice the bananas


Add banana, walnuts, and chocolate chips.  Stir just to combine; do not overmix.  


Transfer batter to the prepared pan(s).  Top with additional walnuts, if desired.


Bake until golden brown and a toothpick inserted into the center comes out clean, 22 to 25 minutes for muffins or mini Bundts, 35 minutes for mini loaves,, 1 hour 10 minutes for a large loaf.


Let cool in pan(s) for 10 minutes, then turn out onto a wire rack to continue cooling.


Saturday, March 9, 2013

CRANBERRY BLUEBERRY MUFFINS

I've been on a blueberry kick lately. So when I saw this recipe for Cranberry Blueberry Muffins, I thought I would give it a try.

Since my husband was outside shoveling the snow the other day, I decided I would surprise him with them when he got through and came inside.

I indicated my particulars in the ( ) in the recipe.  I didn't say the the applesauce took the place of oil.


CRANBERRY BLUEBERRY MUFFINS

2     cups flour (I used soft wheat flour)
1/2  cup sugar (I used Stevia in the Raw)
2     teaspoon baking powder
1      teaspoon salt
1      large egg
1      cup milk (I used skim milk)
1/2  cup natural applesauce (no added sugar)
1/2  cup dried cranberries
1/2  cup fresh or frozen blueberries

2     teaspoons sugar to sprinkle on top before baking.

Preheat oven to 400 degrees F.  Spray muffin pan with cooking spray. (The recipe made 12 regular size muffins and 4 mid-size ones)

Combine flour, sugar, baking powder, and salt with a whisk.

Combine egg, milk, and applesauce in another bowl.

Stir liquid ingredients with flour mixture just til moistened.

Gently toss in the fruit.

Fill muffin cups 2/3 full and sprinkle additional sugar on top of each one.

Bake for 20 - 25 minutes.

Cool for 10 minutes on wire rack 


before you remove them from the pan.


TIP ALERT!  Cooking with fresh blueberries

Fresh blueberries are so much easier to add to batter, if you freeze them first. All you have to do is measure out desired amount of fresh berries, place them on a pan that will fit in you freezer. Do this at least 1 hour before you need them. They won't break apart when you stir them into the batter.

Wednesday, March 6, 2013

MARIE'S WALNUT FUDGE BROWNIES

If you have visited my blog before, especially when I am baking, you know that I usually revise recipes to make them as healthy as I can. I enjoy my sweets, but I also watch my weight and my over-all health.  

That doesn't mean that I don't "cheat" from time-to-time.  It just usually happens when I eat out.  I think that is okay to do though.  You just can't be guilty of doing it too often.  If you do, then you have to accept the consequences.

Recently out Sunday School class, the Bible Boomers, served dinner to our Spanish sister church in downtown Kansas City.  For dessert, they decided to have brownies and cookies.  I offered to make a pan of brownies.

I considered making Donna Jean's brownies that I made and featured HERE.  I also considered making my sugar free, low fat fudge ones that I made a week or two ago HERE. 

But the more I thought about it, I decided the occasion would be a good excuse for me to make my cousin Marie's walnut fudge brownies. That's something else I do....I make a good dessert that I don't make very often anymore because of the calories when I am taking it somewhere to share. That way I can enjoy one serving but won't have the rest around to tempt me.

I did use light margarine instead of butter when I made them.  I didn't, but you could use either 1 cup of sugar blend or 2 cups of Splenda or a stevia product to reduce the sugar calories.  I don't use self-rising flour anymore so the instructions in the parenthesis are a substitute for all-purpose flour.

As I said earlier, this recipe came from my cousin Marie.  The earliest date I have written on the card for making them is 1983. 

They are really, really good.  You won't be sorry for trying them. 


WALNUT FUDGE BROWNIES

1     cup softened butter -- 2 sticks (I did use light margarine)
2     cups sugar
4     eggs
10   tablespoons cocoa
1      cup self-rising flour (I used 1 cup less 2 tablespoons soft wheat flour + 1/4 teaspoon salt)
1      teaspoon vanilla
1      cup chopped nuts

Preheat oven to 350 degrees F.  Spray a 9 x 13-inch pan with cooking spray.

Cream butter and sugar til smooth. (I cut my margarine up to cream faster.)


Add eggs and vanilla.  Mix til fairly smooth, scraping the sides of the bowl as needed. (I only had 3 eggs so I used 1/4 cup egg substitute for the other egg.)

Add the rest of the ingredients (flour, cocoa, nuts)


and mix until well blended.


Spread in prepared pan.Bake for 30 minutes.


Cool 10 minutes on wire rack.


Cut before serving.


Wanna know how I cut the brownies so cleanly?


I cut them with a plastic knife.


Tuesday, March 5, 2013

A NEW SCARF FOR SADIE-SEED STITCH

I think I have mentioned before, I often have a hard time just sitting and watching television....unless I am watching something that really takes my attention.  I can't read....my husband can, but I can't.

During the winter, I tend to get out the knitting needles and make scarves. 

I'm not a great knitter.  I have a couple of friends who are, but I know my limits and stick to them.  I have tried to make sweaters but always give up before I get finished.  

I did make a poncho for Hallie when she was small....but that was just two knitted rectangles that I joined together.  It was cute though.  I should look for a picture of her wearing it.  It is probably on my flash drive since it was almost 5 years ago that I made it.

While I do sometimes use patterns I find for scarves, I just as often find a stitch pattern I can do and just do it until I have the length I need.

One of those stitches I like is the SEED STITCH.  It is only knitting and purling so I can do that and watch television.


Here is my current project I am working on using the seed stitch with a variegated yarn.


I am using size U.S. 8 knitting needles and I cast on 20 stitches.  The yarn is Red Heart Super Saver, a medium weight yarn.

SEED STITCH 

Stitches used:  Knit and purl, casting on and binding off.

Cast on an even number of stitches.

Row 1 :  (K1, P1) all the way across

Row 2 :  (P1, K1) all the way across

Repeat these two rows until you have the desired length.

Bind off in pattern.


Here is another close up picture of the pattern.


And here is the finished scarf.  I plan to give it to my granddaughter Sadie.

Monday, March 4, 2013

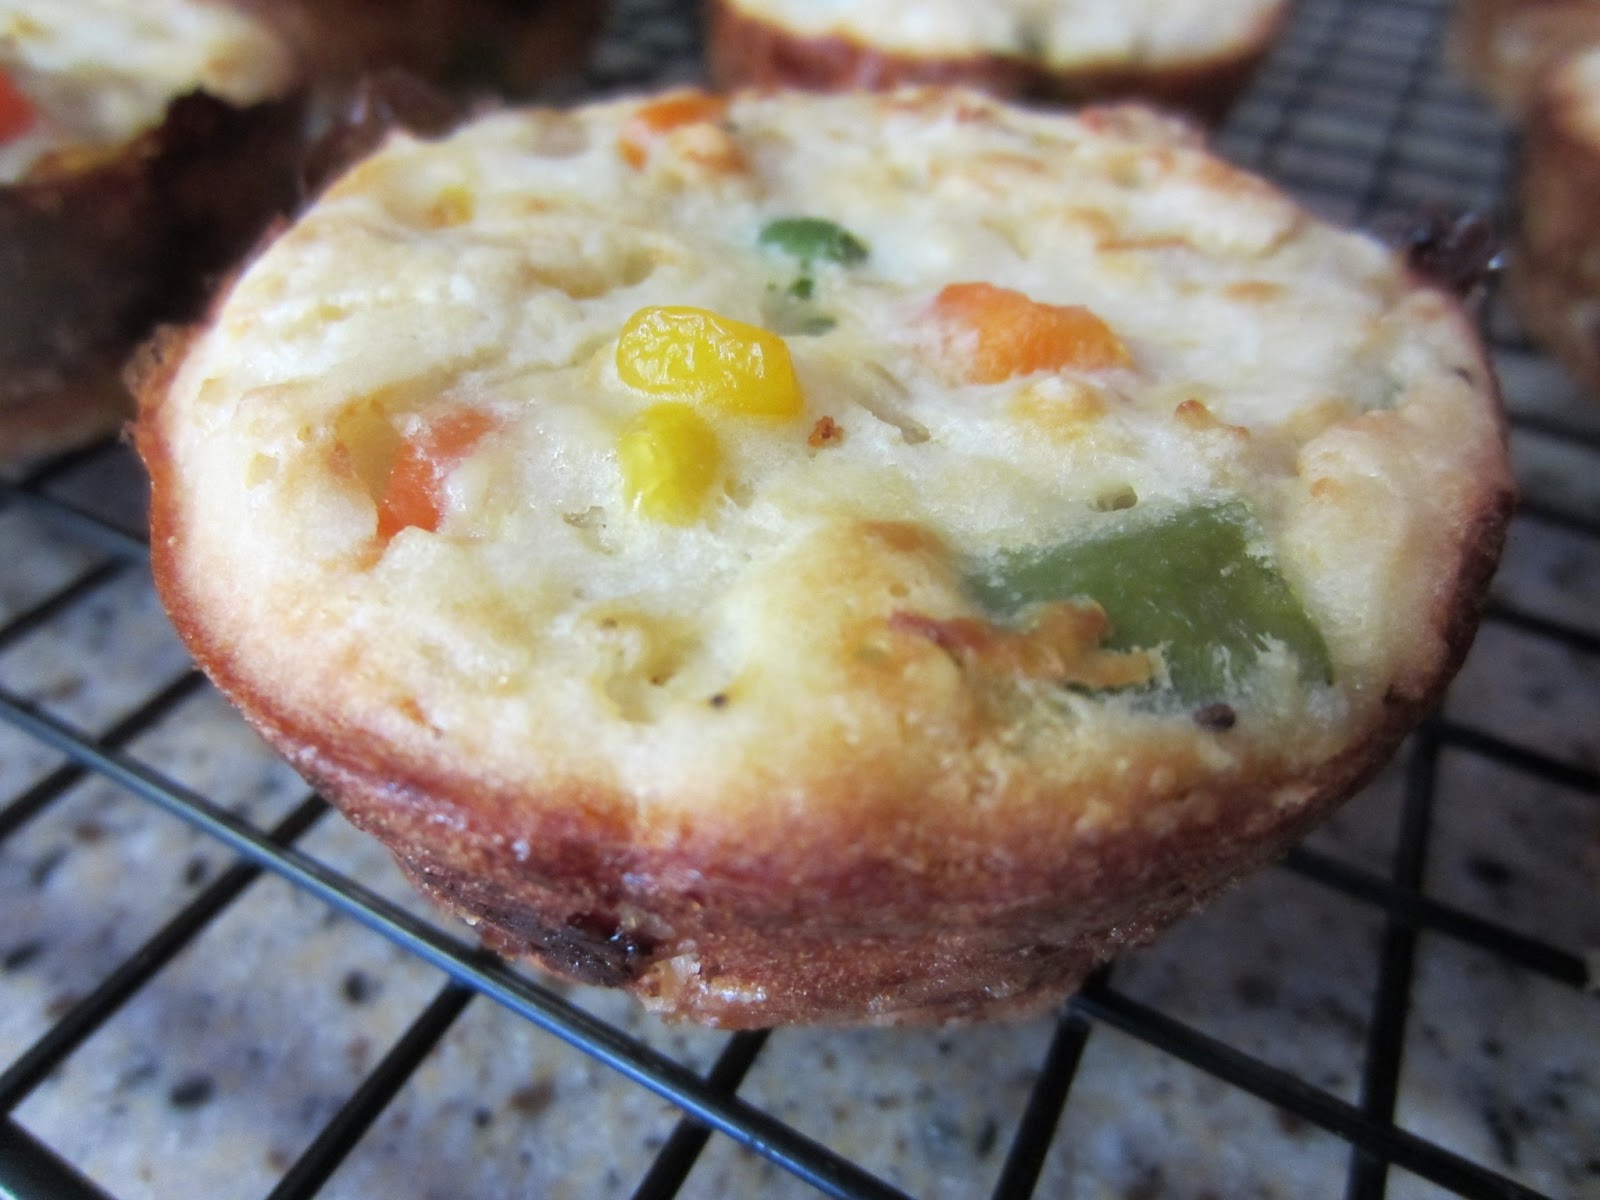
EASY MINI CHICKEN POT PIES


I CAN'T BELIEVE I FORGOT THE CHEESE! But wait, I'm getting ahead of myself.....

I cooked a chicken a few days ago in the Crock Pot and needed to do something with the leftovers. We enjoyed one extra meal and then my husband "cleaned the bones" for me to make soup or something with the meat.

I saw this recipe for easy mini chicken pot pies and decided that would be the perfect thing to do with the rest of the chicken.It looked easy enough - one thing I look for when I am looking for a new recipe. I had all the ingredients - that's even better.
  
So today I decided I would give it a try. Since I was using leftover chicken, I didn't have to cook the chicken as the original recipe said. 


I also had the congealed chicken broth from when I cooked my chicken so I didn't have to open a can or use a bouillon cube ... that's good too.


I spooned the "fat" from the top and scooped out a half a cup of "broth".


Here is my recipe for... 

EASY MINI CHICKEN POT PIES

Chicken mixture:

2     cups cooked chicken cut in bite-size pieces
1/2   cup chopped onion
1/2   cup chicken broth
1     cup frozen mixed vegetables
1/2   teaspoon salt
1/4   teaspoon pepper
1/2   teaspoon celery salt
1/4   teaspoon ground thyme
1     cup shredded cheddar cheese (4 - oz)

Baking mixture:

1/2   cup all-purpose baking mix (I used Jiffy baking mix)
1/2   cup skim milk
1/3   cup All Whites (egg whites) or 2 eggs

Preheat oven to 375 degrees F. Spray 12 - cup muffin pan with cooking spray.


In a sauce pan, heat chicken and broth to simmering. Add frozen vegetables and seasonings. Heat until hot, stirring occasionally. Cool 5 minutes and stir in cheese. (I know I forgot the cheese.)

In a small bowl, stir baking mix, milk, and egg whites with a fork until blended. It will be a very, very thin "batter".


Spoon 1 scant tablespoon of the baking mixture into each baking cup.

Top with 1/4 cup chicken mixture.


Spoon 1 tablespoon of the baking mixture onto chicken mixture in each cup.

Bake for 25 - 30 minutes. Check doneness with a toothpick inserted in center of one of the center pies.

Cool 5 minutes on wire rack.

If necessary, loosen with a thin knife to remove to cool 10 more minutes before serving.

These are obviously not your traditional chicken pot pie, but they are so cute!  And you can see they are full of chicken. They would be a perfect lunch for children.  They can pick them up and eat them like a cupcake.

I will be making these again and next time I won't forget the cheese.

Friday, March 1, 2013

SARA'S LAZY DAY LASAGNA

This is a recipe I got from my dil Sara. Almost exactly 4 years later I am finally getting around to making it. She had made it for us when we went to visit and I had asked her for the recipe.  

You can use your favorite spaghetti sauce. I used Newman's Own Tomato and Basil. I also used whole grain noodles.


LAZY DAY LASAGNA

12    oz. cottage cheese

2      cups shredded mozzarella cheese
2      eggs
1/3   cup parsley
1      teaspoon onion powder
1/2   teaspoon basil
1/8   teaspoon pepper
32    oz spaghetti sauce
3/4   cup cooked ground turkey
9      cooked lasagna noodles
3/4   cup water

Preheat oven to 375 degrees F. Spray 9 x 13 - inch pan with cooking spray.


Cook lasagna noodles according to package directions....(Add two noodles at a time to a pot of boiling water, stir, and boil 10 minutes.)


Meanwhile, cook the ground turkey til done.Add the spaghetti sauce and heat on low while cooking the pasta.


Mix first 7 ingredients together in a large bowl.


In the prepared 9 x 13 - inch pan: 

Spread 3/4 cup of the meat sauce on the bottom of the pan.

Layer 3 cooked noodles on top of the meat sauce.


Spread 1/2 of the cheese mixture on top of the noodles.


Next spread a layer of meat sauce. (about 1-1/2 cups)


Layer another 3 noodles on top of the meat sauce.


Spread the remaining cheese mixture on top of the meat sauce.


Top with last of the meat sauce and noodles.


Pour the water around the outside edges of the lasagna.


Cover with foil and bake for 45 minutes.


Uncover and bake an additional 15 minutes.(Sprinkle more shredded cheese on top)


Remove from oven and let stand 10 minutes before serving.


My dil said she made hers in two 8 x 8 - inch pans freezing one for later. Since I was making this for just my husband and me, I decided I would do the same thing. But when I did it, I didn't have enough to make two complete ones. We ate the complete one I made and liked the taste. If I had made it in the 9 x 13 - inch or even my 8 x 11 - inch pan, I would have had plenty of ingredients for either one of them. Remember that when you look at my pictures.