Sunday, October 7, 2012

VACATION - DAY 2, PART 2, LIBRARY OF CONGRESS

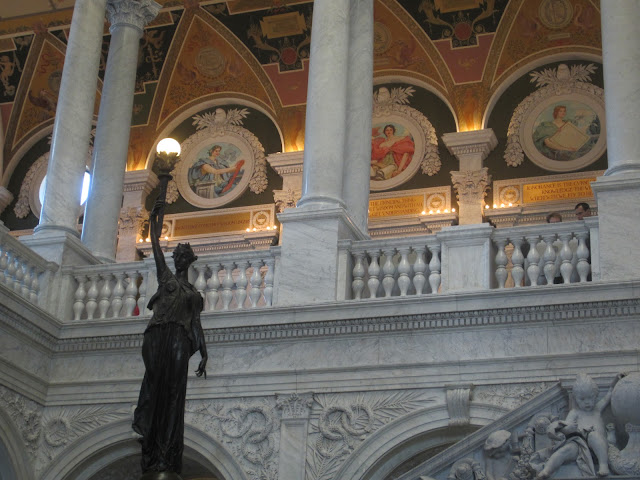
As I said, while we waited for Leon, Janice's husband, to get us passes to both galleries in the Capitol, we visited the Library of Congress.  Personally, its beauty surpassed the White House.  


I won't have a lot to say....the pictures say it all. 

There were two levels we were allowed on....the main floor and the mezzanine.  The doors were shut for the research room which is the main library and the picture you usually see.

The first pictures are of the main level.

Looking down from the Mezzanine to the Main Entry.

Looking up from the Main Entry.


One of the stairways to the Mezzanine
Another stairway to the Mezzanine.....
This ceiling and archway, were not painted but were mosaic tile.  Don't believe me? Check out the next picture.  

 Even the floor was little mosaic tiles....

More gorgeous ceilings and archways....


The next three are progressive pictures for one area.


In several of the pictures you can see the paintings around the ceiling with the etched quotations.  Here are two that I took up close.

Says it all.....

Do you think I was a little impressed with the Library of Congress?

(missed part 1?  Check Here)            (Read the rest of the day HERE)

Saturday, October 6, 2012

END OF THE SUMMER, 2012 VACATION

Last weekend we returned home after vacationing in D.C. and Williamsburg.  It was a perfect trip....weather couldn't have been better and the company more enjoyable.  It all started back in February, when my husband and I purchased a 4-day golf package to Williamsburg, at a Golf Expo in Overland Park.  We were offered a free upgrade for an additional couple and the ability to lengthen the stay for a really good price.  Since my husband planned to play golf as much as he could, I wanted someone along to keep me company.....so we invited my friend Janice and her husband to join us.  

The first thing we decided was to extend our stay in Williamsburg to a whole week.  Then we decided we wanted to fly instead of driving and so decided to fly into DC.  Since we were going to be in D.C., we decided we should stay there a few days.  So before we knew it, our 4-day golf package turned into an 12-day/11-night vacation.

Early in the summer, Janice's husband, Leon, contacted the office of our representative to see if we could get a tour of the White House. (It isn't as easy to do as it used to be.)  Anyway, we returned the application with all the necessary information to do background checks on us and  surprise, surprise, we were selected.  That was one of the main highlights of our trip.  Couldn't take cameras so have no pictures except outside, but it was absolutely beautiful!

Since I can't invite most of you over to look at pictures from our "end of summer 2012" vacation, I will be sharing many of them with you here on my blog in several posts. Hope you enjoy them.  Let me know what you think. (Be kind.)

***DAY 1***
We couldn't take cameras on the tour and there wasn't any place to leave them, so I spent our first full day in D.C. without my camera.  We were allowed to have cell phones though (even ones with cameras) so I did get a few pictures after the tour.  

The White House is such an impressive place.  


 This was the entrance we exited from.


This is the East Wing which we toured.

This picture shows where the National Christmas Tree will be placed.

After we finished our tour, we walked over to the American History Museum and spent most of the rest of the day there and at the Air and Space Museum and then just walking around the Capital Mall.  We WALKED a lot on our trip.  

We stayed in Rosslyn, VA at the Holiday Inn.  The subway entrance was less than a block away.  When we had dinner at the restaurant on the 17th floor each night, we could look down on the bridge over the Potomac River to Georgetown and watch the planes fly by to land at Washington National Airport.


***DAY 2***
(Part 1)


Our second full day in D.C. was spent mainly at the Capitol, but also at the Library of Congress, and the Supreme Court Building.  Janice's husband walked over to the offices of our representative and senator and got us gallery passes for both houses.  That was really interesting.  Our tour guide through the Capitol was fantastic.  He could speak 59 languages and knew "everything" about the Capitol.  He asked you where you were from and if you were from the U. S. he then preceded to tell you when the state came into the union.  If you were from another country, he would carry on a conversation with you in your native language. In the Capitol there are statues of two people representing each state and he knew the names of both of those two people.
My husband, Leon, and Janice in front of the Capitol
I actually got a picture with almost no one in it.  


The dome in the Rotunda.


Zoomed in....Can you see President George Washington?


This was the location of John Adams' desk.  It is pretty neat.  Standing in this spot, you can hear what people are saying from across the room....even when they are whispering.


The Old Supreme Court Chamber


They took your cameras before going into the galleries so I couldn't take any pictures in there.  Most of the building is just too massive to really catch it in pictures anyway.

While we were waiting for Leon to get back with passes to enter the galleries, my husband, Janice and I walked over to the Library of Congress through the underground passage.  I think, it has to be  the most gorgeous building inside (words fail me) and since I took LOTS of pictures, I will post them in another blog. 

Read the next post HERE

Friday, October 5, 2012

TEXAS BEAN SOUP

Fall has arrived in KCMO.  The leaves are turning on the trees.  So pretty!  Temperatures are dropping.  The first frost is even forecasted for this weekend.  Will have to bring my plants in and cover up my pepper plants on the deck.  

At our house when the temps start falling, that means you can expect to hear me say, "Soup"s on."  And that is what I was saying earlier this week when I made Texas Bean Soup.  

I have had the recipe 25 years and don't remember where I found it. It does hit the spot though when you are in the mood for a bowl of homemade soup.


TEXAS BEAN SOUP

1  cup dried beans (kidney or pinto), soaked overnight and drained.
1  large potato, diced
2  cups cooked tomatoes, or 1 can tomatoes
1  lb. ground chuck or ground beef (I use ground turkey)
1  large onion, chopped
1-2  tablespoons chili powder
salt and pepper to taste
1/2  cup water

Wash the beans and drain.

Cover beans with salted water;  simmer until tender.

Peel and dice the potato.

(I used fresh cherry tomatoes from my garden instead of the cooked tomatoes or can of tomatoes)

Add potatoes and tomatoes; simmer until done.

Brown meat and onions, add remaining ingredients.

Combine meat mixture with beans, add enough water to make 4 quarts of soup.

Simmer until all ingredients are tender.

Serve with hot cornbread muffins.

TIP ALERT!

The Quick Method to prepare dried beans if you forget to soak them overnight or decide that day that you want to use them.

I almost never remember to presoak dried bean overnight.  So for years I have used the "quick method".  Wash the beans and cover them with plenty of water in a big pot.  Bring the water to boil (I usually put the lid on the pot to speed up this process.  Just watch it carefully so it doesn't boil over.) and boil for 2 minutes.

Remove from the stove, keep it covered with a lid, and let it stand for 1 hour.  After an hour, pour off the water, rinse out the pot, and then return the beans to the pot and cover with plenty of water.

Thursday, October 4, 2012

STUFFED TOMATOES


These stuffed tomatoes were brought by Marilyn to our recent Farkle luncheon.  I have been sharing some of the salads that were brought and enjoyed.  Marilyn stuffed tomatoes with Curry Egg Salad and Tuna Salad. She said she also uses these recipes for sandwiches.  She brought 20 for us and said she had leftover egg salad and tuna salad from the recipes.

Curry Egg Salad

1/4   cup diced celery
4 chopped hard boiled eggs
1/2   teaspoon curry powder
1/4  to  1/2   teaspoon seasoned salt
1/4   teaspoon pepper
1/4   cup mayonaise


Tuna Salad

6   oz can tuna
1/4   cup mayonaise
1/2   teaspoon Old Bay
1/2   cup diced celery
4  to  6   drops hot sauce
1/4  to  1/2  teaspoon dill
1   teaspoon parsley
1   tablespoon lemon juice


Make the egg salad and tuna salad.  Cut in half and scoop out insides of small tomatoes--Romas work well.  Spoon salad mixture in tomato halves.  Serves well in a deviled egg serving dish.

Wednesday, October 3, 2012

JACK-O-LANTERN BIB

Because this is my grandson, Tyler's first Halloween, I decided to make him a jack-o-lantern bib.  The idea just came to me....one of those creative moments I sometimes have. 

I was in Wal-mart picking up a few things before going on our vacation and decided to look at the fall and Halloween items.  That's when I saw the orange handtowels.  I had seen some bibs when Janice and I were shopping for "Baby's First Halloween" and considered buying one for him, but didn't.  

When I saw the orange towel, I didn't see an orange towel....I saw a jack-o-lantern bib. 


I used a piece of black material for the face,  some flannel to layer in the middle to give the bib a little more "body" or thickness and a black Halloween print for the back. You can trace around a bib you might have for a pattern.  I used a pattern template I found on the purl bee for their liberty bibs. I added two inches to their pattern to make mine longer.  My finished bib is about 8" wide, 14" long, and with a 3-1/2" round opening for neck after snapped.

Directions:

Materials:

1   orange handtowel
1   scrap of black cotton fabric (about 5" x 7") for the face
1   piece of fabric for the back (about 10" x 15")
1   piece of flannel (about 10" x 15")
1   bib pattern
1   piece (about 5" x 7") of paperbacked adhesive  transfer web

                                       **************

 - From the handtowel, the fabric for the back, and the piece of flannel cut one each of the bib pattern. 

 - On a piece of paper, draw the shapes for the eyes, nose, and mouth for the jack-o-lantern to fit the front of the bib.  Make sure they will fit on the scrap of black fabric.

  - Cut the piece of Pelon Wonder Web the same size as the black scrap. 
 - Place the rough side of Wonder-Under to the wrong side of the fabric.
 - With the iron on dry and cotton, press for 5 - 8 seconds . 
 - Let cool.
 - Draw the desired shapes onto the paper backing side


  - Cut the shapes out.
  - Gently pull back the paper backing 


 - Position fusible fabric web side down on the bib.
 - Cover with a DAMP press cloth.


 - With iron at wool setting, press firmly 10 - 15 seconds.  (ALWAYS use a damp cloth.)


 - Layer the three bib pieces as if it were a sandwich with the backing wrong side up, then flannel, and finally the towel with jack-o-lantern face up.


 - Applique the face on the bib using a close zigzag stitch on your machine.

 - Stitch 1/2 inch from the outer edge of the bib to hold the three layers together.

 - Trim away any excess to even up the edges of the three layers.

 - Clip around the edge close to the stitch about 1/4" apart for the edges to "rag" if you like.

 - Attach a heavy duty snap or velcro for a fastener.
 Now I can't wait to see Mr. Tyler wearing it.


Tuesday, October 2, 2012

GLUTEN-FREE/WHEAT-FREE BLUEBERRY SCONES


These scones were brought to our Farkle luncheon by Sue V.   They were so good.  Perfect with all of the different salads we enjoyed.

I don't know what I expected anything gluten-free/wheat-free to taste like, but definitely not as tasty as these were.  

Thanks, Sue for letting me share your recipe on my blog.


Gluten-free/Wheat-free Blueberry Scones
Ingredients:
                2-1/3 cups Pamela's Baking & Pancake Mix (Gluten-Free/Wheat Free) 
                    1/3 cup plus 1 tbsp sugar 
                   1 tsp baking powder 
                   1/2 cup or more of fresh or frozen blueberries 
                   4 tbsp butter 
                   1 egg, beaten 
                   2/3 cup milk
                  
Directions:
Preheat oven to 375 degrees F.

Mix the dry ingredients together. 

Cut in the butter using two knives.

Add the milk and beaten egg. Mix together with a fork. 

Gently fold in Blueberries. Dough will be thick.

Drop large, tall dollops of dough (scones will spread when baking) onto lightly greased baking sheet. 

Bake for 15-17 minutes.

Monday, October 1, 2012

JIFFY SWEET POTATO CORNBREAD

While we were on vacation, we had dinner one night at a restaurant called Food for Thought in Williamsburg, VA.  (btw, I would highly recommend it--food was great!) In the basket of breads were two pieces of what I thought must be sweet potato cornbread.  It didn't really taste like cornbread so I asked our waiter if that was what it was.  (It had more of a texture of cake....less cornmeal than flour, I think.) Anyway, he said it was. I asked him how they made it (recipe) and he wouldn't tell me.  

I searched all of the recipe books everywhere we went after that, but never found a recipe for sweet potato cornbread. I decided I would just have to experiment on my own til I came up with one.

Yesterday, I decided to make a pot of Texas Bean Soup (I'll do a posting of it later this week...it is oh so delicious!) and also some cornbread.  

I had some Jiffy cornbread mix I had bought and thought I would just make it instead of mixing up my recipe from scratch.  Remembering the sweet potato cornbread, I decided to start my experimenting (I do intend to work on a recipe from scratch).  

Well, the result was so delicious I had to take a few minutes to share it with you. It is so easy and so good and so fast. I can't believe I have never thought about doing it before.


JIFFY SWEET POTATO CORNBREAD

1   box  Jiffy cornbread mix
1 egg
1/3  cup milk
1/2  cup mashed sweet potato


Preheat oven to 400 degrees F.
 
Combine all ingredients in a small bowl.  Stir til moistened with a whisk. 


Put a dab of shortening in each muffin cup


and place muffin pan in oven to melt the shortening and heat the pan a little.


Spoon mixture into pan and bake in oven for 20 minutes.


Remove and serve warm.

Great with a little dab of butter.


UPDATE!

I decided to experiment again and this time I came up with Jiffy Cheesy Bacon Cornbread. You have to check them out. My husband really loved them. (And I did, too.) Cheesy Bacon Cornbread