Wednesday, January 22, 2014

HOW TO EASILY CLEAN OLD CANDLE JARS


I really hate to think about how many jars I have thrown away and unfortunately not recycled because of the candle wax still in the jar. Not any more though.  Not since I started using a "warmer" for my jar candles instead of burning them.  

Okay maybe not immediately.  I probably got the idea when I used the warmer to be able to enjoy the last little bit of the candle scent when the wick no longer worked.  You know....you have certain candle scents that you just LOVE.  

Then one day it hit me.....I could use the warmer to also clean the last wax from the jar and then recycle the jar.  And I did that .... until one day when I finished getting the wax out of the jar, I thought.....What a pretty jar!  I could use this for.....  

That's when I started saving the "neat" jars to reuse as a candy dish or a vase, etc.  Now I donate most of the clean jars to Hillcrest Thrift Shop for them to sell.  You can only have so many candy dishes or vases, etc.


It really is an easy process.  


Start with your candle jar.


Using a "warmer"...


Melt the last of the candle wax in the jar.....now you can multi-task and relax or do some other chores.... AND enjoy that scent just a little bit longer.


You will need to prepare someplace to pour the melted wax.  I use an empty cracker box (a cereal box works well also) stuffed with newspaper or paper towels....just something to absorb the wax without making a mess.  You don't want the melted wax seeping through the bottom of the box.
When you are ready, carefully and slowly pour the wax in the box.  The jar shouldn't be hot, but test it before you pick up the jar without a mitt or towel.  If weather permits, you can do this outside.


If too much of the wax cools during this process and coats the side of the jar, you can place it back on the warmer and melt it again.  Otherwise you can fill the jar with boiling water to melt the last little bit.  Pour the water/melted wax outside not down your drain.


Then clean the jar 


If you need some help getting the sticky residue off the jar from the labels, here is another great tip.....Use baby oil.  I like it even better than that goo - off stuff you can buy.


Just put some baby oil on a cotton ball....


and rub...


all done.  I really worked hard trying to get a good picture to show it was all gone.  Finally I sat the jar on a placemat and looked down into the jar....clear bottom.


Here is the jar I started with at the beginning all finished


Some jars I have cleaned...

The Wood Wick candle on the left was really interesting.  The purple "melted" into the glass...or whatever you would call it.  Anyway the color won't come out, but I think that makes the jar really unique and pretty.


Here is one I used as a flower vase...


and my most recent favorite ... a candy dish


Tuesday, January 21, 2014

NEIMAN-MARCUS (CHOCOLATE CHIP) COOKIE RECIPE

It was 3 degrees outside when I checked the temperature this morning.  It was up several degrees by the time I met Janice at the YMCA to walk 45 minutes/about 2 miles.  We don't count the "trips" just watch the time.  Easier that way.  At least the wind wasn't blowing so it didn't feel that bad.  The last couple of days the wind gusts have been 25+ mph.  The 60s on Sunday didn't even feel that warm because of the wind. The next couple of days it will be cold again (brrrrr) and then warm up for the weekend.  That seems like what our winter is going to be now....a roller coaster ride.

This afternoon I have almost made a new skirt for me.  All I have to do is the facing at the waist and hem it.  It's looking pretty.  

Tonight I am off with my "Theater Friends" to see Sister Act at the Music Hall.  This is our second in the Broadway Series.  Wicked was fantastic.  Looking forward to a fun evening.

Today I am sharing a recipe I made yesterday so my husband could take some to share at his tax preparation class at Fort Leavenworth. I also took some this morning to Janice for her and her husband to enjoy.  I enjoyed one when I got home from the Y.  I hope you will give them a try.

This is another recipe that I had cut out and pasted in my spiral notebook years ago of recipes to try.  It was typed on white paper.  I am not sure where I got it.  It looks like it could have been in one of those "collection cookbooks" that teachers hand out at holidays.  Cookbook is a little strong because these handouts didn't usually contain more than a dozen recipes.  

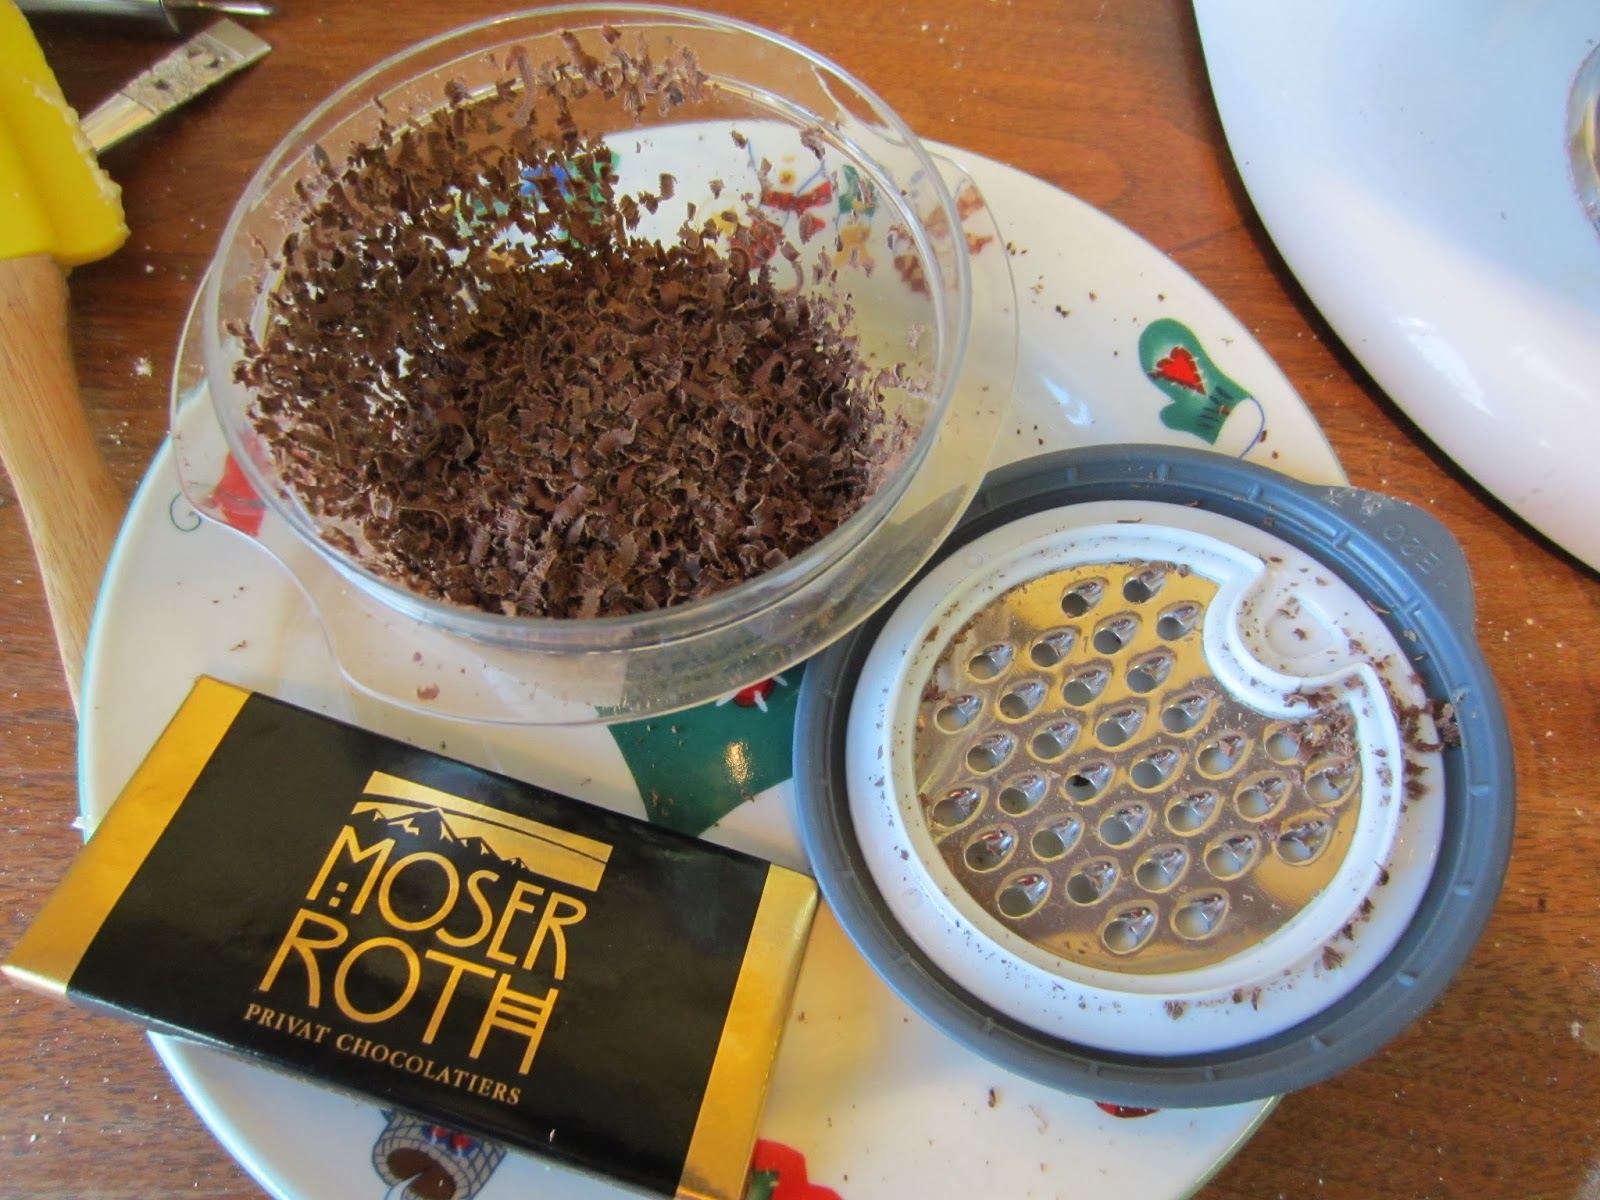
The original recipe made 112 cookies but it was easy for me to cut the recipe in half.  That is what I am sharing....the smaller amount. I did substitute sugar blends (as I usually do) to reduce the calories in the cookies.  I also used dark (60% cacao) chips.  I rarely buy milk chocolate chip these days.  Fill free to use the full amounts of the sugars and milk chocolate chips if you like.  (I do have to say that the recipe just calls for "chocolate chips".  The recipe also called for a Hersey Bar (grated) and I used a premium dark chocolate 70% cocoa bar.  My husband and I were well pleased with my version.


NEIMAN-MARCUS (CHOCOLATE CHIP) COOKIE RECIPE

1        cup margarine/butter (2 sticks)
1/2     cup sugar/stevia blend (or 1 cup sugar)
1/2     cup brown sugar/stevia blend (or 1 cup brown sugar)
2        eggs
1        teaspoon vanilla
2        cups flour
2-1/2 cups blended oatmeal*
1        teaspoon baking soda
1        teaspoon baking powder
1/2     teaspoon salt
12      oz. chocolate chips
4        oz. chocolate bar (grated)
1-1/2 cups chopped nuts

* measure oatmeal and blend in a blender to a fine powder. (1-1/2 cups oats will make 1-1/2 cup oatmeal flour--I used rolled oats)


Preheat oven to 375 degrees F. Line cookie sheets with parchment paper.

Cream margarine/butter with sugars til creamy.


Add eggs and vanilla.  Mix well.


Mix together flour, oats flour, baking powder, baking soda, and salt.


Add the flour mixture to the wet mixture.


Add the chocolate chips, grated chocolate bar, and nuts.


Roll into balls....I used my cookie scoop....and place cookies 2 inches apart on cookie sheet.


Bake for 10 minutes.


Cool 2 minutes on cookie sheet.


Remove cookies to cool completely on wire rack.


Monday, January 20, 2014

"SUNBURST" - 14-POINT KNITTED WASHCLOTH

I don't really consider myself a knitter or crocheter, but I do like to attempt small easy projects.  The scarves I knitted my CO grandchildren for Christmas this past year were a big hit.

I come from a family (mother, grandmother, and aunts) who enjoyed crocheting.  They did some truly beautiful pieces.  Every time I tried to learn, I gave up due to frustration with getting the chains the same length.  (I just wasn't ready to learn.)  

One summer when my parents came to visit us in CA, I told my mother I wanted her to teach me how to crochet. Everyone else could do it but me.  I guess I was really ready this time, because I "picked it up" quickly. In fact she was surprised I learned so quickly.

I am still not very advanced...with either knitting or crocheting, but when I see something that looks like I could do, I try it.  I saw this knitted washcloth and was attracted to the unique design....not your normal square washcloth.  Simply Notable called it "the almost lost washcloth pattern".  She told her interesting story here.  

The pattern reminded me of some of my mother's recipes when she just said "cook til done".  There were a lot of questions that people asked and I read almost all of them.  Someone really interested asked if she could do a tutorial because she was having difficulty fully understanding the pattern.  One comment tried to explain the pattern which helped me a lot.  Anyway I decided I would give it a try.

I wanted to use cotton yarn and actually "undid" a washcloth I had started but didn't finish quite a while ago.  I think it worked out okay.  My finished "center circle" isn't a perfect circle, but maybe it will look better when I make another one.  Once it is wet I probably won't be able to tell it doesn't have a "perfect center circle".  (I really need to work on this problem I have with perfectionism.)

Anyway I have lots of pictures but it shows how to make what I am calling a "sunburst" 14-point washcloth. I should add that I finished it in an evening....I think I can do it in a couple of hours when I am not having to stop to take pictures.

Here is the pattern as Simply Notable presented it:

# 8 knitting needles (U.S.) ((I used #9 needles))

Cast on 14 stitches and knit across

1.  Knit 4, yarn over, knit, leaving 2 stitches and knit back

2.  Knit 4, yarn over, knit, leaving 4 stitches and knit back

3.  Knit 4, yarn over, knit, leaving 6 stitches and knit back

4   Knit 4, yarn over, knit, leaving 8 stitches and knit back

Cast off 4 and knit to end (should be 14 stitches on needle)

Repeat for 14 points

Leave enough yarn to sew sides together and go around circle and draw circle together.  Tie ends in a double knot.


****You have to include the initial "knit across" after casting on the 14 stitches here in the repeat so that you will be back on the right side for the next point.  Her numbers 1 - 4 was confusing for me as that implied the pattern to me. In my pattern I made it row 11 to better follow the pattern. See below with my pictures.

Here is my tutorial.  Hopefully it will help if you are like me and need a little bit more directions.  I have included my directions beside the pictures.  If you have any questions, please ask.  I will get back to you as soon as possible.


"SUNBURST" - 14 - POINT KNITTED WASHCLOTH PATTERN


Cast on 14 stitches


Row 1 - Knit across the 14 stitches 


Row 2 - Knit 4, then yarn over (bring yarn from back over front of right needle and then insert the right needle into next stitch on left needle to knit)


Knit the next 8 stitches, leaving the last two stitches on the left needle (end of row 2)


Row 3 - Turn, bringing the yarn to the back for knitting


Knit across to finish Row 3 - now 15 stitches


Row 4 - Knit 4, yarn over, knit across leaving the last 4 stitches on the left needle.


Row 5 - Turn, move the yarn to the back and knit across the row - now 16 stitches.


Row 6 - Knit 4, yarn over, knit across leaving the last 6 stitches on the left needle.


Row 7 - Turn, moving the yarn to the back to knit


Knit across - Row 7 is finished with 17 stitches 


Row 8 - Knit 4, yarn over, knit across leaving the last 8 stitches on the left needle


Row 9 - Turn, move yarn to the back to knit across the row - now 18 stitches on the needle


Row 10 - Bind off the first 4 stitches


(you now have 14 stitches on the two needles)


Knit across to end - Row 10 finished


***Row 11 - Knit across.  First point finished.  (She doesn't include this row but it puts you back on the right side.)


Row 12... - Repeat Rows 2 thru 11 thirteen more times to make 14 points. 


(Third point finished)


and fourth point finished (You get the idea)


Fourteen points finished.


To finish the washcloth....


-cut the end of the yarn...for the desired length, measure 4 times the length of the 14 (bound) stitches for weaving the ends


- tie the two ends together in a double knot to make a closed circle


- thread a tapestry needle with the cut yarn and insert the needle in the (cast on) stitch on the left


and then the top loop of the (bound) stitch on the right 


all the way down - (the 14 cast-on stitches should match up with the 14 bound stitches)


The other end (from casting on the stitches) can be woven on the wrong side in the same manner.


Totally finished....