I have spent two days this week cleaning the main level of our house. I mean really cleaning. There was a fine layer everywhere from when Sterling sanded the ceiling in the bathroom with the "dustless sander". That tool is definitely misnamed. But the wooden floors look so good now.
While I was moving furniture all around to mop the floors, I replaced one skinny shelf unit I had in the dining room with a bigger one. (I really need a place to put all those cookbooks I buy at estate sales.) Anyway while filling it up, I found a file of recipes from back in the 80s when I used to cut out recipes "to try later". (Do you have one of those files? I actually have more than one.) Distracted, I took a few minutes to look through a few of the recipes and found a "booklet" with 7 Great Ways to Make It Chocolate! with Hershey's Recipe Sampler.
I really wanted to make the Hot Fudge Pudding Cake, but decided to make the Chocolate-Cherry Squares instead. It called for red candied cherries and I had bought some around Christmas to make my mother's Fruitcake Cookies (that never got made...but I digress). Since I also had all of the other ingredients needed for recipe, I decided to make them to serve when friends came over yesterday afternoon to play canasta.
Friend Sharon said they were the best (dessert) I had ever served. I guess she wasn't kidding. After she got home, she called me to say she had gone on my blog but the recipe wasn't there. I told her it would be there tomorrow.
CHOCOLATE-CHERRY SQUARES
1 cup flour
1/3 cup butter or margarine (I did use margarine)
1/2 cup packed light brown sugar (I used 1/4 cup brown sugar blend)
1/2 cup chopped nuts (I used pecans)
Red candied cherries, halved (I had 9 halves as I cut it into 9 squares.
Preheat oven to 350 degrees F.
In a large mixer bowl combine, the flour, butter/margarine, and brown sugar. Blend on low speed to form fine crumbs, about 2 minutes.
TIP! This is the best and fastest way to "cut in" butter or margarine when you want to make a crumb mixture. I didn't soften the margarine at all. If you are using butter, you might want to put it in a bowl in the microwave for 10 seconds first since it is harder. You don't want it melted. It held together so well when it baked, too. So glad I found this recipe.
Stir in the nuts.
Reserve 3/4 cup of the crumb mixture for the topping.
Sprinkle the rest of the mixture in the bottom of a 9 - inch square pan.
Pat the mixture down.
Bake for 10 minutes or until lightly browned.
Meanwhile, prepare the filling:
FILLING
1 package (8 ounces) cream cheese, softened (I used 1/3 less fat cream cheese. It is soft as it is and doesn't require any thing for it to be softened. I think fat free cream cheese would work as you bake the squares.)
1/2 cup sugar (next time I will use 1/4 cup stevia/sugar blend)
1/3 cup cocoa
1/4 cup milk
1 large egg
1/4 teaspoon vanilla extract
1/4 cup chopped red candied cherries
In mixer bowl, combine and cream cheese and sugar and beat until fluffy. (I let mine beat while I meticulously chopped the red candied cherries.)
Add the cocoa, milk, egg, and vanilla; beat until smooth.
Add the cherries.
Spread the filling evening over the warm crust. Making sure the cherries are spread out.
Sprinkle the reserved crumb mixture over the filling.
Garnish with cherry halves. (The recipe says it makes 3 dozen squares and the picture shows a cherry half on each square. If they cut 36 squares they should have called the recipe Chocolate -Cherry Bites because that's all you would get...a bite. The servings for 9 was just perfect.)
Return to oven and bake for 25 more minutes or until lightly browned.
Cool on a wire rack.
Cut into squares.
Store, covered, in refrigerator. ( Since I was making this in the morning for us to eat in the afternoon. I covered the pan with foil and put in the refrigerator until I was ready to serve it. It was about 5 hours in the refrigerator, It was good cold so I would do the same again when I made it.
When I was growing up in southeast Arkansas, we had two television stations we could watch. One of them was KNOE-TV Channel 8 in Monroe, LA which went on the air in September, 1953. Back then it broadcast shows from all of the networks. In the 60s and 70s, Mildred G. Swift hosted a 30 - minute cooking show that aired after the local news. I can remember watching it as a teenager.
When we went back to southeast AR and northeast LA for Thanksgiving, one of the things I did while there visiting with my cousin Carol, a.k.a. Sissy, was go through her mother, my Auntie's things to see if there were things I would like to have. After putting aside some fabrics and quilting books, I almost missed seeing her cookbooks.
One of the first cookbooks I saw was Looking at Cooking and Garden Jobs with Mildred Swift KNOE Home Economist from 1963. I was so excited when she confirmed that she didn't want it and I could have it. Some of the recipes are hers and others are from home economists throughout the U.S. that sent them to her. Some were from viewers. When she could give credit for the recipe, she did.
Mrs. Mae Stone was given credit for this recipe for Banana Nut Bread. My bananas weren't real ripe as the recipe called for, but my result was very good. The only change I made was using 1/2 cup of sugar/stevia blend for the 1 cup of sugar. I did use margarine since the recipe said "butter or margarine". She didn't say how long to cook the loaf, just "bake...until bread shrinks from side of pan."
I made the recipe last week for Sterling when he was here helping me with my unfinished remodeling job. I made one big long loaf. The next time he came back he told me he had toasted and buttered a slice and thought it was good. But his wife Cassie had taken it to her son's wrestling match and that it was dry tasting. I thanked him and told him I wouldn't share it on my blog, if Cassie said it wasn't good.
I think the reason it was dry was that I cooked it too long. I made it again yesterday afternoon and made 3 mini loaves. I cooked them 40 minutes or so (the shiny pans took a couple of extra minutes). I decided to check them with a toothpick in the middle.
I wrapped two of the loaves in foil to freeze (if my husband doesn't want to take them to the Fort), but I cut the other one while it was still warm. I just knew that Mildred Swift would not have included a recipe that wasn't good. And I was right. It was hard not to cut a second slice. I will have to make Sterling another loaf so Cassie can see how good it is.
BANANA NUT BREAD
3 large bananas (very ripe) (a little over 1 cup)
1/2 cup butter or margarine (I did use margarine)
1 cup sugar (I used 1/2 cup stevia/sugar blend)
2 eggs
2 cups flour
pinch of baking soda
2 teaspoons baking powder
1 cup chopped nuts (I used pecans)
Preheat oven to 325 degrees F. Grease 3 mini loaf pans. (I used Pan Grease from an earlier post. Best discovery ever!)
Mash bananas to a pulp.
Cream the butter in a large mixing bowl. (until light and creamy)
Add the sugar to the butter and beat to blend well.
Add the eggs and bananas to the creamed mixture.
Combine the flour, baking soda, and baking powder in a bowl with a whisk.
Add to the mixture. (I added the flour mixture in parts.)
Add the nuts.
Divide batter evenly between the 3 loaf pans.
Bake for 40 minutes or so. Check doneness by inserting a toothpick in the center of the loaf. (If you are making one loaf, I would suggest checking it out after 50 minutes with a toothpick if it is nice and brown and springs back when gently pressed in the center.)
Cool loaves in pans for about 5 minutes before removing.
The downstairs volunteers at Hillcrest Thrift Shop love ice cream, especially the Ice Cream Cake I have made twice already. Will be making it again later this month for Volunteer Ashley's birthday. When I saw a picture in Sunday's Parade magazine in the Kansas City Star, I knew it would be a winner with the volunteers. There was a short caption to go with the picture, but it was easy to figure out what to do.
They had cut the brownies in thirds, but I couldn't see how that was possible. Brownies just aren't that thick. I decided after much thought to just have the top and bottom be brownie and then have the ice cream in the middle. In other words a Homemade Ice Cream Sandwich. That would work great because I could cut them ahead of time and wrap them individually in plastic wrap.
As I said, I thought about not much else on Monday about the best way to make the brownies for it to work. I finally decided to use a brownie mix for a 9 x 13 - inch pan, but cook it in an 8 - inch square pan. As it turned out, even with that, the brownies weren't super thick. But they turned out really cool. And just as I expected, they were a big hit at Hillcrest!
HOMEMADE ICE CREAM SANDWICHES
1 box fudge brownie mix for 9 x 13 - inch pan + ingredients to make them according to box
1 pint your favorite ice cream, slightly softened
Prepare the brownie mix according to box directions and cook in an 8 - inch square pan.
Cool completely on wire rack in pan.
Remove from pan. May need to run a knife around inside edge to loosen the brownies, especially at the corners.
With a sharp knife long enough to cut completely through, slice horizontally about half way. It's okay if it isn't perfectly half way.
With foil tear off a piece long enough to extend up and over a little two opposite sides of the washed pan you baked the brownies in.
Then place the bottom half of the brownies back in the foil lined pan.
Spoon the ice cream and spread it evenly over the brownie half.
Place the top half of the brownies on top of the ice cream and press it down.
Place pan in the freezer and refreeze the ice cream. (I did this the night before.)
When ready to cut, lift the "sandwiches" out of the pan with the aid of the foil extended over the two sides. Pull the foil away from the "sandwiches".
Using the same sharp knife used to slice the brownies into two layers, cut the "sandwiches" into strips as wide as you like. Then cut across the center. The knife I used is in the top of the picture.
Wrap each sandwich with plastic wrap and then place them in a ziplock freezer bag to enjoy whenever you like.
Keep frozen until ready to eat. No need to let them thaw before eating.
After eating one bite, my husband said, "This is one of the best dishes you have made. You make this in a bigger container and I'll quit buying my cereal and eat it every morning."
Do you think he liked it? You know what? I did, too. Besides being the best tasting baked oatmeal dish I have ever made, I love the way you can personalize it to your families "likes".
I did make it again yesterday morning in a larger container and made it "lighter" for my husband. The recipe is below. I spooned out the rest from the pan and broke it up into granola-like cereal. Storing it in a plastic container, I placed it in the refrigerator for him to enjoy again this morning. He likes to add Greek yogurt to it. (That's what he does when he eats cereal.)
If you want to enjoy it warm, just heat your serving in the microwave for 20 - 30 seconds on High, depending on your microwave. Taste like it just came out of the oven!
BAKED OATMEAL GRANOLA
1 large egg
1/4 cup canola oil
2 tablespoons + 2 teaspoons packed brown sugar
1-1/2 cup old-fashioned oats
1-1/2 teaspoons baking powder
1/2 teaspoon salt
1/2 teaspoon ground cinnamon
2 tablespoons finely shredded unsweetened coconut*
2 tablespoons chopped dates*
1 tablespoon mini chocolate chips*
Preheat oven to 350 degrees F. Spray a 1 - quart size baking dish with nonstick cooking spray.
In a large bowl, combine the egg, oil, and brown sugar. Beat with a whisk until well mixed.
In another bowl, combine the oats, baking powder, salt, and cinnamon with a whisk.
Add oat mixture to egg mixture and stir just until moistened.
Stir in coconut, dates, and chips.
Spoon in baking dish
and bake, uncovered, for 20 minutes or until edges are golden brown.
Serve warm alone, or with milk
or yogurt.
Makes 3 generous servings. Double the recipe for more servings. Bake in a baking dish around 9 x 9 - inches or slightly larger. 9 x 13 - inch pan is a little too large.
*Feel free to add equivalent amounts of your favorite "add-ins" such as raisins, craisins, dried apricots or other dried fruit....even nuts if you like.
"LIGHTER" BAKED OATMEAL GRANOLA
1/2 cup liquid egg substitute
1/4 cup unsweetened applesauce
1/4 cup canola oil
3 tablespoon brown sugar blend
3 cups old fashioned oats
3 teaspoon baking powder
1 teaspoon salt
1 teaspoon ground cinnamon
1/3 cup unsweetened coconut
1/3 cup dried fruit (I like chopped dates the best)
2 tablespoon mini chocolate chips
Prepare same as above recipe but bake in a 9 - 1/2 - inch Corning Ware dish (if you have it) for 20 minutes.
I made this Festive Cran-Orange Cake yesterday before the Super Bowl came on television for my husband to take to the tax office at Fort Leavenworth. Because of the snow we started getting Saturday night and the temperature continuing to drop throughout the day and night last night, it looked like they wouldn't be enjoying it until tomorrow. BUT the road behind our house appears clear. So if my husband can get the ice off the windshield of the truck and get out of our neighborhood, he will be going in to "work" today. I know they will enjoy it.
I was attracted to the recipe in Anne Byrn's cookbook, the Cake mix Doctor..., because of the cookies Cranberry Orange Crispies I made recently. I just love the combined tastes of cranberries and orange in baked goods. The fact that it was a Bundt cake also was perfect for "serving" at the tax office.
After chopping the dried cranberries, I was surprised when I cut a slice not to see cranberries throughout the piece. Then I realized it was because the "crust" was full of them. You can see them in the picture below. Since I wasn't sure why Anne included 1/4 cup of sugar in the cake, I decided to use 1/4 cup of stevia instead.
The cake was heavenly! It will be hard not enjoying another piece later this afternoon.
FESTIVE CRAN-ORANGE CAKE
1 pkg. yellow cake mix with pudding in the mix
1 cup orange juice (I used a 10 - oz bottle of orange juice)
1/2 cup canola oil
1/4 cup sugar (I used 1/4 cup stevia)
4 large eggs
1 cup chopped sweetened dried cranberries
Preheat oven to 350 degrees F. Grease and flour a tube pan. (See tip below.)
Combine the cake mix, orange juice, oil, sugar, and eggs in a large mixing bowl for 1 minute on low. Scrape the sides of the bowl with a spatula.
Increase the speed to medium and beat batter for 2 more minutes.
Fold in the cranberries.
Pour the batter in the pan.
Bake for 45 - 47 minutes until cake is golden brown and the sides are just starting to pull away from the sides of the pan.
Remove the cake from the oven and place on wire rack to cool for 20 minutes.
If necessary, run a knife around the edge of the cake to loosen it before removing it from the pan to continue cooling for 30 more minutes.
Meanwhile, prepare the ....
ORANGE GLAZE
1 cup of powdered sugar, sifted
3 tablespoons orange juice (the rest of the 10 - oz bottle of orange juice)
1 teaspoon Valencia orange peel
Combine the powdered sugar and orange juice in a small mixing bowl with a wooden spoon until smooth.
Add the orange peel.
Place cake on serving plate and spoon the glaze over the cake so that it drips down the sides and into the center.
Store the cake under a glass cake cover or covered in plastic wrap at room temperature for up to a week. Also freezes well wrapped in aluminum foil.
TIP ALERT!!
Anne Byrn shared this recipe from Cindy Young of Cincinnati who tested recipes for Duncan Hines for many years. It was used by the test kitchen cooks to "swab the multitude of pans they use for baking cakes".
So many recipes instruct you to grease and then flour the pans to make the recipe. I decided to give it a try and it worked great!
PAN GREASE
2 cups vegetable shortening
1 cup flour
Combine the two ingredients in a large mixing bowl and stir with a spoon or beat with an electric mixer. (I used the wooden spoon and it worked perfectly.)
Wipe pan with a small amount using a pastry brush or a sheet of paper towel. I used the latter.
I folded the paper towel into a smaller piece and spooned about 1 tablespoon of the mixture on it.
I ran the paper around the bottom of the tube pan. Then I simply rubber the towel up the sides of the pan until it was covered.
Store in a covered container at room temperature for up to 6 months. I used a plastic container I had washed and labeled the lid with the current date and the date from 6 months.

 In a large mixer bowl combine, the flour, butter/margarine, and brown sugar. Blend on low speed to form fine crumbs, about 2 minutes.
  TIP! This is the best and fastest way to "cut in" butter or margarine when you want to make a crumb mixture. I didn't soften the margarine at all. If you are using butter, you might want to put it in a bowl in the microwave for 10 seconds first since it is harder. You don't want it melted. It held together so well when it baked, too. So glad I found this recipe.
 Reserve 3/4 cup of the crumb mixture for the topping.
 Sprinkle the rest of the mixture in the bottom of a 9 - inch square pan.
 Pat the mixture down.
 Bake for 10 minutes or until lightly browned.
 In mixer bowl, combine and cream cheese and sugar and beat until fluffy. (I let mine beat while I meticulously chopped the red candied cherries.)
 Add the cocoa, milk, egg, and vanilla; beat until smooth.
 Spread the filling evening over the warm crust. Making sure the cherries are spread out.
 Sprinkle the reserved crumb mixture over the filling.
 Garnish with cherry halves. (The recipe says it makes 3 dozen squares and the picture shows a cherry half on each square. If they cut 36 squares they should have called the recipe Chocolate -Cherry Bites because that's all you would get...a bite. The servings for 9 was just perfect.)
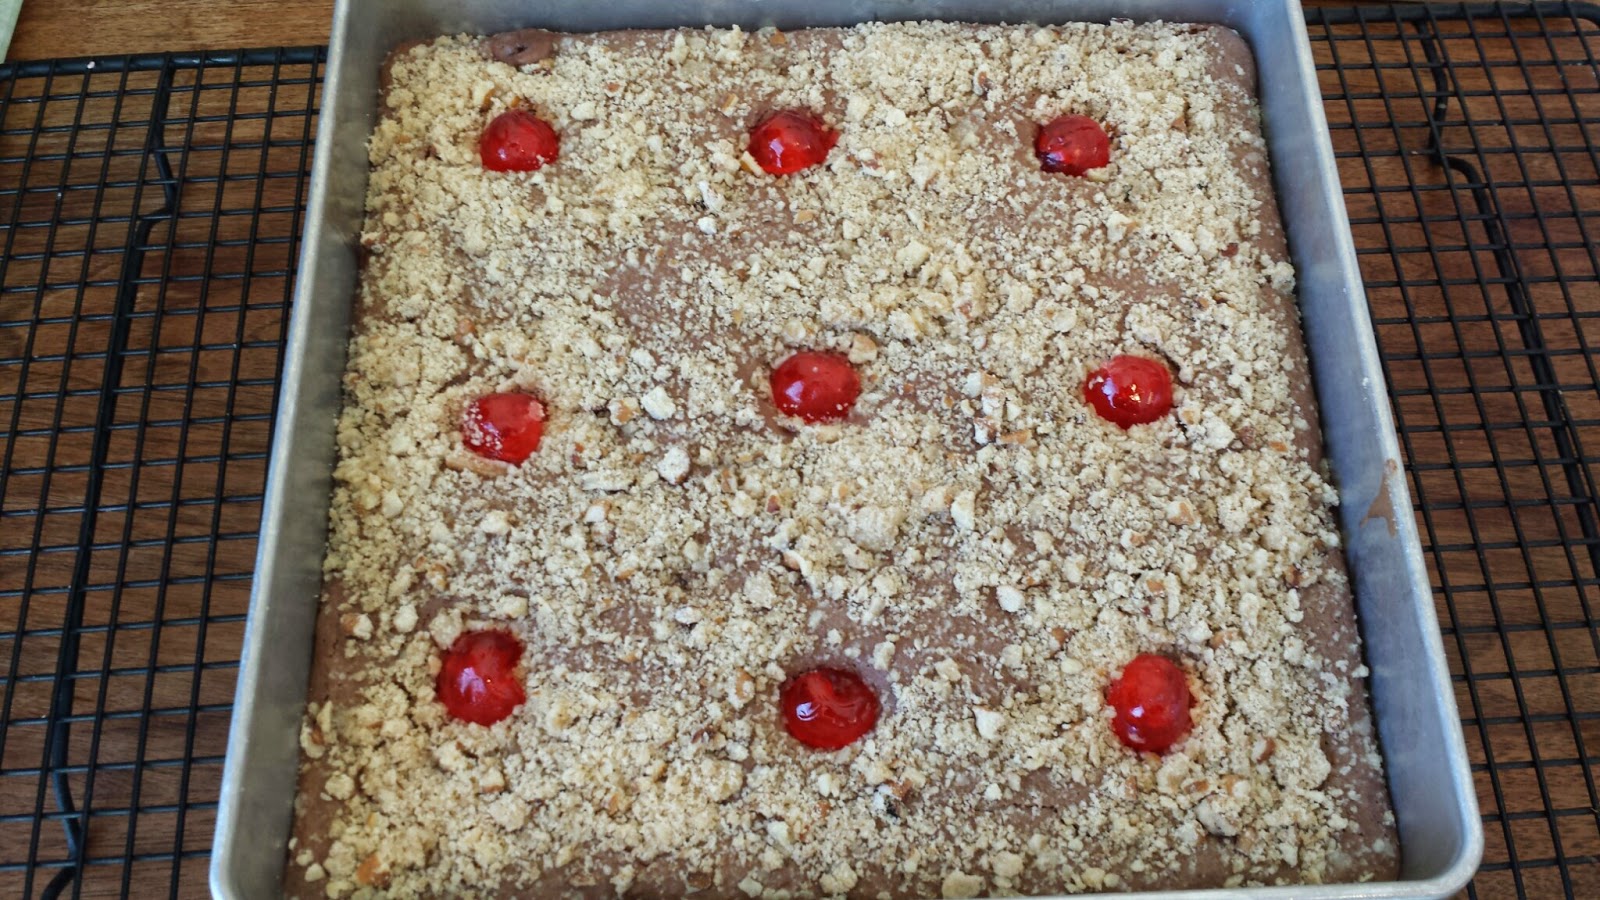 Return to oven and bake for 25 more minutes or until lightly browned.
 Cut into squares.


