Monday, May 23, 2022

BANANA DREAM CAKE

After having such great result with my last effort in the kitchen make the Slow Cooker Chicken Extraordinaire, I thought I would make something sweet since it has been so long. We really did enjoy the chicken dish and it made enough for us to enjoy three meals from it. (RECIPE)

Now for a dessert. One with not too much sugar added but we wouldn't feel guilty eating it for a while.

I had four bananas that were getting ripe and needed to be used or frozen so that's where I first started looking -- recipes using bananas. I didn't want to make a quick bread. And I didn't really want to make muffins. So that just left cake or pie. I saw a recipe for a banana and something pie, but I don't really like bananas in pies. I almost decided to make a banana pudding, but the bananas were more ripe than I like to eat them and you really taste the bananas in banana pudding. 

Beside my glider on the (enclosed) back porch was a thin family cookbook collection from a dear friend Linda who played handbells on my right in our handbell choir. There was no index in the back so that meant I had to find the categories. 

It didn't take me long to find this recipe for Banana Dream Cake. I loved the story that went along with the cake. "Carolyn Shelton - When my brother-in-law was stationed with the Marines in Vietnam, I sent him this cake along with a can of ready to spread frosting. When the package arrived, him and his buddies didn't take time to frost the cake. They quickly devoured it then passed the can of frosting around."

Anytime I see a recipe that uses a yellow or white cake mix, I get excited because I know I can use a sugar-free yellow cake mix. The Dream Whip only has 2 grams of added sugar and I can use unsweetened coconut. The bananas will have natural sugar. Carolyn's Banana Dream Cake was definitely going to be my first attempt in quite a while for making something "sweet" to eat. She sprinkled the top with powdered sugar and even though that wouldn't have added much sugar, I decided not to do that. That is what I usually do instead of icing a cake to reduce the sugar though.

As with all of my recipe that I share with reduced sugar, you don't have to use sugar-free products or sugar substitutes as I do. But I know that are a lot of people who do have to watch their intake of sugar that read my blog.

PRINTABLE COPY OF JUST THE RECIPE


BANANA DREAM CAKE

1     pkg white or yellow cake mix (I used a sugar-free yellow cake mix)

1       envelope Dream Whip

4       eggs

1       cup mashed bananas (2 large ones)

1       cup flaked coconut (I used unsweetened coconut)

3/4    Tablespoon water

1/2     teaspoon vanilla


Preheat oven to 350 degrees F. Grease and flour a 10" tube pan. Set aside.


Mix all ingredients in a large mixing bowl and

blend until all ingredients are moist.

Beat mixture for 4 minutes.

Scrape the sides of the bowl.

Pour batter into  pan.

Bake for 40 to 45 minutes.

Cool in pan for 15 minutes on a wire rack.

Turn out cake on a cake rack or plate to finish cooling. May sprinkle with powdered sugar, if like.

Delicious served with fresh fruit and a scoop of ice cream if you choose.


Wednesday, May 18, 2022

SLOW COOKER CHICKEN EXTRAORDINAIRE

 Believe me or not, but I actually made time to cook this week. It didn't take me too long because I used my slow cooker. Because of the 30-Block Exchange Group I joined the last of February, most of my time since then has been spent in my sewing room. But for the most part I am finished with that. I have one more block that I the pieces for but haven't made yet. I also have a couple of blocks I still need to write tutorials for. And then of course when I receive my 28 blocks I will want to start on my Friendship Quilt with them.

I have also started another home improvement project that was planned for last summer but didn't happen. I am painting the walls downstairs in the family room, a.k.a. Wayne's man cave. Then nailing up some ship lap with a chair railing for the lower part. The room is so dark because it is partials below ground level and with what I have gotten done so far, it already looks brighter. Anxious to get it finished, but I am not rushing. I plan to write a post on the work as I go along so you can be looking for it.

But today I am sharing an awesome recipe for cooking chicken in the slow cooker that I made Monday afternoon. I had good intentions to start it Monday morning, but something got in the way. That's the good thing about cooking in your slow cooker. If I don't have enough time to cook, I just cook it on High instead of Low and that's what I did.

The recipe said to cook on Low for 8 hours. Instead I cooked it for 4 hours on High. I started out with the chicken breasts frozen and they were pull-apart tender 4 hours later. I used regular spaghetti that I cooked on the stove, but I think it would taste good also if you used rice, brown rice in particular. The recipe cooked enough for us to have full-serving leftovers so if you are cooking for four, it will be perfect and you wanted used two chicken breasts. How cool is that?

For a printable copy of just the recipe, click HERE.


SLOW COOKER CHICKEN EXTRAODINAIRE

2       chicken breasts

3       cloves of garlic, chopped or left whole

10.5  ounce can of cream of chicken soup

3/4    cup of chicken broth

1/4    cup (2 ounces) cream cheese

1/4    cup butter

1       0.6 ounce package of Italian dressing mix

 *     *     *     *

Spaghetti or rice


Spray the inside of the slow cooker with non-stick cooking spray.


Place the chicken breasts in the bottom of the cooker. They can be frozen or thawed. (I used frozen ones.)

Top with the garlic. I peeled and kept mine whole


Soften the butter and cream cheese in the microwave. Whisk until smooth. (Best to start with room temperature butter and cream cheese.)


Whisk in the soup, undiluted, and then add the dressing mix. (I used zesty Italian mix.) Then add the chicken broth. (I made my own using 3/4 cup of water and 1 bouillon cube in the glass measuring cup and heat to boiling in the microwave. Then stir to dissolve the bouillon cube. Whisk mixture well. 


Pour over the chicken breasts. 


Cover and cook on Low for 8 hours or High for 4 hours. Reduce temperature to Keep Warm if you are not ready to eat.


Prepare spaghetti or rice according to package directions.


I cubed the cooked chicken and since it was just the two of us eating,

I used as much of the chicken as I wanted to and added it along with some of the "gravy" to the spaghetti to serve it.

I also sprinkled a little parsley on top.

The leftover chicken, I added back to the slow cooker with a little bit of extra spaghetti I had and covering it, placed in the refrigerator to eat another day.


It was quite tasty and was so easy, I think it will probably become a regular way to cook chicken since we eat so much.


Here is a teaser for the upcoming post of our remodeling project downstairs. (I love those overalls. I have had them for many years. They fit so nicely. Whatever possessed me to use them as my painting attire? 


Friday, May 6, 2022

APPLE SPICE MUFFINS

 I have been so busy writing tutorials for the different blocks I made for the 30-Exchange Quilt Block Group that I have let my recipes on the side. The only problems is if I wait too long, I can't find the cookbook or recipe. BUT the good news is I did find the recipe for these delicious Apple Spice Muffins that I made for Wayne's friend (and mine) on his birthday. They just happened to be playing golf that afternoon so while I was making some quick biscuits for breakfast, Wayne asked me if I could make some cupcakes or muffins that he could take to the group. 

Since my time was limited I had to find something quick and also solicited Wayne's help. He ended up chopping the apple and pecans for me. I was taking the second pan out of the oven when he said he needed to go. 

Get a Printable copy of just the recipe HERE.


APPLE SPICE MUFFINS

1       package plain spice cake mix (no pudding included)

1-1/3 cups buttermilk

1/2    cup oil

 3      large eggs

1       teaspoon maple flavoring

1       cup finely chopped apple (peeled)

1/4    cup packed light brown sugar

1/4    cup finely chopped pecans

1/2    teaspoon ground cinnamon


Place a rack in the center of the oven and preheat oven to 375 degrees F. Lightly spray 22 cupcake cups with nonstick cooking spray and set the pans aside.


Place the cake mix, buttermilk, oil, eggs, and maple flavoring in a large mixing bowl and

stir with a wooden spoon until the eggs or beaten and the ingredients are just incorporated. Set the batter aside.


Place the apple in a small bowl along with the brown sugar, pecans, and the cinnamon. Stir to combine.


Spoon or scoop two tablespoons of batter into the prepared cupcake pan. A tablespoon scoop works great for this.


Then place a heaping teaspoon of the apple mixture

on top of the batter in the cups.

Repeat with 2 more scoopfuls of batter on top.

Top with another heaping teaspoon of the apple mixture. 


Place the pan in the oven and bake the muffins until the tops spring back when lightly pressed with a finger, 20 to 25 minutes. Remove the pan from the oven and place it on a wire rack to cool for 5 minutes.

Run a dinner knife around the edge of the muffins and lift them carefully from the pan using the end of the knife, and

place them on the wire rack to finish cooling.


I had just enough extra batter and apple mixture to make a single layer mini bundt muffin for the birthday boy.


Store the muffins in a cake saver or under a glass dome, at room temperature for up to three days. You can also freeze the muffins for up to 3 months. I placed some on a small cookie sheet and quick froze them in the freezer. Then I placed them in a ziplock bag to enjoy later. Let the muffins thaw overnight on the counter before serving.

Wednesday, May 4, 2022

BLOCK 28: GRANDMOTHER'S CHOICE BLOCK


The way the 30 - Block Exchange Group works that I am a member of is there are thirty people in the group and each person makes 30 blocks. They can be the same block or different ones. I chose to make thirty different blocks. We were given three months to make the blocks and then a month to get them mailed out. One block is not mailed out as it is your 30th block. 

This block was intended to be my kept block. I have always wanted to make a black and white quilt with a little splash of red. I have been gathering different prints for several years now. This block contains some of those prints. Don't ask me how I did it, but somehow I miscounted my blocks. One thing that caused some confusion with me was when someone dropped out and then a week or so ago, we realized another person had dropped out, I think. I'm still confused. 

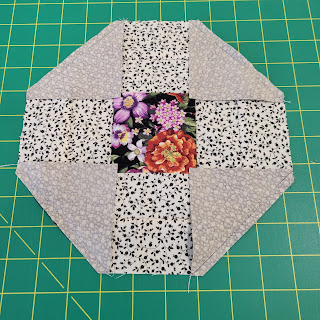
Anyway, I thought I was finishing with my Scrappy Log Cabin Heart block, but last night I rechecked my records and realized I had not sent one of one of the ladies. Her block was so beautiful that she sent me, I decided I had to send her my saved one. It looks different, but really isn't. Besides I have more of the prints, so I can make myself another one. I hope she likes it as much as I do.


HOW TO MAKE GRANDMOTHER'S CHOICE BLOCK

(using a 1/4" seam with four prints)

CHOOSE a focal print, a light background print with a darker design, and two different prints with the darker color in the light print  - one slightly darker than the other one

From the background print

CUT   four (4) - 2" x 3.5" rectangles 

          two (2) - 2" x 6.5" rectangles

          two (2) - 2" x 9" rectangles

          four (4) - 2" x 9.5" squares 

From the focal print

CUT  one (1) - 3.5" square (fussy cut)

         four (4) - 2" squares (fussy cut)

From the medium print 

CUT four (4)  -  2" squares

From the other medium print

CUT  four (4) - 3.5" squares

CUT  four (4) - 2" squares (I fussy cut them from the focal print) 


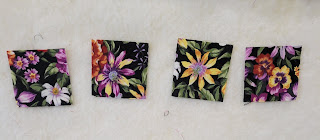
The four fussy cut 2" squares for the outer corners.


First arrange the center 9 - patch on the design wall. 

SEW the center together as you would a 9-Patch. (If you have questions, ask below in the comment section.)


PRESS the seams as pictured here basically toward the darker print for the rows. Then I pressed the rows toward the center row.

SQUARE the center section to 6.5". TRIM off any excess.

Back on the design wall with the first row of borders. Start with the side borders.

Then sew the top and bottom ones on. You might be able to see in the picture that after sewing the side borders on, the right side looks a little short

so I decided to check the width of the center section before sewing the top and bottom borders on.

Don't let the picture confuse you, this is the center section; I just turned it on my cutting board so I could cut it better.

The wrong side to show the pressing. I usually PRESS toward the added strip. That seems to be the way the seam wants to lay.


Back on the design wall with the next added pieces.

DRAW diagonal lines on the wrong side of each 3.5" square from the second medium print, a little darker overall than the other medium print.

I realized the finished portion needed to be SQUARED UP and TRIMmed to 9.5" so I did that first and

then placed the squares over the corners on the portion as pictured. SEW with only one on at a time to make sure you have the square exactly over the corner. 


Then TRIM the outer portion of the corners 1/4" from the sewed line

and

PRESS toward the darker print.

Now for the last border and start with the side borders first (9.5" rectangles). PRESS toward the added strip.


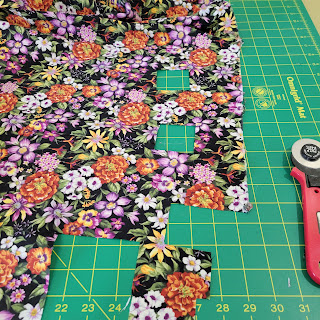
Earlier I said I fussy cut the squares from the focal print. If you are not familiar with fussy cutting, this is what your fabric make look like after you have cut the squares. It wasn't easy to find a complete flower since the square was only 2".

On the design wall to see the best arrangement for the corner squares.
You will SEW the corner stones on the ends of the top and bottom rectangles. This time though PRESS the seam toward the rectangle so you can "nest" the seams when you SEW them to the block.


PRESS seams toward the outer border.

The last thing to do is to SQUARE the block to 12.5" and TRIM off any excess.

The finished block.


OTHER BLOCK PATTERNS YOU MIGHT BE INTERESTED IN:

Block #31 Log Cabin Quilt Block

Block #1 Disappearing Nine-Patch Quilt Block

Block #2 Woven Ribbon

Block #3 Blue Skies

Block #4 Time in the Garden

Block #5 Double Pinwheel

Block #6 Patience Corners

Block #7 Janice's Tulip

Block #8 Sadie's Paddle Wheel

BLOCK #9  MORNING HAS BROKEN

Block # 10 HEATHER'S PENNSYLVANIA

BLOCK # 11 FAMILY REUNION

BLOCK #12 SUZETTE'S INDIANA PUZZLE

BLOCK #13 OH SUSANNA

BLOCK #14 YANKEE PUZZLE

BLOCK #15 SARA'S CHOICE

BLOCK #16 A STROLL THROUGH THE FLOWER GARDEN

BLOCK #17 SEW-SAW BLOCK

BLOCK #18 ASSORTED TAFFY

BLOCK #19 SUNFLOWER STAR

BLOCK #20 RIGHT HAND OF FRIENDSHIP

BLOCK #21 PEACE