Thursday, December 29, 2016

TRUSTY APPLE DESSERT

Gracia Schlabach said this dessert is delicious with ice cream. That is certainly true....especially the Salted Caramel Craze variety.

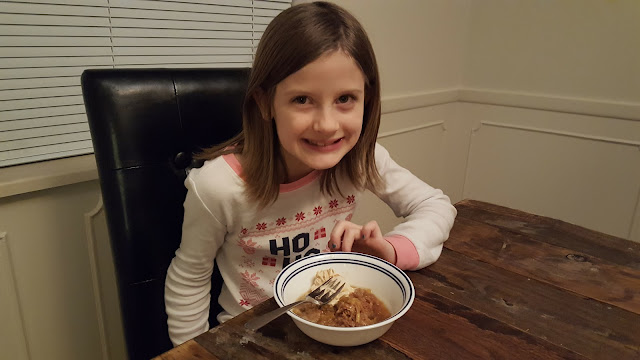
I didn't think that I would be making this dessert with my two granddaughters, Hallie and Sadie, for our early celebration of Sadie's birthday, but that is just what I did.

The recipe is in Kevin Williams' book Amish Cooks Across America. Kevin from Amish365.com and I collaborated earlier this year when his second daughter was born. He asked me to prepare a week of posts of Amish recipes that he could post daily and have some bonding time with the new addition to the family. As a thank you, he sent me a copy of his book. It is full of recipes from Amish settlements all across America. What is also interesting is the narrative he tells about these settlements - how they differ and how they are alike. I was totally absorbed reading it. I would highly recommend the book if you are interested in learning more about the Amish and having a variety of their recipes.

I took a picture of the page before we left home to come have our Christmas with our older son and his family in CO in hopes that I would have time to make it while there.  What I didn't do is take note of what area of the country Gloria lives in. (I will go back and add that information after we get back home.)

My dil Sara didn't have a 9 x 9 - inch square baking dish so we used an 8 x 8 - inch one. That made the "cake" portion thicker than it was probably supposed to be. 


TRUSTY APPLE DESSERT

2         medium-size apples (Red Delicious or Gala), peeled and shredded
1          cup sugar
2         tablespoons butter, softened
2         cups all-purpose flour
1          cup milk
2         rounded teaspoons baking powder
1          tablespoon ground cinnamon
1          teaspoon vanilla extract
pinch of salt

SYRUP

1-1/2   cups firmly packed brown sugar
1-1/2   cups water
2         tablespoons butter, melted
1          tablespoon imitation maple flavoring

Preheat oven to 350 degrees F.

Place the shredded apples in the bottom of a 9 x 9 - inch baking pan. (Whatever variety of apple we used, it turned brown fairly quickly, but it didn't affect the taste.)

Combine the sugar, butter, flour, milk, baking powder, cinnamon, vanilla, and salt in a large mixing bowl. Mix until smooth and well combined.

Pour the dough mixture on top of the grated apple. (The dough was too thick to "pour". We took two spoons each and dropped spoonful amounts over the apple and then smoothed them out.)

Make the syrup:

In another bowl, combine the brown sugar, water, butter, and maple flavoring. Pour the syrup mixture over the top of the dough.

Bake for 35 to 40 minutes, until bubbly and the center is set.


Allow to cool a little before spooning out to serve.


I can't share this recipe without also sharing pictures of my beautiful granddaughter.

Sadie helped grate the apples.
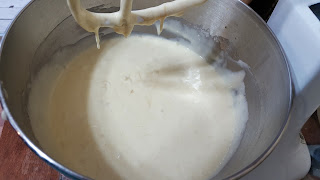
Hallie stirred the "cake" batter.

The almost birthday girl enjoying her dessert.
I almost forgot to take a picture of mine with the ice cream....


Tuesday, December 27, 2016

CREAM CHEESE COOKIES

Friend Janice knows that one thing she can't forget to make for their family Christmas gathering are her Cream Cheese Cookies. While I have personally not been fortunate enough to get to enjoy one, I am sure that they are everything and more than she proclaims.


CREAM CHEESE COOKIES

1/4       cup butter, softened
1           package (8 ounces) cream cheese, softened
1           egg
1/4       teaspoon vanilla
1           package yellow or devils food cake mix

Preheat oven to 375 degrees F.

Cream the butter and cream cheese together til smooth. 

Blend in the egg and vanilla.

Add the dry cake mix, 1/3 at a time, mixing well after each addition. (If you are using a mixer, stir in the last 1/3 addition by hand.)

Cover and chill dough for 30 minutes.

Drop by teaspoonfuls onto ungreased cookie sheet.

Bake for 8 to 10 minutes or until light brown.

Cool slightly on cookie sheet before removing to finish cooling on wire rack.

When totally cool, ice with canned lemon frosting.

Thanks Janice for sharing your picture and the recipe with me. Next time, save me a cookie.

Monday, December 26, 2016

CRANBERRY ORANGE BREAD

This is such a good bread to make and give as gifts. The recipe will make one large loaf or two mini loaves. I mentioned to my friend Janice that I was making them and her comment was, "You can't go wrong with cranberries and orange."  You know -- she is right.

I found the recipe in a 1972 The ideals Family Cookbook.


CRANBERRY ORANGE BREAD

2       cups flour
1        cup sugar (I did use 1/2 cup of stevia/sugar blend)
1-1/2 teaspoons baking powder
1/2    teaspoon salt
1        egg, beaten
2       tablespoons shortening
1        teaspoon grated orange rind (I always use McCormack's Valencia Orange Peel)
3/4   cup orange juice
1        cup fresh cranberries, cut in halves

Preheat oven to 350 degrees F. Grease or spray a large loaf pan or 2 mini loaf pans.

Measure the flour and blend with the sugar, baking powder, and salt using a whisk.

Mix in the shortening using your fingers or pastry cutter.

Add egg, orange juice, and peel. Stir til all ingredients are wet.

Fold in cranberries.

If using the two mini loaves, divide the batter evenly between the two pans.

Bake one hour for the single loaf or 45 minutes for mini loaves. Check doneness with a toothpick inserted in the center of the loaf.

Cool on wire rack about 10 minutes. Remove from pan and continue cooling. Wrap in foil to keep moist.


I made two loaves in a decorated mini loaf pan and gave as presents in the pan. AND I made two loaves to keep for ourselves. A slice is perfect with my yogurt in the morning for breakfast.


Wednesday, December 21, 2016

BUTTER PECAN BANANA CAKE

Our Friends' Couples Bridge group was scheduled to meet last Friday night at Friend Linda and Mitch's house. I had offered to bring a dessert instead of an appetizer. (surprise, surprise)

I had seen this cake in one of my Name Brand Cookbooks and kept going back to it. I thought it would be a cake everyone would like. I had to buy the butter cake mix and the homestyle frosting because I don't normally buy specialty cake mixes and frosting. I also had to buy some more pecans because I didn't have enough to put 1 cup in the cake and then another cup in the frosting.

Normally on Friday Friend Janice and I go to estate sales and lunch. She and her husband were having their family Christmas back in their hometown over the weekend and she needed to do some last minute shopping before they went so that gave me plenty of time to get the cake made that morning.

I should say that we were forecasted to get 1-3 inches of snow during the day and it was extremely cold. But I got the cake made and frosted and then about an hour and a half before we were suppose to leave, Linda called and said they were postponing due to the weather. Mitch had gone out and said the roads were getting slick and several couple who live north of Kansas City said it was really bad at their houses. I certainly understood and part of me wasn't surprised, but all I could think of was I had this huge cake and we didn't need to eat it all. 

Fortunately for me, Jeff came over the next afternoon returning dishes I had used for "treats" I had given him and his roommates to enjoy. I jumped up and asked him he he would like some cake. He said, "Sure!" So guess where half of the cake went. 

My husband has been enjoying it. In fact, he told me it was one of the best cakes I had ever made. He assured me that everything I make is really good, but this cake was one of his favorites. (It's one of mine also.) 


BUTTER PECAN BANANA CAKE

Cake:

1       package Duncan Hines Moist Deluxe Butter Recipe Golden Cake mix (I used a yellow cake to have the 18.25 oz cake mix. See UPDATE below!)
4      eggs
1       cup mashed ripe banana (about 2 large or 3 medium)
3/4   cup oil
1/2    cup sugar
1/4    cup milk
1        teaspoon vanilla (I used 1 teaspoon butter flavoring since I used a yellow cake mix)
1        cup chopped pecans

Frosting:

1        cup coarsely chopped pecans
1/4    cup butter
1        container (16 ounces) Duncan Hines Creamy Homestyle Vanilla Frosting

Preheat oven to 325 degrees F. Grease and flour a 10 - inch Bundt or tube pan.

For Cake:


Combine the cake mix, eggs, bananas, oil. sugar, milk, and vanilla in large mixing bowl. Beat at low speed with electric mixer until moistened. Beat at medium speed for 2 minutes.


Stir in 1 cup chopped pecans.
Pour into pan.

Bake for 50 to 60 minutes or until toothpick inserted in center comes out clean. Cool in pan 25 minutes. 


Invert onto cooling rack. Cool completely. Place on serving plate.


For Frosting:


Place 1 cup pecans and butter in skillet.
Cook on medium heat, stirring until pecans are toasted.
(Be carefully as they will suddenly turn brown.)
Stir into frosting.
Cool
until spreading consistency.
Frost cake.


UPDATE!!!
This recipe was in my Favorite Brand Name Bake Sale Cookbook. The recipe called for Duncan Hines Moist Deluxe Butter Recipe Golden Cake Mix. The problem I ran into was that Duncan Hines is now making their cake mixes the smaller 16.5 oz size. I was a little concerned as to how or if the cake would turn out since it was a smaller size. I made the cake and it didn't rise right in the middle. I let it cool and then cut a piece before I frosted it and it looked and tasted okay. 

Today I made the cake again as we are having a make-up for our cancelled evening tonight. Today though the cake didn't turn out well. I guess I needed to cook it longer. I went to a different grocery store to see if they had the original DH deluxe cake mix and they didn't. They didn't have one cake mix by DH that was the 18.25. What they did have though was their store brand of a yellow cake mix that was 18.25 oz. I decided to get it and just substituted imitation butter flavoring for the vanilla flavoring. It worked perfectly. I have removed pictures of the first cake I made and have included pictures of the second cake I made today. (BTW, my husband is going to eat the first cake I made today. He just thought I should take something else tonight to share.)

Tuesday, December 20, 2016

CROCHET CANDY CANE STOCKING

When I decorated our Christmas tree the other day, I didn't have any small candy canes to place in each of the crochet candy cane stockings that my mother made years ago. They are so cute and different. 

I have never seen a pattern for these but it was fairly easy for me to figure out a pattern just by looking at the ones Mother had made. I used to have some variegated yarn that was red and green that I wanted to use but I couldn't find it. I think it would make cute ones. Instead I just decided to use some red, green, and white yarns like two of the ones Mother had made. She made one just from green yarn and bound it in red. 

At first I thought it was just a granny square but when I finished making the square, it didn't look right when I folded it in half. Then I noticed my mistake. Redoing the round with the white yarn, it worked perfectly. I am so excited! I think I will make one for each of my grandchildren. Hopefully they will keep them and just add another candy cane next year. They can hang it on the tree and then enjoy the candy cane on Christmas.


Instructions for the Candy Cane Stocking

With color 1

Make a slip knot . Chain (ch) 4.

Create a ring - (insert hook in first chain closest to slip knot and pull the yarn through making a slip stitch (sl st)

Round 1: Ch 3 (counts as the first dc), 2 dc in ring, ch 2, 3 dc in ring, ch 2, 3 dc in ring, ch 2, 3 dc in ring, ch 2. You should have 4 sets of 3 dc clusters.

Join to first set by inserting needle in top chain of the ch 3 and sl st forming first round. Cut the yarn leaving a couple of inches and then pull through stitch and tighten to a knot.


Round 2: With color 2, you can start the second round in any of the ch 2 spaces from the first round. Insert needle in space and bring color 2 yarn and make a sl st. (This stitch counts as your first ch in the ch 3)

(Make a corner) Ch 3 (counts as the first dc), 2 dc in ring, chain 2, 3 dc in same space (You will need to slide the dcs over to make room for all 6 dc in each space), Ch 2 and continue in each Ch 2 spaces from the first round with 3 dc, Ch 2, 3 dc making the corners. When you have 8 sets or 4 corners made, join together with a sl st in top chain of the Ch 3. Cut yarn leaving several inches.


Round 3: With color 3:

You can begin round 3 in any of the ch 2  spaces. (I started in the "side" left of the side you ended round 2 in the picture below. You can also start in the corner just left of where you tied off round 2.) As with Round 2, you will connect Color 3 and ch 3, 2 dc to form first set. (This forms the "side" for Round 3 in this example.) ch 2 and then make a corner with 3 dc, ch 2, 3 dc.,  ch 2, 3 dc, ch 2. In the ch 2 space that you ended with in round 2, make 11 dc. (You will need to slide the dc to make room for all 11.) ch 2, 3 dc, ch 2, 3 dc in next ch 2 space to form another corner and then ch 2. (You should now be on the opposite side from the side you began this round.) 3 dc in this Ch 2 space from Round 2. (Picture below.


Ch 2 and then form the next corner. (3 dc, ch 2, 3 dc) ( Remember you always have a Ch 2 between each set of 3 dc.) ch 2. You should be back where you started this round. sl st to join the first ch 3, tie off and cut yarn leaving a couple of inches tail.


(Round 1 has 4 sets of 3 dc, Round 2 has 8 sets.)

If you are changing colors with each round, you can catch the end when you make the 3 dc or work the tail in later. The picture of the back side shows how I "caught" the end/tail each time. Then just cut off the extra yarn.


 You are now ready to fold the piece in half with the 11 dc on the bottom to form the "toe" of the boot. Match all of the stitches together.


Using color 1 you will "sew" the sides and bottom together leaving the top side open. When you fold the piece in half you should have 5 dc on each side forming the toe with 1 dc forming the end. 


I came in from the inside on the left side of that middle stitch and then came back around the other side of it. (In my picture the end of the hook looks like it is further down, but you want to match up the stitches on each side as you work your way around.)


When you get around to the top of the stocking, ch 8


You can bring the hook back down into the last worked stitch and sc it to connect. 


Tie it off, cut a tail, and weave it into the edging. Cut off excess.


I ended up making 6 for my 6 grandchildren and added the candy cane.


Here is one of the stockings my mother made that I have hanging on my Christmas tree.


I found the candy canes at a Dollar Tree store. The package of 12 looks like the package you can buy in other stores. The great thing about theirs is they are slightly shorter making them the perfect size for the stocking.

You can also use the stocking to leave $$ for your special ones.