Showing posts with label Holidays. Show all posts

Thursday, March 27, 2025

MINT CHOCOLATE CHIP COOKIES

When Cafe Treats Baker Mary dropped off her cookies Sunday at PWUMC and I removed the lid on the plastic container, I was hit with the strong scent of mint! I also saw these delicious looking green cookies full of chocolate chips! I couldn't wait to fill a tray and put them out to offer to our patrons, either.

Later Friend Adam came up and asked me if I had the recipe for them. He wanted to make them for his husband Michael because Michael loved mint. I told him as soon as I got it, I would share it.

Imagine my surprise when I asked Mary to send me the recipe to share and saw it. I figured it was an involved recipe with ten or more ingredients. So seeing the base was a pouch of sugar cookie mix took me completely by surprise. How easy can you get?

I can't wait to make these myself! I only have to buy the creme de mint chips, but that will be easy to do. If you don't have them, just use 2 cups of regular chocolate chips and maybe add another drop or two of the mint extract.

Let me know how yours turn out.


PRINT RECIPE.

MINT CHOCOLATE CHIP COOKIES

1     pouch (17.5 oz) sugar cookie mix

1/2  cup (1 stick) butter, softened

1/4  teaspoon peppermint extract

1     egg

8     drops of green food color

1     cup creme de menthe baking chips

1     cup semi-sweet chocolate chips

Preheat the oven to 350 degrees F. Line cookie sheets with parchment paper. Set aside.

In a large mixing bowl, stir the dry cookie mix, butter, mint extract, egg, and food coloring until a soft dough forms.

Stir in the creme de menthe baking chips and the chocolate chips.

Using a small cookie scoop, drop onto the prepared cookie sheet, placing 2 inches apart.

Bake for 10 minutes or until set.

Cool 3 minutes on the cookie sheet, then transfer to a wire rack.

Serve warm or cool completely.

Store tightly covered at room temperature.


Thursday, March 13, 2025

SIRAPSKAKOR (SWEDISH SYRUP COOKIES)

 You think this cookie is going to taste like a plain sugar cookie, but it doesn't. I couldn't really decide what it tasted like until I looked at the recipe and saw the different ingredient. Molasses. 

The molasses definitely lets you know it is not a "plain" sugar cookie. It was different and I really liked it. Thanks to Cafe Treats Baker Dorene again for this unique cookie. 


PRINT RECIPE.

SIRAPSKAKOR (SWEDISH SYRUP COOKIES)

2-1/2   cups flour

2          teaspoons baking soda

1           cup sugar

1/2       cup (1 stick) + 6 tablespoons butter (cut into tablespoons)

2          teaspoons molasses

Preheat the oven to 350 degrees F. Lightly grease or line with parchment paper two cookie sheets. Set aside.

Sift together the flour and baking soda. Set aside.

Using a mixer on medium speed, cream together the sugar, butter, and molasses. Scrape the sides of the bowl as needed.

Slowly add the flour mixture on a lower speed until all is blended.

Roll the dough 1/8 " thick on a lightly floured surface.

Tradition calls for the dough to be cut into strips 1-1/4 " by 3-1/2 ", but you can cut them into round shapes or special shapes using cookie cutters.

Place on cookie sheets. The cookies do not spread when baking so you can place them close together.

Bake until light brown, about 10 minutes. 

Remove to cool on racks.


Thursday, February 27, 2025

BRENDA'S DROP SUGAR COOKIES

 What a beautiful week so far! It is so warm (mid 50s to 60) that it didn't take long for the snow to melt everywhere. The car wash places are making a killing this week. I had about 10 cars ahead of me when I got it washed yesterday. I had planned to do it on Sunday but the lines were so long it would have taken me quite a while to finally get up to the building. 

But my car is clean now and I am even out with Friend Janice today. I think this is our first outing this year. There were no estate sales in the Northland so we are heading 21 miles in the Southland to the nearest one.

I also got my new glasses yesterday - the first in three years at least and am dealing with getting them properly adjusted to fit comfortably. Fun to look at a different person in the mirror.

Today I am sharing another recipe from the Cafe Treats that I especially enjoy. It is for a sugar cookie but one that doesn't have to be rolled out. The dough is dropped and then pressed down with a glass, etc. Baker Brenda makes good cookies for us and they are always well received at the "Cafe". She dropped the scoops of dough into a bowl of red sugar to make them festive for the month.

PRINT RECIPE.


SUGAR COOKIES

2     sticks of butter or margarine, softened

1      cup white sugar

1      cup powdered sugar

1      cup oil

2     eggs

4     cups + 4 tablespoons flour

1      teaspoon cream of tartar

1      teaspoon baking soda

1      teaspoon vanilla

Preheat the oven to 375 degrees F. Line the cookie sheets with parchment paper. Set aside.

Cream together the butter, sugars and oil.

Add the eggs, one at a time beating well.

Combine the dry ingredients in a bowl and then add to the wet mixture, mixing well to blend.

Drop by a tablespoon measure (cookie scoop works well) onto cookie sheet and press down with a sugared glass bottom. (You can roll the scoop in decorative sugar if you like for the occasion first if you like and then place them on the cookie sheet to flatten.)

Bake 10 to 12 minutes. Cool slightly on pan before removing to a wire rack to cool completely.

These cookies freeze very nicely.


Monday, December 23, 2024

CANDY STRIPE COOKIES


Candy Stripe Cookies! So adorable and so delicious! What can I say? Want to impress everyone? They would never guess how easy these are to make and you won't give your secret away either.

These are another awesome treat that Cafe Treats Baker Dorene made for the Sunday before Christmas. I have to say that really fast. It is so hard to believe Christmas is only a couple of days away. Where has the month gone?

We have already celebrated with our CO son and his family for Christmas and also with our MO son and his family. We will still attend church on Christmas Eve with our MO family and then just the two of us for the 11 pm Candlelight service later that night.

I guess I am getting used to it and have learned that you can celebrate anything anytime you want to, but it would be fun though to be able to have a Christmas like I had growing up when the whole family - maternal aunts and uncles and their kids got together on Christmas Day at Grandma and Granddaddy's house. My paternal grandparents were divorced and lived out of state so I didn't see them very often.  My paternal granddaddy died when I was eleven. My mother's family was very close.


PRINT RECIPE.

CANDY STRIPE COOKIES

1/2     cup (1 stick) unsalted butter at room temperature

1/2     cup butter-flavored shortening

1-1/2  cup sugar

1         large egg

2        tablespoons milk

1         teaspoon vanilla

3        cups flour

1/4     teaspoon baking soda

1/2     teaspoon salt

1/2     teaspoon mint/peppermint extract

red food coloring (or green would be pretty also)

In a large mixing bowl, cream the butter, shortening, and sugar until light and fluffy.

Beat in the egg, milk, and vanilla.

Combine the flour, baking soda and salt and then add to creamed mixture. Stir just until combined.

Divide the dough in half. Flavor one half of the dough with 1/2 teaspoon the mint or peppermint extract and tint with the red food coloring.

Line a loaf pan with waxed paper.

Divide each portion in half.

Press one of the red tinted portions in the bottom of the pan.

Top with one of the white portions and then the other red tinted portion. Finally press the other white portion on top. 

Cover and refrigerate for 1 hour or until thoroughly chilled.

Preheat the oven to 350 degrees F.

Invert the pan and remove the waxed paper. Cut the dough in half lengthwise. Cut each half in 1/4 - inch slices; place slices 2 inches apart on an ungreased cookie sheet.

Bake for 10 to 12  minutes or until edges begin to brown.

Cool on a wire rack.


Whatever holiday you might be celebrating, I hope it is a blessing for you and that 2025 blesses you also.


Thursday, July 4, 2024

RED/WHITE/BLUE/GOLD STAR CUT-OUT SUGAR COOKIES

I don't remember the last time I made cut-out cookies. I guess I just have settled into drop cookies because they are so easy to make since I bought the tablespoon sized cookie scoop. I really need to make the effort. I will put that on my to-do list.

Cafe Treats Baker Dorene must love to make cut-out cookies because she has made them several times for us for the church's Cafe Treats and by different recipes each time.

This time she went festive for the 4th of July and made these cut-out stars. She sprinkled sugar sprinkles on them and it melted making it look like she had iced them. Cute.


PRINT RECIPE.


RED/WHITE/BLUE/GOLD STAR CUT-OUT SUGAR COOKIES

3     cups flour

3/4  teaspoon salt

1     cup (2 sticks) unsalted butter, softened

1     cup sugar

1     egg, beaten

1     tablespoon milk

powdered sugar for rolling out dough

Sift together the flour, baking powder, and salt. Set aside.

Place butter and sugar in a large bowl and beat until light in color with an electric mixer.

Add egg and milk and beat to combine.

Put mixer on low speed and gradually add the flour mixture and beat until mixture pulls away from the side of the bowl.

Divide the dough in half, wrap in waxed paper, and refrigerate for 2 hours.

Preheat the oven to 375 degrees F.

Sprinkle work surface with powdered sugar. Remove 1 wrapped pack of dough from the refrigerator at a time. Sprinkle a rolling pin with powdered sugar, and roll the dough out to 1/4 inch thick.(Make sure the dough is not sticking to your work surface.)

Cut with desired shape and place the cut cookie at least 1 inch apart on a greased cookie sheet or parchment lined cookie sheet.

Bake for 7 to 9 minutes or until cookies or just beginning to turn brown around the edges. Rotate the cookie sheet half way thru the baking time.

Let the cookies sit on the cookie sheet for 2 minutes before removing them to a wire rack to finish cooling.

Serve as is or decorate as desired. (Dorene just sprinkled the cookies with sugar sprinkled.)


Thursday, December 21, 2023

JEAN'S CREAM CHEESE COOKIES

 Friend Jean made these delightful Cream Cheese Cookies for the Cafe Treats last Sunday. I had my new festive paper plates that I had bought to show off the treats and started by placing the cookies around the inside edges. They fit perfectly and I noticed they looked so pretty on the plate as they rounded the Christmas Tree. I just decided to leave it that way. It just meant I had to keep replenishing them as they were quickly selected by people as they visited the Cafe.

I added Jean's personal notes at the end of the recipe. You still have time to add them to your holiday baking list, you know.


PRINT RECIPE.

CREAM CHEESE COOKIES

1/2     cup (1 stick) butter at room temperature

4        oz. cream cheese at room temperature

1        cup sugar

1        egg

2        teaspoons vanilla

1/2     teaspoon baking powder

1-3/4  cup flour

1/2     teaspoon salt

powdered sugar for dusting

finely chopped peppermint

Cream butter and cream cheese til smooth. Add sugar and beat to blend. Add the egg and vanilla and mix.

Combine the flour, baking powder, and salt and then add in 3 portions to the creamed mixture. Mix well.

Cover the dough and chill for 1 hour.

Preheat the oven to 375 degrees F. Line cookie sheets with parchment paper.  

Roll dough into balls and place on baking sheet. Flatten slightly with your fingers. The cookies will not spread as they bake. (Jean said she used a small cookie scoop but didn't pack it in. The cookies were dainty.)

Bake for 8 to 9 minutes only. Let the bottom slightly brown. Do not overbake! Immediately sprinkle crushed peppermint on top while cookies are still warm. Dust with powdered sugar. Cool on wire rack.

Notes from Jean:

You want to work quickly and sprinkle crushed peppermint on the cookies while they are hot from the oven so it will stick. 

You could also use chopped chocolate chips instead of the peppermint.

You could also add extract flavors such as mint, lemon, coconut, etc as part of the vanilla flavoring.

Jean says the cookies are better if they don't brown too much on the bottom. They seem to be a little more moist.

Tuesday, December 5, 2023

SHARON'S MOM'S BLONDE BROWNIES


We have been in Colorado Springs for an early Christmas with  our older son Jeffrey and his family. It was so good to see them as it has been since January that we saw them. 

Since we were gone over the weekend that meant I wasn't here Sunday for the Cafe Treats at church, but I left everything in good hands with friends, Charlotte and Adam. Adam sent me pictures of everything so I would have a picture to go along the recipes.

Sharon treated everyone with two kinds of brownies... Chocolate ones and her mother's old recipe for Blonde Brownies. She tweaked the recipes to make them festive and Christmassy. I have been told they were really a big hit. I know that they looked yummy in the picture. She doubled her mother's recipe to make more and added red and green M & M's to the batter. She also added some sprinkles to the top of the baked brownies as soon as she took them out of the oven. I love the little white flower or snowflake ones.

The chocolate brownies were made from a dark chocolate brownies box mix and added sprinkles to the top as soon as she took them out of the oven. Sharon also said she added the M & Ms to them also. She said she often adds things to recipes but doesn't measure the ingredients. She just adds until she thinks it looks right. So I have tried to recreate her treat as best as I can.


PRINT RECIPE.

SHARON'S MOM'S BLONDE BROWNIES

1     cup flour

1/2  teaspoon baking powder

1/2  teaspoon salt

1/3  cup margarine

1     cup brown sugar

2     eggs

1     teaspoon vanilla

1/2  cup nuts (optional)

1/2  cup chocolate chips (optional)

sprinkles (optional)

red and green M & M's (optional)

Preheat the oven to 350 degrees F. Grease a 9 " square pan. Set aside. (If you double the recipe, grease a 9 x 13 " pan.)

Melt the margarine; remove from heat and add the sugar and stir until the sugar is dissolved.

Add the eggs and vanilla and beat well.

Add the flour, baking powder, and salt and mix well.

To make the brownies festive, add some red and green M & M's to the batter.

Pour batter into prepared pan and bake for 30 minutes.

Sprinkle some sprinkles on top as soon as you take the brownies from the oven.

Cut into squares to serve.


Monday, February 6, 2023

(ZERO-SUGAR) CHERRY COOKIES

 Since I don't have enough to do, I find myself taking on another responsibility at church. Don't take that the wrong way. I feel I can't do enough for my church. AND since I love baking so much, what's another excuse to bake some more? Right? Right!

This time I'm baking treats for the coffee hour. We have two services - a modern one at 9:30 and a traditional one at 11:00. In the welcoming area between the Worship Center and the Sanctuary is an area with small tables and a bar area for making and serving coffee. Before the Worship Center was built, donuts were offered downstairs in the dining room between services. They were very popular, but was stopped when the Worship Center was opened. Then COVID hit and the church was temporarily closed and we moved to online services for a year.

Move to present-day and coffee is now being served in the "Cafe" area. There are no plans right now to bring back the donuts so I offered to bake some cookies, mini-muffins, etc. I've done it three or four times so far. That means I have another opportunity for more recipes to share with you.

One recipe I always try to make is something sugar-free. Many times the recipe I make wasn't a sugar-free recipe, but I made it one by the ingredients I used. That's the case with this one. The good news is you can make it sugar-free or not. Your choice.

This recipe is another one of those that I like because you have so much freedom with it. You can make the cookies for any special occasion by changing the flavor of the jello. With Valentine's Day coming soon, I chose a red jello. Not as red as I would like, but I didn't want to make a special trip to the grocery store when I had one I could use - the black cherry flavor instead of cherry or strawberry that would have been more red.

Another interesting story when I was making them - I wanted to add something else to the cookies, but wanted to keep them sugar-free. I thought about some unsweetened coconut and asked Wayne what he thought. He said personally he would like the coconut but since so many people don't like the texture or taste of coconut, I should not add it. I knew what he meant and decided to not add the coconut. I made two dozen cookies "plain" and had a little bit more dough so I thought I would add a little the coconut. When I formed the cookies, there wasn't any coconut showing on top so I just sprinkled a little coconut and pressed it down on top. I also picked up the stray pieces so they wouldn't burn on the cookie sheet as the cookies baked. Long story short - - they were the first ones eaten Sunday when I placed them out on the tray. They both tasted really good, but I must admit, I really liked the ones with the coconut. 

PRINT the recipe.


(ZERO-SUGAR) CHERRY COOKIES

1      Sugar-free/Zero sugar cake mix - yellow or white (I used a yellow one)

1      box sugar-free jell-0 (I used black cherry but use any flavor you wish)

1/2   cup oil or melted butter (I used oil)

2      tablespoons water

2      eggs

unsweetened coconut (optional)

Preheat the oven to 350 degrees F.


Combine the cake mix and jell-0 mix together with a whisk.

Add the rest of the  ingredients to a mixing bowl and mix well til combined.

I did use the electric mixer to do this and then scraped the sides of the bowl with my spatula.


Using a small cookie scoop - 1 tablespoon size, drop dough about 2 inches apart on an ungreased cookie sheet.

Bake for 10 to 12 minutes. Cool about 1 minute and remove cookies to cool

completely on a wire rack. 


Note: If you are adding the coconut to the dough,

press a little extra coconut on top of the dough and press lightly into dough. Remove any excess coconut that falls on the cookie sheet.


Store in an air tight container.


Thursday, December 1, 2022

EASY MUFFIN-COOKIE MAGIC

 How many times have you watched a Christmas movie on television when the child reminds his/her mother or daddy that he is supposed to take cookies to school the next day? And s/he does this just before going to bed. Then before the parent goes to bed, you see these beautifully decorated cookies s/he made in no time at all. 

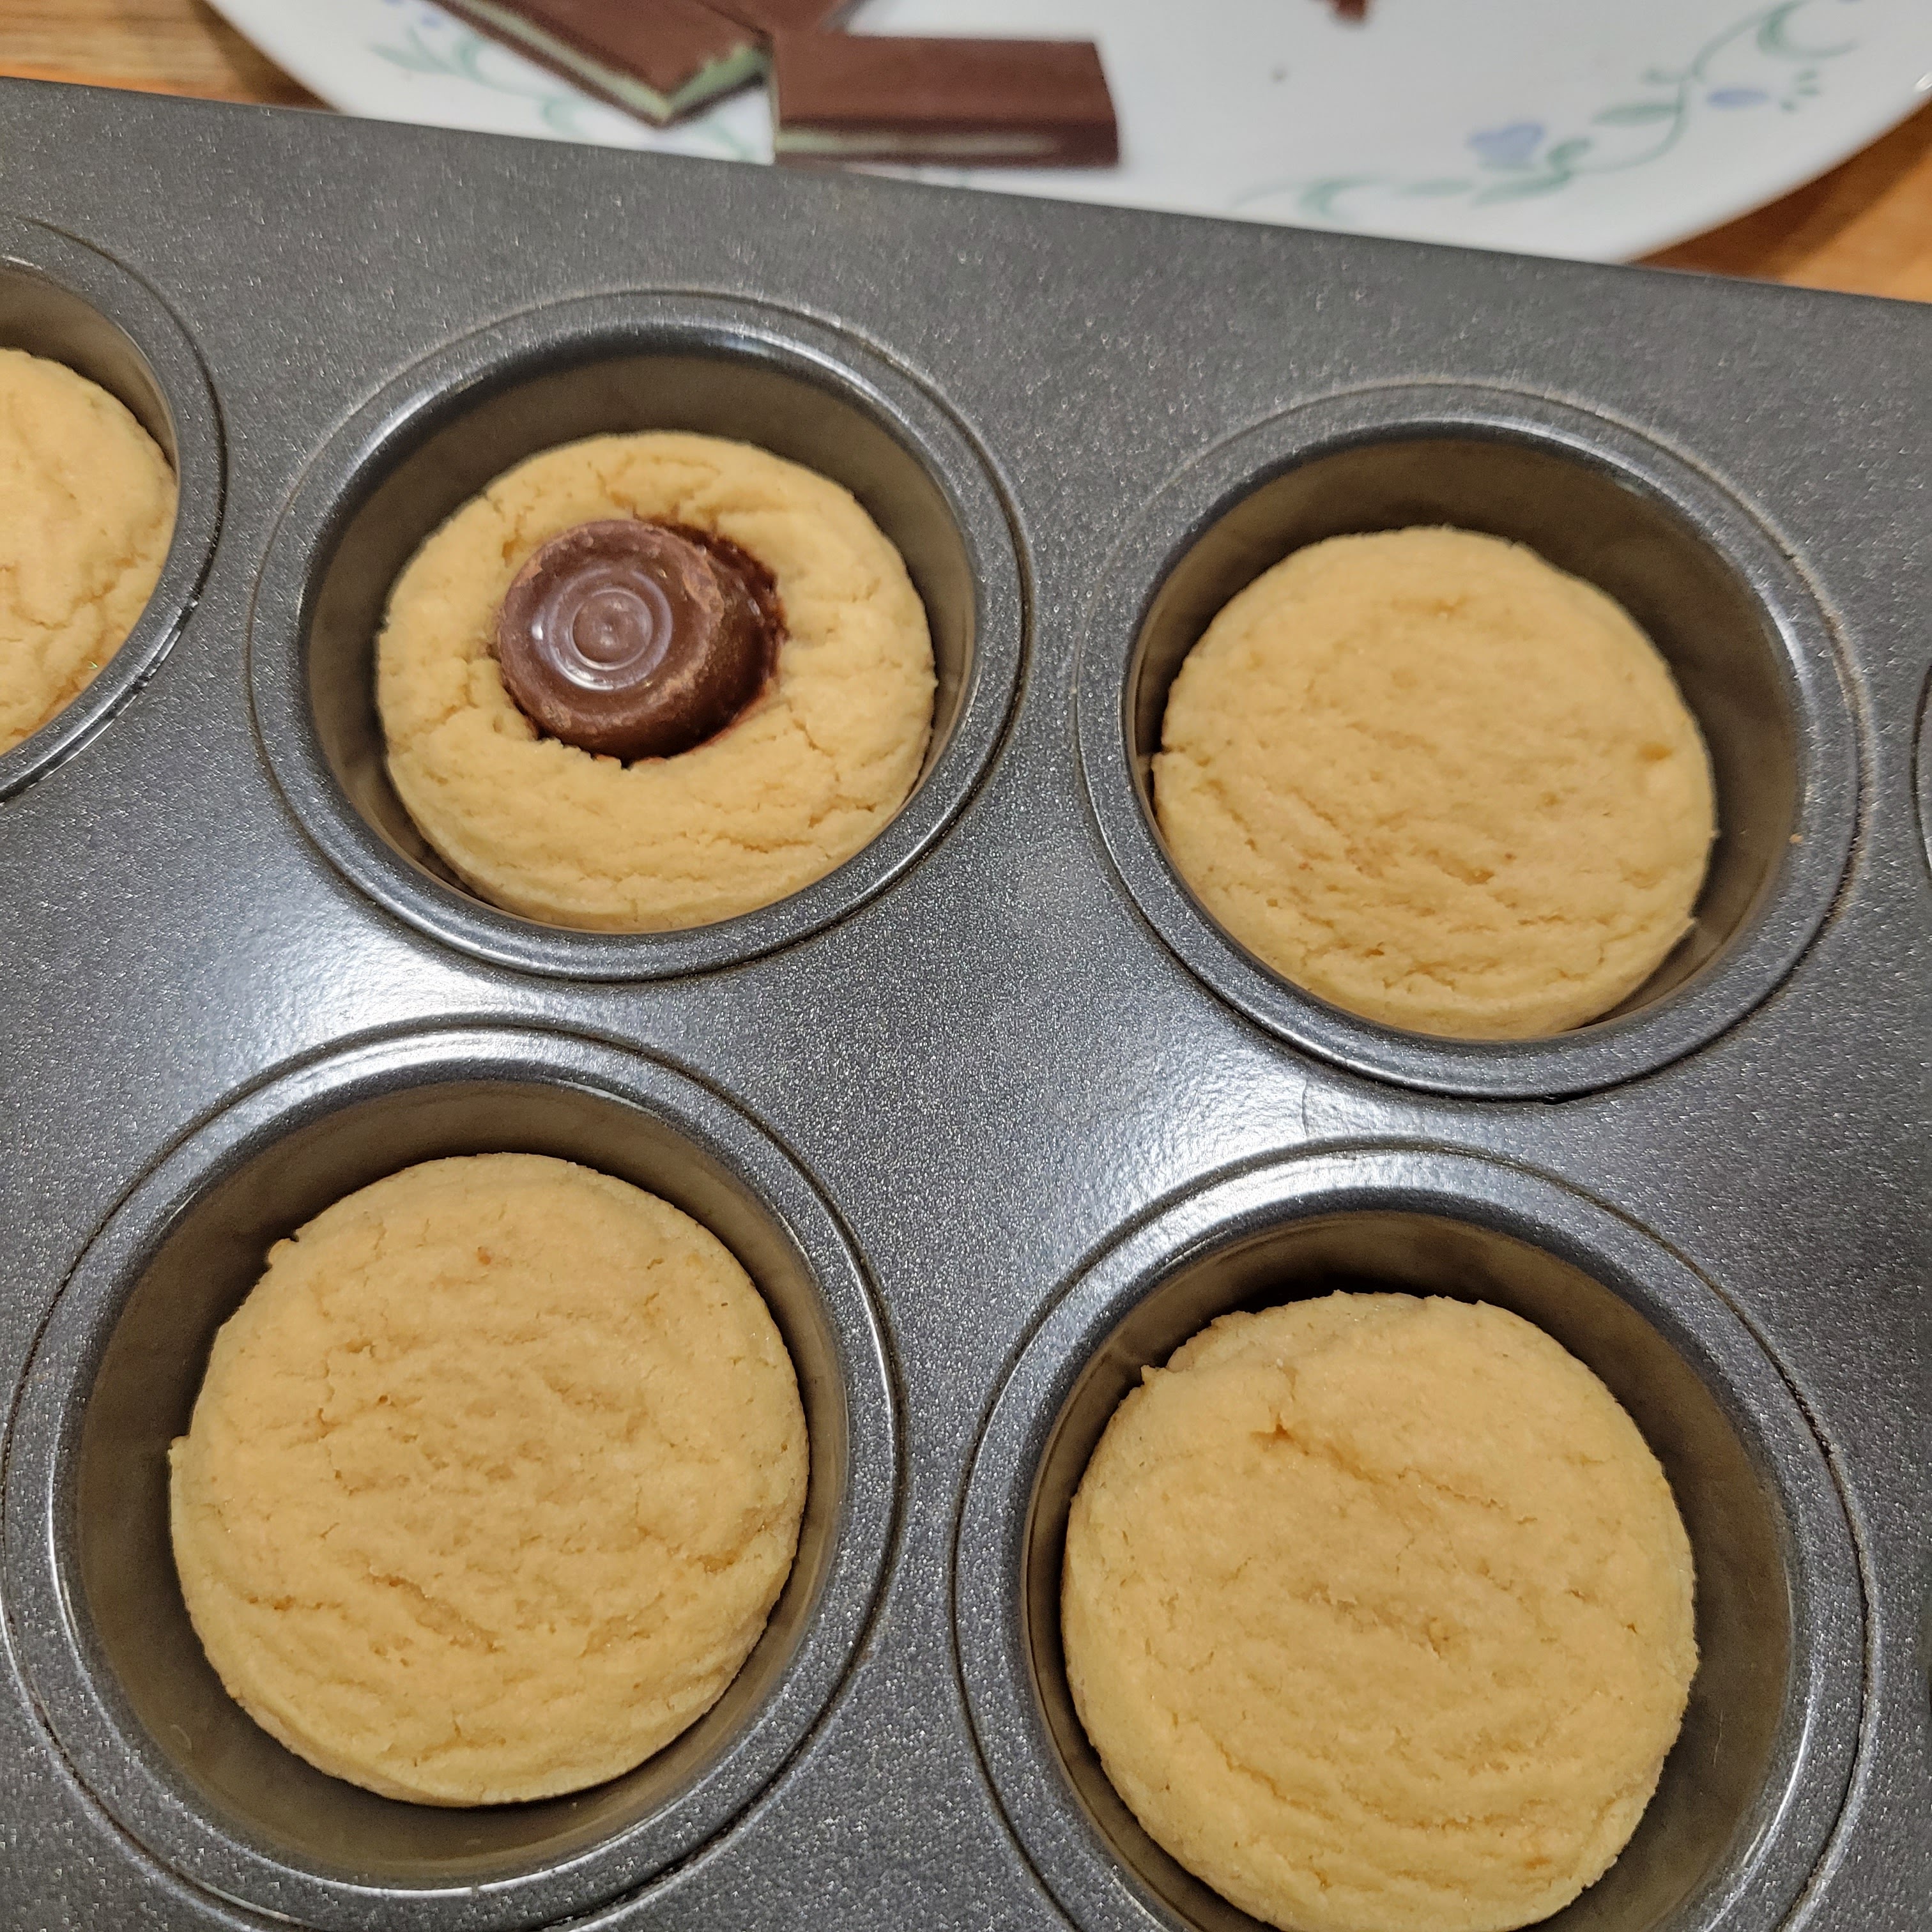
Well, these cookies are actually super easy, look great, and taste great and sure to be enjoyed by every child in the classroom. Even better you could have your child help you make them and then feel some pride in a job well done and most of all joy in doing something with you. It does help to have an assistant when you start pressing the candy in the center of the cookie. (I had my husband help me.)

I made these cookies using a peanut butter cookie mix, but the sugar cookie mix, the chocolate chip cookie mix, even the snickerdoodle cookie mix could be used. You can also use a variety of mini candy treats. I used Rollo and even a few Andes candies when I didn't have enough of the Rollo's and the mini unwrapped peanut butter cups. I was surprised  at the options I found.

PRINT recipe.


EASY MUFFIN-COOKIE MAGIC

1      17.5 package of cookie mix (sugar, peanut butter, chocolate chip, or snickerdoodle)

1       egg

6       tablespoons butter, melted or at room temperature or 1 stick (1/2 cup)

mini unwrapped candy such as Rollo's, peanut butter cups, Andes, etc

Preheat oven to 375 degrees F.


Combine cookie mix, egg, and butter in a large mixing bowl and

beat on low/medium til soft dough forms.


Using a small (1 tablespoon) cookie scoop, scoop dough and place in the center of the mini muffin cups pan (I used a 24 mini-cup pan).


Bake for 10 to 12 minutes or until set and very light golden brown.


Remove pan and place on a wire rack. Immediately press the mini candy in the center of each puffed cookie.

You can press the candy right side up or upside down in the cookie. I did both to see what they would look like.


Allow to cool a few minutes before removing from pan to finish cooling on wire rack.

If you wait too long and the cookies don't want to come out, place in oven at about 250 degrees F for a couple of minutes to reheat slightly. 


I think I like turning the candy upside down. The candy stays farther down in the cookie.


UPDATE:
I made these for the Cafe Treats and made them a little more festive. I used the sugar cookie mix since the Cafe Treats is a nut-free zone. I added 2 tablespoons of sprinkles to the batter and then sprinkled some red sugar over the cookies after we stuck the rollo in the center. They didn't last long.


Wednesday, November 2, 2022

BUTTERSCOTCH PUMPKIN CAKE

UPDATE!! 

Last Thursday as Friend Janice and I were just starting out to estate sales, I received a text from Friend Vicki letting me know she was thinking of me because she was making my Butterscotch Pumpkin Cake for the church friends meeting at her house that night. Vicki was in Hope Circle back when we hosted the district meeting for the United Methodist Women that I write about below. They ended up moving to the Atlanta suburbs a few years later though.
 
A few weeks ago Vicki and her husband Don were visiting some of Don's family nearby and we met together to get caught up on our goings-on. At the time she told me she made several of my recipes from my blog including this recipe. Since I was driving, I had to wait until lunch to text Vicki back.

I told her about the problem I had every time I made the cake with the melted butterscotch cooling into blobs when I tried adding it to the cold mixture. She answered back that she had finally figured out after making the cake the second time to melt the butterscotch chips and immediately add it to the canned pumpkin. (The recipe had said to let the melted chips cool and add it at the end.) Well, I thanked her for her suggestions and told her I would have to make the cake soon. It really is a delicious cake!

So Sunday during church I decided I needed to make a treat that afternoon and bring it to church the next morning for Staff Appreciation Month. I don't usually wait until the last day of the month to "appreciate" them, but October just got away from me.

Well, the first cake I made Sunday afternoon worked out great with Vicki's suggestion, but it stuck to the Bundt pan and I had to make another one after dinner. I ate some of the "stuck" portions so I knew I had to make it again. It was as good as I had remembered and had no butterscotch blobs. I also knew I had to update this post with the corrections because the cake is just too good to pass up. I do hope you will try it. I replaced all of the pictures with new ones, too. I did not use the stevia this time but you definitely could.


October 29, 2014

I cut this recipe from Nestle back in 1999 and put it in my spiral notebook of "to try someday" recipes.  Someday finally came  12 years later. I don't remember why, but according to my notes, I made it 3 times within a week and a half. 

When Hope Circle, the United Methodist Women's unit, at our church had to host the district meeting, I suggested this cake for dessert. We made four of them at the church for the luncheon. 

When I needed something to bake for Hillcrest Thrift Shop on Tuesday, I wanted to make something using pumpkin. As soon as I saw the recipe in my notebook, I knew it was the one to make this time. Since I am always trying to cut calories especially from sugar, I decided to use all stevia for the sugar. I know when I cook with stevia, the result is never as sweet tasting as it would be if I had used the sugar.  But this time I thought it was worth a try since there would be the sweetness from the melted butterscotch chips.  

I wasn't disappointed. I personally thought it was just perfect. Everyone at the thrift shop is always so complimentary so I asked them to tell me honestly if they thought it tasted good.  They agreed with me. I'm always glad when I find a recipe that the substitution works so well.

PRINT recipe only.


BUTTERSCOTCH PUMPKIN CAKE

1         cup butterscotch chips
2         cups all-purpose flour
1-3/4   cups stevia or sugar
1         tablespoon baking powder
1-1/2   teaspoons ground cinnamon
1         teaspoon salt
1/2      teaspoon ground nutmeg
1         cup pure pumpkin (canned)
1/2      cup canola oil
3         large eggs
1         teaspoon vanilla extract
powdered sugar (optional)

Preheat oven to 350 degrees F.  Spray or grease and flour a 12 - cup tube pan. (Make sure you grease and flour good. Vicki said she uses Baker's Joy that includes flour.)


Combine the flour, stevia (sugar), baking powder, cinnamon, salt, and nutmeg in a medium bowl

with a whisk or slotted wooden spoon.


Measure the pumpkin into a medium sized bowl.


Microwave the chips in a microwave-safe bowl on high for 15 seconds. Stir. Repeat this process until chips are almost melted. (3xs for me.) Continue to stir until completely melted and smooth.


Add to the pumpkin.

Whisk until smooth.

Add the oil, eggs, and vanilla;

whisk until smooth and then add to the flour mixture stirring until blended.

Pour into prepared pan. 

Bake about 50 minutes, or until a toothpick comes out clean when inserted in the center of the cake.


Cool in pan on wire rack for 30 minutes.


Invert serving plate over cake and

remove to cool completely.


Sprinkle with powdered sugar. I made a leaf design for the staff's cake.


This is how I made the leaf pattern....


I placed a fake leaf on the cake...


I sifted a little powdered sugar over the leaf...


Lift the leaf.... (I forgot to take a picture of the cake after just doing the first leaf, but c
ontinued four more times being careful not to sift any sugar over the other "leaves".


Serve....