Showing posts with label Blankets of Hope. Show all posts

Sunday, August 10, 2025

PATIENCE CORNERS BLANKET OF HOPE


The first time I made this block pattern I was involved in a group I found on Facebook that contained thirty women who were to make thirty 12.5 inch quilt blocks, one for each member of the group. With the thirty blocks, each person could then make themselves a quilt with blocks from all over North America. You could make the same block if you wished or make different ones. 

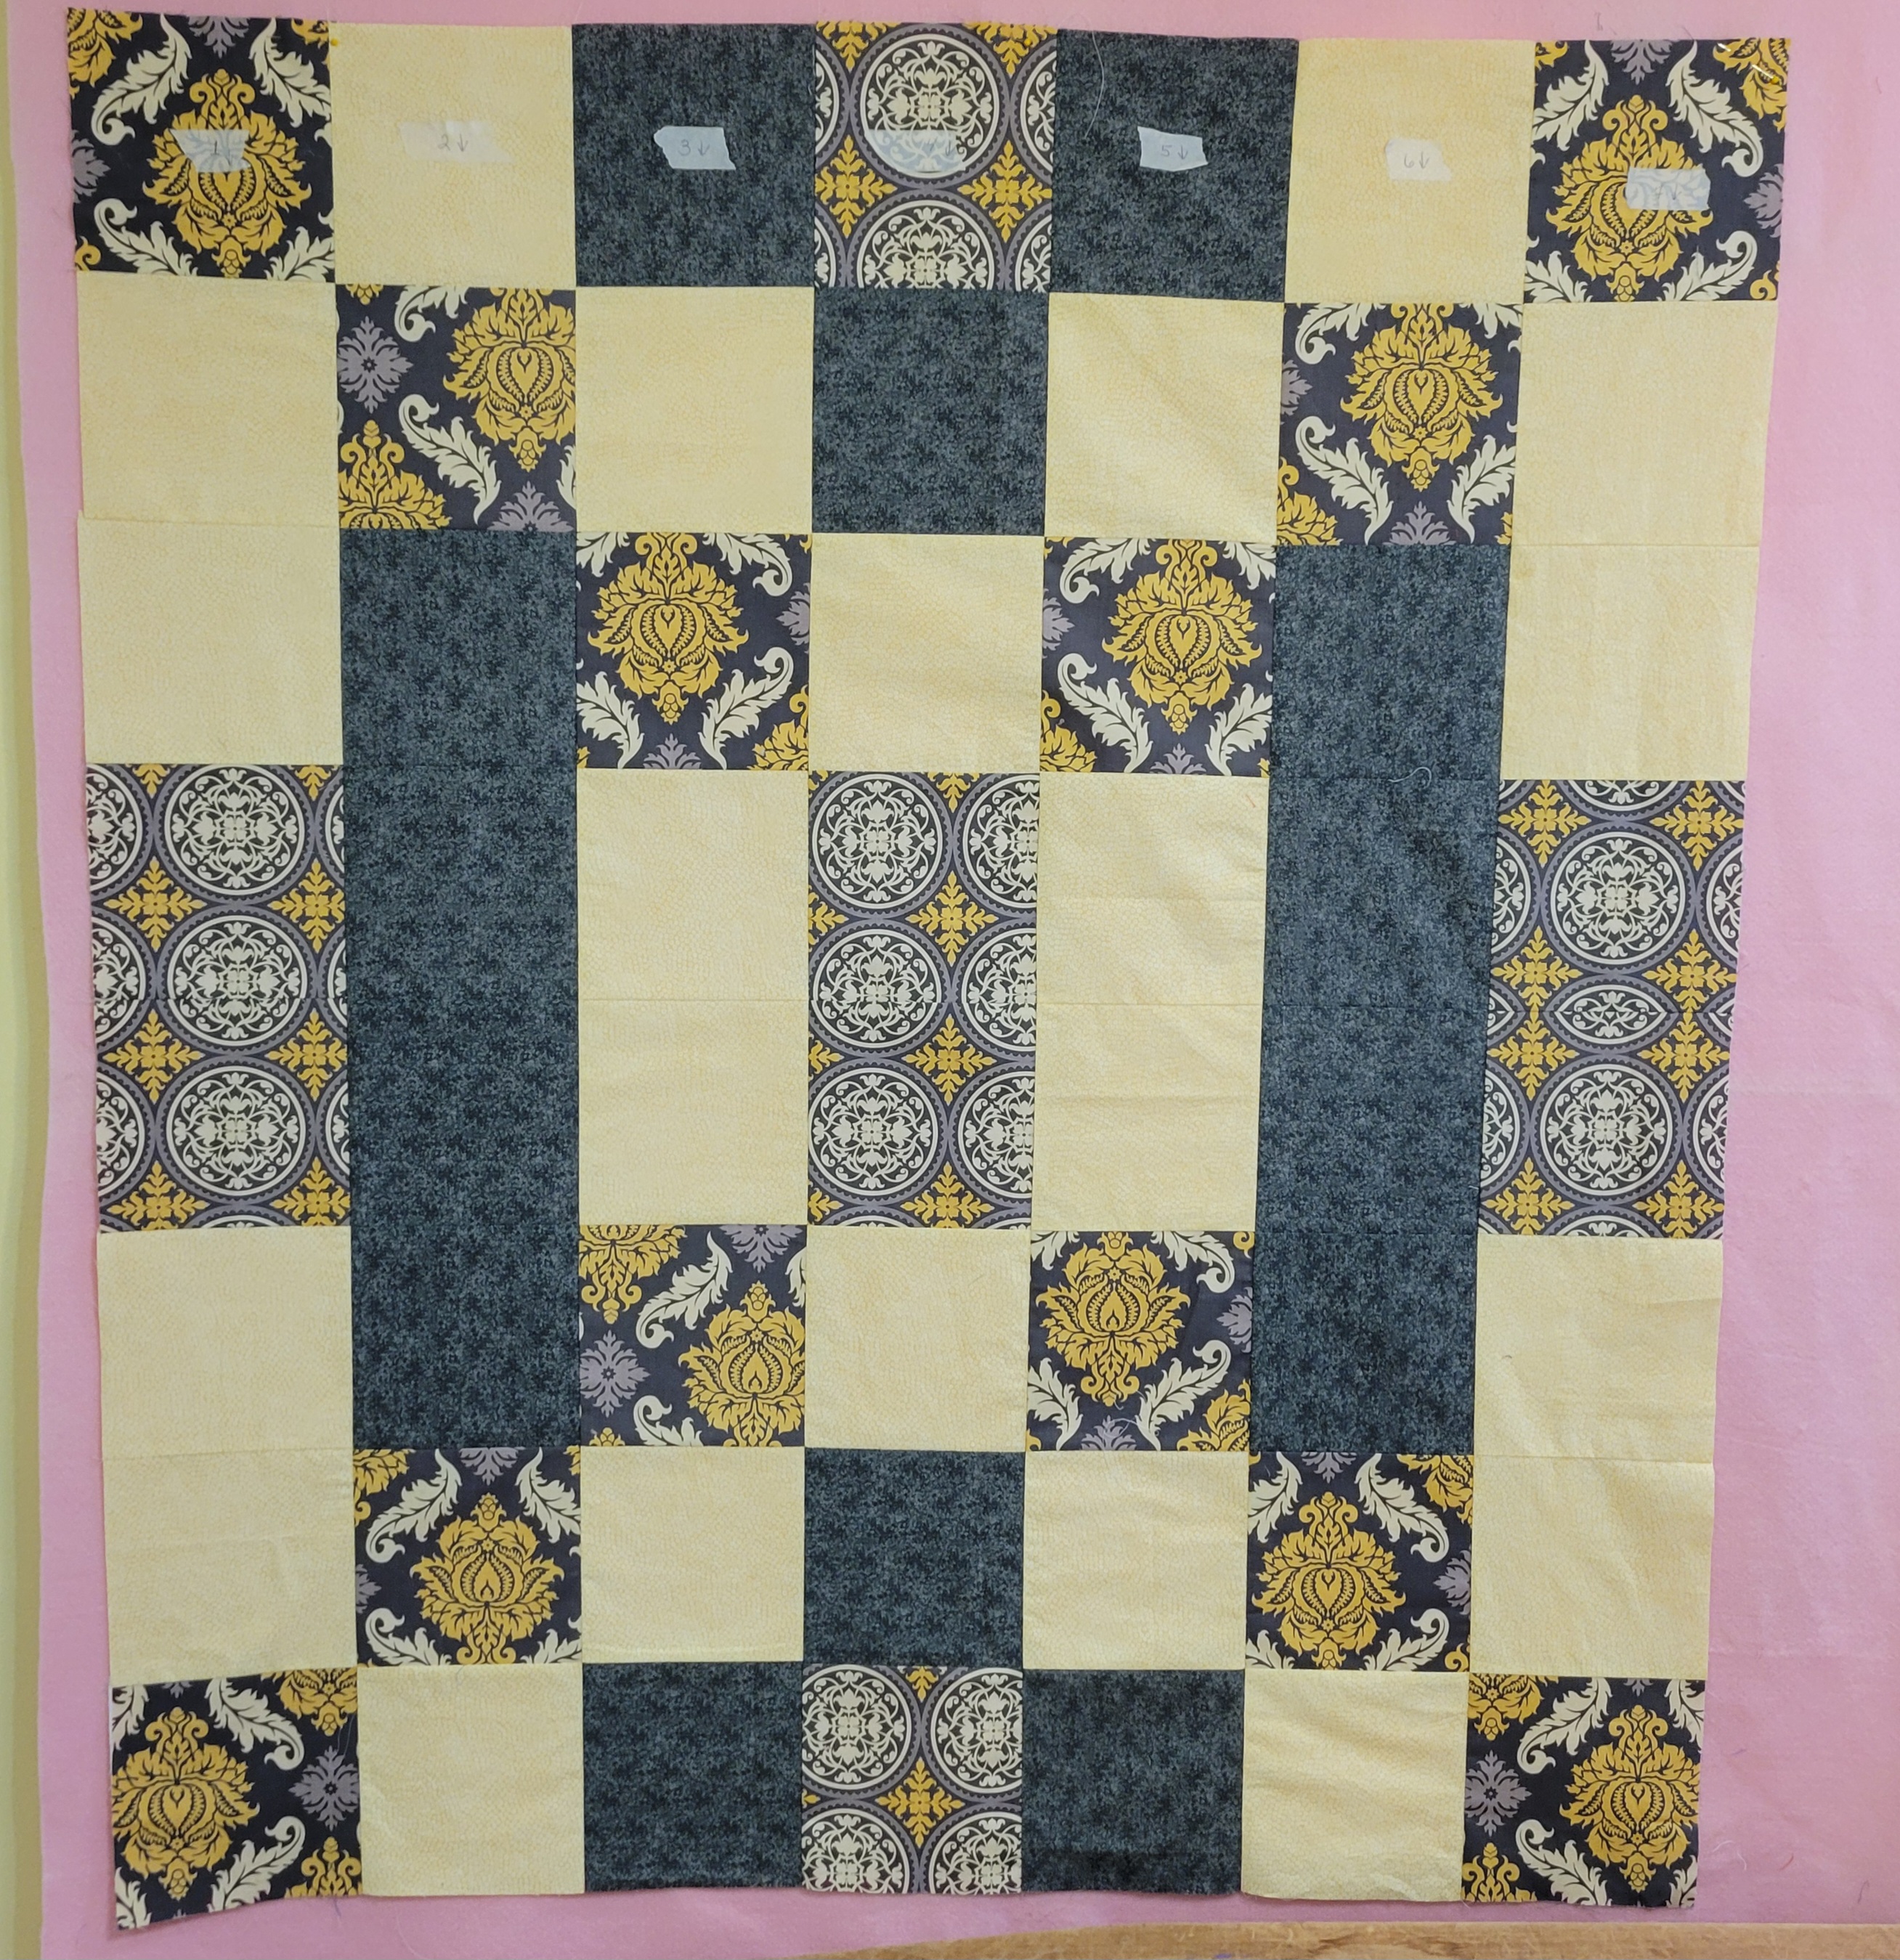
Since then I have made a couple of Blankets of Hope for our church's quilt ministry using the pattern. It makes such a pretty quilt that several other members have used the pattern also. I just finished one that I especially liked because of the fabric prints I used and since I haven't had a tutorial in a while for a quilt pattern, I thought I would show how to make it.

It is such a versatile pattern because of its versatility with fabrics. If you are making a lap size quilt (about 42 X 48 inches), it makes up nicely using a charm pack or make it "scrappy by using scraps, or like how I made this one, use one "busy" print for all of the 4.5" squares.


The pattern consist of 42 (forty-two) 4.5 inch squares and 42 strips 4.5 X 2.5 inches and 42 strips 6.5 X 2.5 inches. To make the quilt 42 X 48 inches, I added a 3 inch border.

I used a solid for the strips that went well with the print I used for squares. I cut a strip the width of the fabric and 4.5 inches wide and a strip the width of the fabric and 6.5 inches wide. Then I cut the two strips into 2.5 inch wide pieces to make the rectangles.

From the busy print I chose, I cut strips 4.5 inch across the WOF. From each one I cut  9 (nine) 4.5 inch squares. Doing the math, that means I cut 5 (five) strips.

If you are using a charm pack, you will have to trim the squares down to 4.5 inches for this size quilt. *

Since my busy print was non-directional (didn't have a pattern that had prints going one-way), I could speed up the time to make the blocks by "chain-sewing". I took all of the squares in a pile and first sewed the shorter rectangle to one side of the square without stopping to cut the thread. I  pressed the seams first to seal the stitches and then pressed the seam on both sides to one direction.  Then I stitched the longer strip down the perpendicular side with the first seam. Repeated the pressing. AND the blocks were made. 


All I had to do was arrange them on my design wall so that I distributed the print out over the top.


Did you notice how I arranged them? I alternated the rows so that the squares were completely surrounded by the solid color. Now that meant sometimes corners were touching with the squares and sometimes they weren't. I'm not sure which were the "patient" corners - the ones meeting or the ones not. What do you think?

I sew the blocks together to make strips (rows or columns) depending on which would be the less. In this case, the top is 6 columns by 7 rows so I will sew the vertical blocks together to make 6 columns because that will be one less strips to sew to complete the panel. 
When I have the columns made, I seal the seam and then press the seams in each column going the same directions for the column. So that the seams will "nest" when I sew the columns together, I press the odd numbered columns going back toward the first block and the even numbered columns going away. Now you can do which ever way you prefer. It is easy for me to remember this way. You just want to be consistent so your seams will match up when you sew them.

Once you sew the columns together, you can press the seams any direction you wish, I just think it looks nicer if you do all of the columns the same direction.

Now I added the 3 (three) inch border by cutting 5 (five) strips 3.5 inches wide (remember the two quarter inch seams) across the width of the fabric. You need five because the "length" of the quilt will be 48 inches and your fabric is probably 42 inches at the most. The fifth strip will be pieced with two of the other strips for the sides. Sew the top and bottom strip on first and press it toward the border unless it is a white fabric. Cut off any access that you might have. Then sew two of the other strips together pressing the seam to one direction and sew it to one side of the top. Cut off the excess and then sew the excess to the last strip you cut and sew it down the last side.


To finish the quilt, I went back to the pink that I had used for the rectangles in the blocks to cut for my binding. I cut the strips 2.5 inches wide across the width of the fabric for the binding. I usually cut five strips but this pink fabric was wider and I only used three and part of a fourth one to make the binding. I sewed the binding on the back and then brought it over to the front and machine stitched a fancy decorative stitch to sew it back down. If you are sewing the binding down by hand, you will machine stitch it to the front of the quilt and bring it over to the back to slip stitch down. I have only started doing the fancy stitch because sometimes my arthritis in my hands does not want to corporate with me. 


I "turned in" the Blanket of Hope yesterday when our quilting group met.


Let me know if you have any questions. I would love to see your finished quilts in the comment section. Enjoy.

Tuesday, January 16, 2024

JEAN'S MINT CHOCOLATE DREAM COOKIES

 It has taken me a few weeks to get the recipe from Friend Jean for these awesome Mint Chocolate Dream Cookies, but she has finally come through for me. 

These last few of extremely low temperatures with especially low wind chill that is has been difficult to make myself do anything. I have managed to do at least one thing each day, but otherwise I have spent/wasted a lot of time in my recliner along with either Charlie, or Parker, or both. The are having a hard time getting the energy to run around and/or chase after each other. One day Parker got up between the floors from the laundry room and we couldn't find him anywhere. When I finally discovered where he was, we had difficulty getting him down. Wayne had to remove a short support board so Parker had enough room to get out. He was coming down from a different place than where he went up. (We did finally discover how he managed to get up there.)

Anyway, I can't say enough about how delicious these cookies were that Jean made for the Cafe Treats. I was hoping they wouldn't all be eaten, but they were. In fact, before second service was half over, everything was gone.

The only change I could suggest is using a zero sugar devil's food cake mix to reduce some of the sugar, but you definitely want to use the Andes Mint chocolate candy. I may just have to make some of these myself. If you can't find the Andes Mint Chips, you can chop up the smaller individually wrapped Mints to make 3/4 cup.

PRINT RECIPE.


MINT CHOCOLATE DREAM COOKIES

1      pkg devil's food cake mix

2      eggs

1/2   cup oil

1      teaspoon mint extract

1      cup semi-sweet chocolate chips

3/4   cup mint chocolate bits

Preheat the oven to 350 degrees F. Grease or line baking sheets with parchment paper. Set aside.

In a large mixing bowl, combine the cake mix, eggs, oil, and extract. 

Mix on low speed for 1 minute or until well blended. Dough will be stiff.

Stir in the chocolate chips and chocolate mint bits.

Drop dough by 1 tablespoon cookie scoop about 2 inches apart.

Bake for 8 or 9 minutes or until firm around the edges.

Cool for 1 minute before removing from sheet to wire rack to finish cooling.

Here are some pictures of our "children", Charlie and Parker.


"OUCH"


I've also been working on two Blankets of Hope... Unfortunately, the weather prevented the group from meeting last week so I've not been able to finish them. 


Thursday, January 4, 2024

A NEW BLANKET FOR HENRY

 It has been a while since I shared a tutorial for a new quilt, but this one is surprising easy and looks awesome when it is finished. I liked it so much that I made one quickly for Henry, our ten year old grandson in CO. I can't wait to make another one for Blankets of Hope, the quilt ministry at church.

I just love when I see a picture of a finished quilt especially if it looks challenging but discovers it really isn't when I see what the pattern is. I so enjoy "patterns". When I taught math in middle school, I was always telling the students to look for the pattern.

Back this fall, I took a day trip with two quilting friends to Hamilton, MO to a quilt show. We didn't see as many quilts as we thought because I was helping one of them who is new to quilting to look at the quilt and find the pattern. By the end of the day, she was doing really well. 

Henry living in CO is a Denver Bronco fan so a few days before we left to go to have an early Christmas with them, I decided to make him a blanket using some scraps I had left over after I made a Blanket of Hope for a young man at church who was very ill. I asked his mother if he liked the Chiefs (we do live in Kansas City afterall) and she said, "No. Actually he likes the Denver Broncos." I had to order the fabric because our fabric stores sell Chiefs material. I did have to buy some more blue and orange flannel because I was out of it for Henry's quilt.

I didn't have enough time to completely finish it before we left, but I got the top made, sandwiched it with backing, machine quilted it, and sewed the binding on. After we got to CO, I handstitched the binding down in the hotel that night and gave it to him the next morning when we saw them. 

This is the best picture of the quilt top for you to see how pretty the pattern is. It looks like a Bronco square is resting on top of blue and orange squares/blocks.


 Here it is hanging over the railing which is where quilt tops usually "live" after I get the top made but before it is finished as a quilt. It does usually end up back here after it is finished until the group meets.


Here it is as it went with me to CO with the binding sewed on with the machine. Many of my friends sew the binding down also with the machine, but I like to finish the binding by slipstitching it down by hand. It is so relaxing for me and gives me a chance to enjoy the quilt.


This binding was a piece in my stash that I have had a long time. It worked perfectly though with its navy background and small orange flower with a little added green leaf. 

And finally a picture of the finished quilt showing the backing. If you look closely, you can see how I machine quilted it. Since I made the blanket a little bigger than my usual lap-sized quilts, I purchased an oversized throw and it worked perfectly. I didn't use any batting since the blanket was thick and the top was mostly flannel.


My quilt/blanket consisted of sixteen 12-inch finished blocks and a top and bottom 3-inch finished row that is a partial block. I hope that is easy to see. The secret to the pattern though is that it is sewed together in 6-1/2 inch rows and not this 12-inch finished block.


Let start at the beginning with the cutting...just two ways of cutting.

The focal square is a cut 6-1/2 inch square from the print that I wanted to "showcase". I cut sixteen of those. I did this by cutting three 6-1/2 inch wide strips across the width of the fabric (wof) and then cutting six 6-1/2 inch squares from each strip. I had enough of the fabric, that I could "fussy cut" (chose where I was going to cut) where I cut the strips to feature either the word Bronco or the horse's head. (I initially cut twenty squares but settled on just using sixteen of them.)


I arranged the squares on my design wall to make sure I didn't have two similar blocks next to each other.

With the blue and orange flannel fabrics, I cut 3-1/2 inch wide strips across the wof from each color. I sewed two strips together, one of each color and made a bunch of these. They will form what looks like the blue and orange squares that the Bronco squares rests on. This technique is called "strip piecing".


I pressed them open and

then cut across in either 3-1/2 inch pieces (called a twozie*) that will be used with the 6-1/2 inch focal print square 
or

6-1/2 inch square pieces also a twozie* that will be used in rows with other 6-1/2 inch square twozies*.

That's it. After I have all of my pieces cut,  I go back to my design wall and lay the pieces out in the pattern. Look at the picture on the right at the top row above the blue line. This row consists of the 3-1/2 inch twozies* and the 6-1/2 inch focal print squares. (There is a twozie* before and after each focal print alternating for a checkered board effect. As you look at the picture you can see the fourzie** that forms with the twozies* since they come before and after the focal print. The row consists of four focal prints squares and eight twozies*.
or

eight of the 6-1/2 inch square twozies*  cut from the orange and blue wide sewed strips. (just below the blue line) Every other square is inverted to give a checkered board effect.

To further show making the row with the focal print, first sew two of the twozies* together alternating the colors to make a fourzie**. (four squares sewed together) (I know you can't see this in the picture.) Press the seam to one direction.

Then sew the fourzies** between the focal print starting and ending each row with a twozie*.

I did the same for the other row of just 6-1/2 inch twozies alternating across for the checkered board look. The top three rows are sewed in the picture, but not sewed together even thought it looks like it in the picture. I usually wait until I have all of the rows made, but you don't have to.

When you are ready to sew the rows together, the only seams that you have to match are the ones between what is the 12-1/2 inch block. To make this easier, I resort to my normal way of pressing seams...the odd numbered rows, I press back toward the beginning of the row and the even numbered rows, I press toward the end of the row. This allows me to "nest" the seams. 


I finished the top by repeating a  row of the 6-1/2 inch square twozies* and sewed one on the top and the other one on the bottom. 
To machine quilt the blanket, I first sewed an asterisk in the center of each focal square. This was a fancy stitch on my machine that made a line of these. I just stopped it when it finished the asterisk. Look closely - it is below the big C in Broncos and the ER in Denver.
I made sure I had the layers flat and pinned it in each corner and then pinned the center where I would stitch the asterisk. 
After that I machine stitched along the seams of the 12-1/2 inch block horizontally and vertically with a wavy pattern my machine will make.


Depending on the look you want for your quilt, if you want it to look 3 dimensional, if you want to use prints instead of solid colors for the background, choose small prints  so that the seams won't stand out. You also should not chose a directional print since you are alternating/inverting the background pieces. 

As I said earlier, I know I will be making another quilt by this pattern for Blankets of Hope.*** I would love to see pictures of your finished quilt, if you decide to give the pattern a try. If you have any questions just ask in the comments. 

My finished quilt/blanket for Henry was 48 x 54 inches.
 
It consisted of five rows of the 6-1/2 inch square orange and blue fourzies** (eight 6-1/2 inch twozies* sewed together

and four rows of the 3-1/2 inch twozies* before and after each focal print. (eight 3-1/2 inch twozies* on each row and four 6-1/2 inch focal print squares.

If you do the math, from the 3-1/2 inch x wof strips, I started with each color and cut thirty-two 3-1/2 inch twozies* and forty 6-1/2 inch twozies*. So I cut about 10 strips of each color, orange and blue - 3-1/2 inches x wof from approximately 1 yard of fabric of each color. I had a yard of the Bronco focal print.


* a twozie or two squares sewed together

** a fourzie or two sets of twozies sewed together. The four smaller squares can be four different colors or two different colors arranged with the same colors/prints sewed* diagonally from each other.

*** I picked out three pieces for the Blanket of Hope. What do you think?

Thursday, April 27, 2023

MY LATEST BLANKET OF HOPE, JANUARY 2023


I dreamed about this latest Blanket of Hope for several months before I finally was able to make it. Maybe you have done this or not. I don't know. But I "saw" the general pattern for the block and couldn't get it out of my mind. 

It's not a new creation. The block is a common one that has been around, but I knew how I wanted to utilize it in a quilt. I didn't see the actual fabric, that would be really weird. I just knew how I wanted to use my fabric with the pattern. Finally the material was another interesting happening though. 

At our first meeting of 2023, we had decided at our December end-of-the year celebration brunch that we would start the year off by getting our closet and cabinets in the room we use at the church reorganized. We had added quite a bit of material to our stash the last several month of 2022 and everything was looking very messy.

A couple of us were doing other things that afternoon though and I didn't go down and look at the hall closet like I should have. The four who worked on it worked for almost 2 hours and deserved a show of appreciation from the three of us working on future things. One Sunday in January my Sunday school class was serving with the Hospitality Team and during a downtime I went upstairs and decided to take a look at the closet. That is when I saw the material in a nice little stack. I knew immediately that that was the perfect material I needed for my "dream" quilt. I took the three different coordinating prints home with me.

The next day I cut out all of the pieces, decided to use a new technique for me -- chain stitching the pieces together to make the blocks and then chain stitching what I could of the blocks together to make the quilt top. I was finished with the top within a couple of hours. (I did have to do a little math and a whole lot of pressing during that time also.)

We try to make our Blankets of Hope 42" x 48 ".  This was the measurement we were given especially good for use with a wheel chair, but also if the blankets/quilts are only 42 inches wide we don't have to have a seam in the backing. Since traditionally the blocks for the blankets are cut 6-1/2" squares, that makes the blanket pattern 7 x 8 blocks or 56 total blocks.

I started with a 6-1/2" block but added the two strips down two sides. I cut them 2-1/2" wide so that gave me an 8-1/2" block and a finished quilt of 40 x 48 " or a pattern of 5 x 6 blocks or 30 total blocks.

I chose the larger print for the 6-1/2" square. I needed thirty (30) of them or five (5) strips cut the width of the fabric and 6-1/2" wide. That will produce exactly 30 squares. I considered using a strip from each of the other prints with the 6-1/2" square, but that isn't how I had pictured it in my "dream". One of the first quilts I ever made was a Rail Fence Quilt. I guess that pattern is always in my mind. Since the quilt will be thirty (30) blocks and following a rail fence style, half of them will include one of the small prints and half will be the other small print.

Time for a little math ... 15 x 2.5 = 37.5 . Cutting a strip the width of the fabric and 8-1/2" wide, then cut fifteen (15) 2-1/2" wide. From the remaining strip, cut one strip 6" x 2-1/2". Cut a second strip the width of the fabric and 6-1/2" wide. Cut 14 strips 2-1/2" wide. Save the rest for your scrap bag.


Chain stitching is a method of sewing to basically save thread as I see it since you are feeding the next pieces to sew without cutting the thread. Since my machine cuts the thread, that wasn't that big of a deal for me. But after trying it, I see it also saves me time. I usually sew from my design wall (a large piece of felt hanging on my wall that I press the cut pieces to in the pattern I am making.) That means I get up and get the pieces I am going to sew together between each piece. That does take time which I just consider exercise. 


With chain stitching, I had my thirty (30) squares and the fifteen (15) strips of each print. (Yes, I have two sets of strips for each print, but I just worked with one size at a time.)


I started by sewing the shorter strip across the bottom of square so I chose the top and bottom of the square when I placed the edge of the short strip along the edge of the square to sew my 1/4" seam.


After sewing the first "block", I moved the second block close to the end of the first one and continued to run the machine until the next block was "picked up" by the sewing machine foot attachment.


I continued until I had finished sewing on the shorter (6-1/2") strips of one print and


continued with the other print of the same length.


That took about 10 minutes or so. I then cut the thread between the blocks to separate them.


Before I could sew the longer strip on I had to get up and press the seams open that I had just sewed. 


1) Set the seams. Quickly press on top of the seam on the wrong side. 


2) Open the seam out and start in the center of the seam on the right side to press. I find this is the easiest way to press the seam to one side. I pressed toward the short strip. 


With the shorter strip sewed on, I was ready to sew on the longer strip following the same chain stitching method

but this time on the left side of the block.


(This means you are sewing from the bottom up.)


Repeat the process, cutting the connecting threads, setting the seams, and pressing the seams open.


Important Note. This time when you are pressing the long strip, you will not be pressing them the same way. Press one of the prints toward the square and the other print toward the strip. Then when you sew the blocks together the seam will nest (fit together smoothly) in the one place that you have two seams together. (where the longer strips meet at the top of one square and the bottom of the above square.)


The thirty blocks on my design wall...


This was the challenge for me with the chain stitching, but since the quilt had six (6) rows and five (5) columns, I could start at the upper left top corner and sew the two blocks together going down the column.

And then stitched the two beneath and finally the bottom two in the first column on the left. (Notice I did pin the ends and where there was a seam and then in-between.)

Once I had the three pairs of the first column, I could just move to the second column and so on until I had the whole top in pairs.

I cut them apart and

then sewed the first two-block pairs together.  At this point I had to stop my chain stitching because I only had one block pair left for the first column.

I sewed the last block pair onto the four blocks and had the first column sewed.

I placed each column on my design wall to make sure I wasn't messing up the pattern. 


Before I could sew the column strips together I had to press the seams I had made. A while back I started pressing the odd numbered row/column away from me and the even numbered rows/columns toward me, so that is what I did. 

I sewed the first two columns together from the left, then the next two, leaving a single column on the right. Then I just sewed the three "sets" together to have my finished top.

Here is a close up so you can see the prints all together. This has to be just about my all-time favorite quilt I have made. I just love how all of the prints and colors went together.


With the top finished, it had to be sandwiched with the batting and the backing and machine quilted - I just sewed in the ditch a bunch. (sorry I didn't take pictures of this part.) 


After I squared up the quilt and trimmed the excess, I had to chose a fabric for the binding. This purple, yes, it is purple that looks a little blue in this picture, was the winner.

If you would like to view my tutorial on making the binding, you can check out this POST. 

I cut the strips 2-1/4 inches wide for the binding (five of them), made one long strip that I folded in half lengthwise and pressed the fold. I sewed it to the quilt top a quarter inch from the edges.

I fold the binding to the back and secure it down with clips.

I blindstitched it down on the back side.


The finished quilt and one of my most favorite Blankets of Hope I have made.


If you have any questions, please ask away. I will try to answer them.