Wednesday, June 20, 2012

MAKING APRICOT JAM

When we were visiting in COS, the Sunflower grocery store had apricots on sale for $1.77/lb.  Knowing this was a really good price, I decided to get some to bring back home so I could make some apricot jam.  One thing I miss from living in Ventura, CA is all the fruit trees we had in our yard.  We had one each: peach, lemon, plum, apple, orange, tangerine, fig, and apricot.  I would spend a considerable amount of my summer "off" (teacher) making jam. But that was ok as we love the homemade taste of jam.  Since we were growing all the fruit, the cost was affordable.  Even though I have to buy the fruit here, I don't mind.  I know what is in the jam and as I said, WE LOVE THE TASTE OF HOMEMADE JAM.

This morning as I made my jam, I decided to take pictures (as best as I could considering I was stirring with one hand and trying to take the picture with my other one) showing the process in case anyone wanted to try it.  I use Sure Jell premium fruit pectin and pretty much follow their directions until the "canning" directions in  step 9. I sometimes use the No Sugar Needed Sure Jell and use less sugar or Splenda. The "look" of the jam is different (not as pretty) and the jam has a different consistency, but my husband prefers the less sugar idea and says he doesn't care. So I do some for him.

The first thing I do is get EVERYTHING ready and set out before I start preparing the fruit.  Once you start cooking the jam, you don't have time to get things measured etc, as you need to be stirring constantly. The large glass bowl has the 7 cups of sugar and behind it in the smaller measuring glass is the 1/4 cup of lemon juice. I did forget to get the tongs out ahead of time so they aren't in the picture. The larger measuring cup in the picture is used to measure the prepared fruit. The jars are washing in the dishwasher so they will be ready and hot when the jam is ready to be poured. It is important to have the jars HOT when you pour the jam in them to seal.


The recipe for apricot jam calls for 3.5 lbs of apricots or 5 cups of prepared fruit.  It took only about 3 lbs for me to have 5 cups, but you don't want to come up short.

I cut the apricots in half to remove the pit. Do not peel the fruit. I put 5 apricots at a time in the blender and pulse to chop. Too many will make it harder to just chop the apricot. You don't want to puree them. It may be necessary to stir them up in the blender if they aren't being chopped. Here is a picture showing the consistency of the chopped fruit.
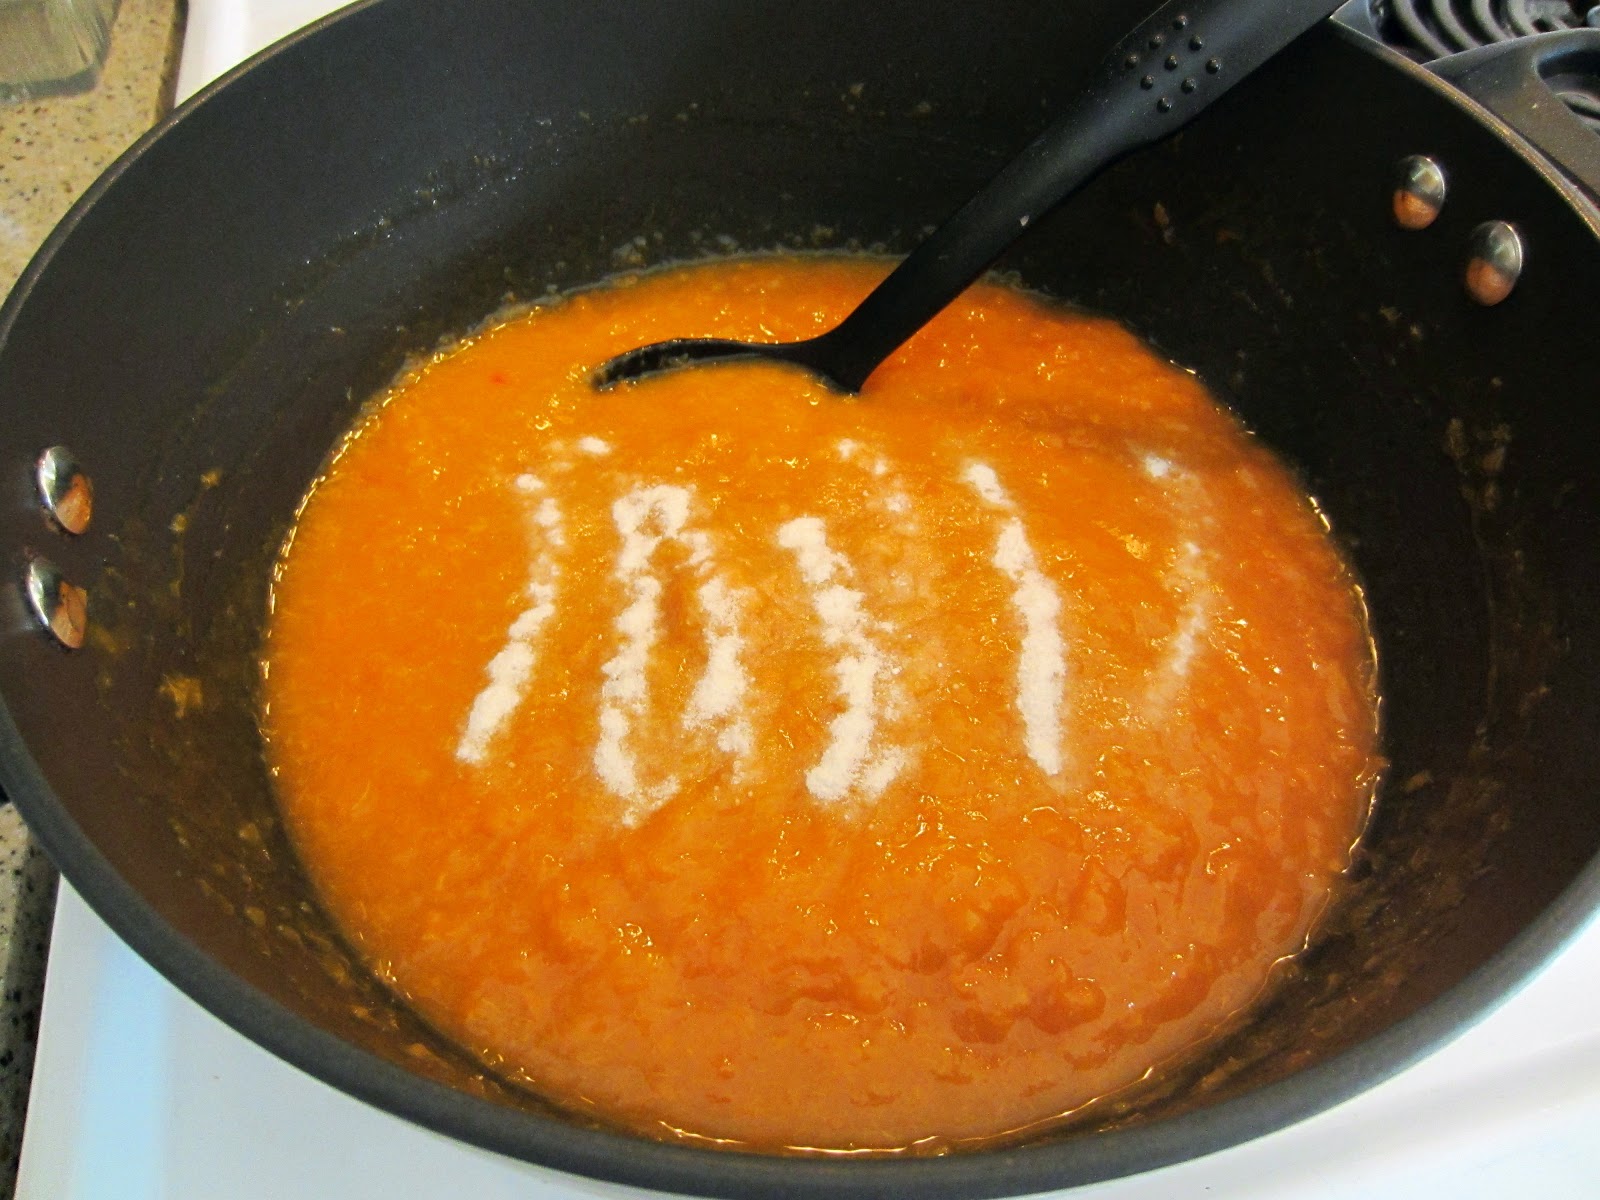

 
When you have the 5 cups prepared fruit, pour into a 6 - 8 quart saucepot (I use my dutch oven pot.) and add the lemon juice. I SLOWLY add the Sure Jell and stir in between to make sure there is no lumping of the pectin (upper picture) and then add 1 teaspoon of butter. The recipe calls for 1/2 teaspoon, but I have always put a whole teaspoon. The butter will keep down the foam that forms as the jam cooks. (I had none with this batch.  Sometimes I have a little, but it is easy to lightly spoon it out as there won't be very much.)

To me, the next two parts are the hardest because you have to judge a "full rolling boil".  Cook the mixture over medium high heat until the mixture comes to a full rolling boil (a boil that doesn't stop bubbling when stirred) stirring constantly.  I also keep scraping the sides of the pan to keep all the fruit being used. I think I rushed this step this morning because the mixture was "popping" out and burning my hand. It was boiling though.


Then dump the 7 cups of sugar all in at once and stir making sure all lumps are dissolved.


You can see how the looks and consistency has changed since you added the sugar.  If you have some  large pieces of fruit at this stage, you can spoon them up to the side and "cut up" with the edge of the spoon, if you like.


Return the mixture to a full rolling boil remembering to stir constantly and scrape sides of pan. Then set the timer for 1 minute and continue to boil the mixture stirring constantly. Remove from heat when the timer goes off.


The lids have been boiling slowly in a pan while you have cooking the jam.  I actually boiled some water and poured over the lids in the pan when I started.  I turned the burner on to bring the water back to a boil about the time I added the sugar to the mixture.


I place a towel on the counter to work on as everything is hot that you are dealing with. Using a hot plate, place pan with prepared jam, along with the jars from the dishwasher.  I also have a cup that I use to dip the mixture out into the jars and a wide mouth funnel. Also place your lids still in water along with tongs for lifting the lids out. The directions with the Sure Jell always made me feel like I had to ladle the jam into the prepared jars almost before I took the mixture off the stove, but I have learned that I can take a minute or two to get the jars out of the dishwasher (that way they are still HOT) and get everything else that I need.  (Remember I got everything out before I started so it is just a matter of gathering them together on my towel.)

Placing the jar as close to the pan as I can, and inserting the funnel, I carefully ladle the jam into the jars using the cup.


I fill the jar with the jam up to the bottom of the funnel - looking down in the jar.
Remove the funnel and place in another empty jar and rest the cup in it, while you wipe the top of the jar to make sure there isn't any jam on it.  Remove a lid with the tongs and place on the jar and then tighten on the ring. Continue until you have used all the jam. The recipe says it makes 9 cups. That means it will make 4 pints and a half pint. I always wash 5 pint jars and several different sizes that I have of half-pint jars---just in case.  That means I also heat on extra lid. You can save it if you don't need it and use it the next time. The seal hasn't been damaged by the heat.  Just to make sure this last statement is clear, a lid that has been heated in water is safe to reheat and use later. You should NOT reuse a lid that you had previously used to seal a jar. You can see the impression on the rubber seal of a used lid.

When all the mixture has been poured (and if you are lucky, you may have a little extra left in the pan that you can just spoon into a custard dish and enjoy when it cools), make sure all the rings are on tight. Use a wet towel to hold the jar as you tighten the ring, because the jar will be really hot to touch. Also wipe off jar to clean away any jam that might have gotten on the jar as you were filling the jars. THEN turn the jars upside down on the towel and set the timer for 5 minutes. This method is called the Inversion Method. Turning the jars upside down for 5 minutes seals the jars and it is not necessary to water bath the jars.


After the timer goes off, turn jars right side up using the wet towel again and wait to hear that wonderful POP that indicates the jar has sealed. IF a jar doesn't seal, don't worry, simply put that jar in the refrigerator and enjoy it now.


Note, sometimes a lid will end up sealing when you press on it--no POP. That is ok. As long as the lid stays "down", it is sealed. As the jam is cooling in the jars, I will check a couple of times to make sure the lid has sealed by pressing down  the center of the lid.


I hope if you have always wanted to make your own homemade jam, but were afraid to try it, that this tutorial will help you.  I would love your comments on your efforts or any questions you might have.

You can check out making peach jam HERE and strawberry jam HERE.

Tuesday, June 19, 2012

VOTIVE CANDLE HOLDER


I saw these candle holders recently in a vintage shop for sale and was immediately drawn to them.  When I looked at them closely, I realized they would be so easy to make.  I just needed a saucer and a globe from a chandelier. "Well,  I can get plenty of these at the thrift shop where I volunteer," I told my friend, Janice. 

 So, for $2  I had what I needed from the thrift shop and since I had some Super Glue for Glass at home to use, I was in business.  I actually plan to take these back to the thrift shop to sell in our recent "Up-Cycled" area to show people what they can do with items they can find in a thrift shop.  I hope we can get $4 for them.  I will be real excited if we do.  The one above has a flameless candle in it.  The ones below actually have a votive candle in them.  

As I said, this was so simple and took literally minutes to do.  

Here is what you need to make these votive candle holders:


  Simply spread Super Glue for glass along the bottom of the globe...


 and then place it in the middle of the saucer or whatever glass "plate" you are using and allow to dry.

 Put pressure on the globe for 15 to 60 seconds.

 Allow to sit for 24 hours before you use it.  This glue says it is dishwasher safe.

Here are  pictures of two other ones I made.


With votive candles.  I think at night the etched design on these globes will look really pretty.


I think I am going to have to make some of these for myself in addition to the ones I make for the thrift shop to sell!

Let me know how yours turn out.

Sunday, June 17, 2012

HAPPY FATHER'S DAY

Father's Day, 2012, has almost come and gone.  I hope it was as good of a day for you and yours as it was for us in COS with our older son, Jeffrey, and his family.

I am glad that Father's Day is on a Sunday, because I can't think of a better way to spend the start of the day than by worshiping our Heavenly Father.  We heard a really good message about how the New Testament came about being.   
Since it was Father's Day, Jeffrey got to select the place we were going to eat brunch.  He selected Nana's Kitchen, a cafe in Falcon where he teaches school.  Here is a picture of him and Colby and Hallie.  Sadie didn't want to be photographed.
We decided to go home to change out of our "church clothes" before going to play miniature golf.  The kids were so excited.  We have talked about playing on several previous visits, but this was our first time to actually be able to do so.  Here is a picture of Jeffrey with all of his children .  Sara is also visible in the background of  the picture of Hallie.  Sadie was ready to be photographed here.  I took the picture of my husband in his true golf form and told him I was going to print it and put it in a "golf" frame I gave him a year or so ago that we have never put a picture in.
It was a lot of fun.  I must add that I took honors for lowest score.  Now if I could just do that on a real golf course.  Here is one more picture of the "gang" outside afterwards.
It was a beautiful day in COS today and while playing golf, we had to stop half way through and go get drinks to refresh ourselves.  As we got in the car Sara looked at me and said, "This would be a great time to go to that other place we had talked about going to while you were visiting."  I immediately agreed and when the kids heard we were going to YoYogurt, they showed their excitement and agreement.
Back home and some quiet time, the "fathers" watched the US Open on their laptops while the kids and I watched the movie, The Smurfs.  It was cute and fun for me to watch and enjoy with the kids. We ended our full day (after supper) enjoying the back yard and roasting some marshmallows.  Here are some pictures of the kids playing with the chickens and then "roasting fun".
Unfortunately we could celebrate Father's Day today with only one of our sons.  I took this opportunity to take a picture of three generations of males in our family.  When we celebrate Father's Day with our other son, Patrick, I will take a picture of my husband, Patrick, and his son Tyler.
So the girls wouldn't feel left out, I took a picture with them included.
I can't end this blog on  Father's Day without thinking about my daddy.  He was a loving husband and father, the perfect gentleman. Here he is with Mother.  They are celebrating together in Heaven.
Happy Father's Day, Daddy.  I love and miss you both.

Saturday, June 16, 2012

WHAT JOY!


Joy is.....
  • having a friend to come check on the cat, Miss Sara, and water the plants and garden when you are out of town!
  • getting out of the truck and the grandchildren run out the front door to give you a hug! 
  • watching the grandchildren excited about what you have brought them!
  • reading a book to the granddaughter who isn't reading yet! and Later having her tell you that she doesn't like storytime, BUT she likes to listen to you read to her!!!!!!
  • seeing the other two grandchildren enjoying reading on their own! and
  • then watching all three of them totally into their books!
  • sharing the granddaughters' excitement with their new dresses you had made!
  • hearing the giggles as they surprise you with a "belated" birthday party!


  •  creating a western town with a gazillion Lincoln logs and then having fun playing with it!
  • coloring ( a favorite activity of both of the girls)!

  •  knowing that if you had three hands, they would all hold one; if it were possible, they would all sit by you in the car and at the table!
  • most of all, being called "Grandmother"!!!!!!

Monday, June 11, 2012

MY UP-CYCLED LADDER SHELF

Thought you might like to see how my Up-cycled Ladder Shelf looks now.  I try to change it for the seasons.


I'm so excited.  I just finished hanging my new sign I got Friday in Jamesport -- WE ARE SO BLESSED.  

I saw this idea on Pinterest of taking an old ladder and hanging it horizontally on the wall and using the sides as shelves.  It took me a couple of months but I found the ladder at an antique show in Weston.  It was the perfect length for my wall that really needed something to show it off.  I filled it with pictures of my grandchildren (of course), a peach scented candle (my husband was called "Peach" in college by his frat brothers because he was from GA), a beautiful paperweight I received as a present from a student one year at Christmas, and a little vase that belonged to my mother that I put a little silk flower in.  The hanging heart was given to me to decorate a lamp at Christmas by a friend.

The ladder hung on the wall with just that for at least a month, before I found the wooden blocks that spelled SMILE and the wooden sign that has Life Is Good painted on it recently when I went to a vintage shop with my friend Janice.  I have a cap and a t-shirt that says Life is Good on it so I knew as soon as I saw the sign, that I had to have it for the top "shelf" of the ladder.  Friday, Janice and I went to Jamesport, an Amish community, in northern MO.  I was hoping I would find something to hang from the bottom "shelf".  And I did find several things that I liked, but when we saw the WE ARE SO BLESSED, I knew I had to have it.  I had a little trouble deciding on the color of the board as they had 4 different ones.  But I am so pleased with it and the whole look.  

Did you notice the other hook that is holding the ladder on the wall doesn't have anything hanging from it?  Well, I am still looking for just the perfect thing to use there.

If you haven't realized it, everything I have on my ladder shelf has a special meaning to me.


TIP ALERT!
I hung the sign using a tip from Pinterest.  It made it such a breeze.  Once I decided where I wanted to put the "eye hooks", I put a piece of tape across the space.  My helpful husband drilled a tiny hole in the sign for me to screw in the hooks.  (I could have drilled the holes, but I like for him to think I couldn't live without him. ha)
   Then I removed the tape and stuck it on the underside of the ladder so he would know where to drill the holes in the ladder for the hooks.  

It worked perfectly.
I like that every time I walk by it going into the living room or come up the stairs from the family room, I will see it and be reminded of just how blessed I am.

Sunday, June 10, 2012

PATRIOTIC T-SHIRT DRESSES


I never thought about making a dress by using a purchased t-shirt and simply adding a gathered skirt to it until I saw it on Pinterest.  To this day, I have made four for my two older granddaughters and two for my youngest.   Friends kept asking me how I made them so when I made these last three, the patriotic ones, I decided to take pictures as I went along so I could have a tutorial to show them.  One friend whose granddaughter is less than a year old decided to use a onesie for the shirt.  She sent me pictures and they were so cute.  I was so pleased that I had helped her do something she was proud of for her granddaughter. 

After making seven dresses using a single piece of material for each skirt, I decided I was ready to get "creative".  Because you divide the tail of the t-shirt into fourths for ease of gathering the material to make the gathers, I decided I would chose four different prints for this skirt.  Here are the instructions for making my Patriotic T-Shirt Dress. 

After prewashing the shirt and the material you have selected for the skirt, you are ready to begin.
 
There are two things you need to know before you start cutting--how long you want the t-shirt to be above the skirt and then the length of the skirt.  Add a half inch to the t-shirt measurement and one and one-eighths inches to the skirt measurement.  This latter measurement will determine how much material you will need for the skirt.  Buy a couple of inches more than the length of the skirt...this allows for any shrinkage you might have when you prewash the material.


( For this one the t-shirt needed to be 15 inches from the back center of the neck.  With the half inch needed for the seam, I cut the t-shirt off at 15.5 inches.)


The next thing to do is to mark the tail of the shirt into four equal parts.


(This shirt was 13 inches across, so I snipped the center mark at 6.5 inches through both the front and the back at the same time.)


(Then I snipped at  3.25 inches from each side to mark the quarter marks.)

If the shirt isn't an easy number to divide into fourths, just fold the shirt matching the side seams, to snip the fold (center).  Then match the center mark with the side seam, and snip the fold which will be the quarter mark. (sorry no pictures)


You are now ready to make the skirt.  Since I had chosen four different prints, I needed to figure out the measurements for cutting them.  (I make the pattern twice the finished size for gathering.) Since
each quarter of the shirt is 3.25 inches, twice that would be 6.5 inches.  BUT don't forget to add for the seam. For these dresses I decided I would sew the skirt pieces together with a quarter inch seam and a half inch seam at the "waist".  So that would make the pattern 7 inches wide. The finished skirt length is 11.5 inches--that includes the half inch seam at the "waist" and then the 5/8ths for the skirt.  From tissue paper I cut the pattern--a rectangle measuring 7 inches X 11.5 inches.)


By folding the material,  cut two pieces by the pattern from each of the four prints.


After deciding the arrangement you want for the prints, you are now ready to sew the 8 pieces together using 1/4 inch seam.


Once you have all 8 pieces sewed together, press the seams to one side.  (I chose to top stitch the seams on the side that I pressed the seam to.  This keeps the seams flat.)

Make the last quarter inch seam to joins the 8 pieces together and then press that seam as you did the others and top stitch it down if you top stitched the others.


It is easier to make the shirt-tail hem now before you sew the skirt onto the shirt.

To make the hem, fold over about 5/8 inch.  If you are new to shirt-tail hems, I suggest you press this 5/8 inch first.  Then it will be easy to do the next step.


and then tuck under about 1/4 inch.


 This will give you about 3/8 inch hem.  The more experienced you become, you can do this by just "eyeing" it and not have to press it the 5/8 inch.


Sew with a quarter inch.


Finished hem.


You are half way through with the skirt.  You are now ready to make the gathers at the waist and then sew the skirt to the shirt.  Gathers scare some people, but they are not that difficult---if you work in sections.  To begin, you want to pull the threads on the machine from the needle and bobbin to about 5 or 6 inches.  Set the stitch length to the longest length on your machine.  Starting at one "side" of the skirt, sew a line of stitches 1/2 inch from the edge to the other "side".  Don't cut the threads until you have pulled them out about the 5 or 6 inches like when you started.  Repeat for the back.

You are now ready to pin the skirt to the t-shirt. (I sew the two together with the skirt on top.  That way I can see the gathers.) This means that you will turn the shirt right side out and pin the right side of the skirt to the right side of the top.  You will be working with the shirt inside the skirt. First match the "side" seam of the skirt with the side seam of the shirt and pin.  Taking the long top thread on the skirt, gently pull the thread and just make some gathers on the skirt just past the center--that will be the seam of the second and third prints. Match the center mark that you snipped with this seam and pin it.


Now you can see if you need to pull more or loosen the gathers from the skirt to match the quarter mark and the second seam. 


Evenly spread the gathers and pin.  Then work from the other "side" of the front toward the center pulling the thread gently.  Repeat  with the back.


Carefully sew the skirt and the shirt together with a half inch seam all around. You can remove the pin just before you will be sewing over it with the machine, if you like.  (I have to admit I sew over the pins, but I have broken a few needles too.)


Remove the pins if you didn't as you sewed the two pieces together and sew once again around as close as you can to your original stitches to secure the skirt and shirt together.  Then cut the long thread at the sides from gathering the material together.


AND YOU ARE FINISHED.


I took a lot more pictures that I decided not to show here.  I hope that my instructions along with the pictures help you be successful.  I know people are at various levels of experience and I have tried to be as complete as I could for the beginner seamstress.