Friday, October 30, 2015

CHOCOLATE CHIP-OAT COOKIES

My cookie jar was empty so that meant I had to try a new cookie recipe and fill it. The night before I had been looking through one of the cookbooks my friend Janice had gotten for me at an estate sale back in September and found this recipe for Chocolate Chip-Oat Cookies that I thought sounded like a winner. I loved that it used a cake mix because then I could use a sugar-free one and reduce the sugar. The only sugar in my version of the cookies is the amount in the 60% cacao chips which is less than in semi-sweet ones. Of course you don't have to use a sugar-free cake mix or the darker chips if you prefer others. You could also use a chocolate cake mix and make Double Chocolate Chip-Oat Cookies. 


CHOCOLATE CHIP-OAT COOKIES

1       package yellow cake mix (I used a sugar - free one)
1       teaspoon baking powder
3/4  cup vegetable oil
2      eggs
1       teaspoon vanilla
1       cup uncooked old-fashioned oats
3/4  cup chocolate chips (I used 60% cacao chips)

Preheat oven to 350 degrees F. Lightly grease cookie sheets or line with parchment paper..(I did the latter.)

Stir together the cake mix and baking powder in a large bowl.

Add the oil, eggs, and vanilla, stirring by hand until well blended.

Stir in oats and chips.

Drop dough by slightly rounded tablespoonfuls 2 inches apart onto cookie sheets. (I used my cookie scoop that holds a tablespoonful of liquid. If you turn the dough over so that the flat side is up and the rounded side in down, the cookie will bake flatter. In the picture below you can see the ones I turned over and the ones I didn't.)

Bake 10 minutes or until golden brown. Do Not Overbake. (I took them out after 10 minutes.)


Let cookies stand on the cookie sheets 5 minutes; transfer to wire racks to cool completely. (I admit I forgot to do this but will try it the next time.)


Makes about 3-1/2 dozen cookies.

Baking Tips

"Heavy aluminum cookie sheets produce the most evenly baked and browned cookies. Dark sheets can cause over browning and burnt bottoms. Cookies won't get as crisp if you bake them on insulated sheets--the ones with an air pocket--and may take slightly longer to cook." from Favorite Brand Name 3 Books in 1 Cookies, Bars, and Muffins cookbook.


Thursday, October 29, 2015

APPLESAUCE SPICE CAKE

I made this Applesauce Spice Cake for the volunteers at Hillcrest Thrift Shop Tuesday and have never received so many compliments. It was a delicious cake, even if I say so myself. When I removed the cake cover and they saw the cake, several noticed a piece or two were missing. I told them I had to keep peace at home. 

The funny thing was when I told them it was made with a spice cake mix, Ellie started telling about a cake idea she came up with one day driving home using a spice cake mix. She decided to add applesauce and apples. I couldn't help but laugh as I told her, "Well, this cake might taste familiar to you as it also has applesauce and apples in it."


APPLESAUCE SPICE CAKE

1       package plain spice cake mix
1       cup sweetened applesauce (I used unsweetened applesauce)
1/2   cup buttermilk
1/3   cup butter, at room temperature
1/3   cup solid vegetable shortening
1       teaspoon vanilla 
1       teaspoon finely grated lemon zest (I used dry lemon peel from the spice rack)
2      large eggs
1       cup chopped peeled apple
1/2   cup chopped pecans

Preheat oven to 350 degrees F. Grease and flour a 12- cup Bundt pan. I used my homemade Pan Grease.


Place the cake mix, applesauce, buttermilk, butter, shortening, vanilla, lemon zest, and eggs in a large mixing bowl. 
Blend with an electric mixer on low speed for 1 minute. Stop the machine and scrape the sides of the bowl with a rubber spatula. Increase the mixer speed to medium and beat for 2 more minutes. Scrape the sides of the bowl.


Fold in the apple and
pecans.


Pour the batter into pan, smoothing it out. 


Bake for 50 to 55 minutes until golden brown and it springs back when lightly pressed with your fingers.


Cool on wire rack for 20 minutes. Run a knife around the edge of the cake and 
invert it onto wire rack or serving plate. Allow it to cool for 30 minutes more.


Dust with confectioners' sugar or spoon a brown sugar caramel glaze over the top. I decided to do the latter and everyone loved it and wanted to know what it was.


Cut and serve


Store covered in plastic wrap or under a glass cake dome at room temperature.


BROWN SUGAR CARAMEL GLAZE

3       tablespoons margarine
3       tablespoons packed brown sugar
3       tablespoons granulated sugar
3       tablespoons heavy cream (I used a fat-free half and half)
1/2   teaspoon vanilla


In a medium saucepan, place all ingredients over medium heat.
Bring to a boil stirring to combine the ingredients.


Boil for 1 minutes, stirring often.


Pour over cooled cake.


Source: the Cake mix Doctor by Anne Byrn

Wednesday, October 28, 2015

HALLOWEEN T-SHIRT FUN


Because my grandson Tyler liked his Jack-O-lantern t-shirt I made him last year so much, I decided to make him another one this year. He is now 3-1/2 so I know his "likes" this year. He just loves Mickey Mouse. I got the idea to make him a Mickey Mouse Jack-O-Lantern shirt this year when I saw a Hallmark card with just that on it. 

This isn't the one on the card, but what do you think?


I searched on Google and found templates for the ears and the face. Following are the links...

Template for Mickey Mouse's ears here. I used the large pattern.

Template for Mickey's face here.

I ironed them on using Pellon Wonder-Under Transfer Web. 

I didn't take pictures as I made it since I had taken pictures when I made one for my 2 - year old grandson, Henry, last week. Henry loves Batman. I originally intended to do him a Batman Jack-O-Lantern but when I searched on Google for Batman masks templates, I found this really darling one that looked like a Batman Boy and decided to just do it. I still used the orange t-shirt I had bought. You can find the Batman mask template here.

Here is a picture of Henry's Batman t-shirt.


 The Pellon Wonder-Under Transfer Web is iron-on pellon with paper on one side. This allows you to iron the product onto the fabric you are using for the pattern, then draw your pattern on the paper side, peel it off, and then iron it to your clothes. If you like you can leave it with no sewing involved or you can sew around the edges to make sure it stays on the clothing item.


I printed the template I found online.


Cut it out...


I measured a piece of the pellon to make sure I had a piece big enough for the pattern and also the fabric I was going to use and ironed it on the wrong side of the fabric. (Place rough side of Wonder-Under against wrong side of fabric. Press for 5 - 8 seconds with hot dry iron. Let cool.)


Draw the template pattern onto the pellon...


Cut it out with sharp scissors...


Carefully peel off the paper backing...You will be able to see if you got a good coverage of the fusible when you pull the paper backing off.


Position the piece on your clothing with the web side down (right side of the fabric will be up).


Set your iron at Wool setting with no steam. Cover the area with a DAMP press cloth.


Press down firmly for 10 - 15 seconds over area.
Repeat, lifting and overlapping iron until all fabric is fused.


I then decided to cut the two narrow strips to make the lips and pressed them on.  Even though they had a complete coverage on the backside, they didn't "stick" the first time and I had to use a smaller iron I have for small areas. 


My dil Sara sent me this picture of Henry in the shirt. Isn't he just the cutest thing? Of course, I'm not prejudice.


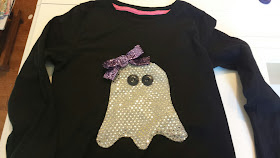
I am making my youngest granddaughter Madison a ghost t-shirt, but I am not finished with it. The pellon did not stick on one area of the "fancy" fabric I bought so I am going to sew it down. I ironed it on so that it will stay in place while I sew around the edges of the ghost, but I still need to do that. I will come back and add a picture of it when I get that finished later today. I pinned the bow on so that when dil Lori washes it, she can remove the bow. 

UPDATE! I have Madison's shirt finished. I sewed around the edges of the ghost with the applique stitch on my sewing machine, and I sewed the buttons on for the eyes.

Here is a picture of it. 


Now, I can't wait to see Tyler and Madison in their shirts. I will share the pictures with you here.

UPDATE!!!! Here are the pictures I promised. They were so cute when they first saw them.

Tyler...


Madison wouldn't let me take a picture of her alone with her shirt on so this is the best I could do. She is having fun with her grandad


I also wanted to share the "Jack-O-Lantern Jell-O Cups" we made. Well, I mixed up the orange Jell-O and added some applesauce to it. I decorated two cups for them and then they had fun decorating some of their own.

We just used a permanent marker to draw the faces on the cups.

Here is a link to see the shirt I made Tyler last year. It was much simpler than the Mickey Mouse one I made this year, but I think he will really like it. You can also find a link there for a bib I made Tyler the year before.

If you would like to see some other fun things I have done for Halloween in the past you can check them out here.

I hope you have a fun Halloween.

Tuesday, October 27, 2015

JANICE'S PUMPKIN SHEET CAKE

This recipe came from my friend Janice. When we met at her house to play cards, she served it along with her fabulous Apple Crisp. I have featured her Peach Crisp before and it is the best ever. She makes the Apple Crisp using the same recipe....she just uses apples instead of peaches. (I will write up a post soon though with a recipe for the Apple Crisp.)


PUMPKIN SHEET CAKE

1       16 -ounce can of pumpkin
1       cup oil
4      eggs
2      cups sugar
2      cups flour
1       teaspoon baking soda
1/4   teaspoon salt
2      teaspoons baking powder
2      teaspoons cinnamon

Preheat oven to 350 degrees F. Grease and flour a sheetcake pan (size 10 x 15 x 1-1/2 - inch)

Combine and pumpkin, oil, eggs, and sugar and mix until the mixture thickens. Set aside.

Combine the flour, baking soda, salt, baking powder, and cinnamon in a mixing bowl.

Fold in the dry ingredients into the pumpkin mixture.

Pour batter into prepared pan and bake for 20 to 25 minutes.

CREAM CHEESE ICING

8       ounces cream cheese
1/4    cup soft margarine
2       cups powdered sugar

Beat together til smooth.

Frost cooled cake.


Monday, October 26, 2015

PUMPKIN WHIP

Want to get on the fall pumpkin-everything craze? It does seem like everything is pumpkin flavored this time of the year. Well, this fast and easy Pumpkin Whip might just be what you have been missing. Another great thing is you can make it sugar - free. Or maybe I should say no - sugar - added since the canned pumpkin contains 4 grams of natural sugar. I always try to reduce the amount of sugar in things I make because I know sugar isn't really good for you. If you don't care or can't find the products, just use the sugar ones.


PUMPKIN WHIP

1         package (4 - serving size) instant butterscotch pudding mix (Yes, you can find a sugar-free version)
1-1/2  cups cold milk (skim milk will work)
1         cup canned pumpkin
1         teaspoon pumpkin pie spice
1-1/2  cups whipped topping (the sugar-free version is the only one without high fructose corn syrup)
Gingersnaps, optional (will have a tad of sugar if you use them on top)

In a mixing bowl, beat pudding and milk until well blended, about 1 - 2 minutes.

Blend in pumpkin and pie spice.

Fold in whipped topping.

Spoon into dessert dishes. Chill.

Garnish with gingersnaps if desired.

Friday, October 23, 2015

BANANA - APPLE MUFFINS


Last year I added my dentist to my list of places to take my goodies. They really enjoy and appreciate them. Dr. G. told me I didn't have to feel like I should bring something every time I come. I told him to consider it a bribe ... so they will be very gentle with me. 

Earlier this year when I went for my 6 - month cleaning/checkup, he discussed with me re replacing a crown I had done at least 30 years ago when we lived in Arkansas. He wasn't the first dentist who didn't especially like the looks of it; my dentist in CA mentioned replacing it also. When I went back a couple of weeks ago for my checkup/cleaning, the subject was brought up again. He calmed my nerves and so I scheduled the appointment to have the work done. I guess it was good I finally gave in as he said it was "leaking" a little on the back side. I certainly prefer not having to have a root canal.

My "bribe" for the initial appointment was these delicious Banana - Apple Muffins. I made them before I went (it helped pass away the time before I had to go) so they would still be warm before I went. I think everyone but Sandy, Dr. G.'s dental assistant, enjoyed one before I left.

The recipe was in a Beta Sigma Phi Food in the Fast Lane cookbook (1992) that I got at one of the garage sales Friend Janice and I went to. I did alter the recipe a little bit, but Kathleen Freeman from Boulder, CO contributed the original recipe.


BANANA - APPLE MUFFINS

1/2         cup butter or margarine, softened (1 stick)
3/4        cup sugar
2            eggs
1-1/2      tablespoons milk
1             banana, mashed (1/3 cup)
2            cups all-purpose flour
1/4         teaspoon salt
2            teaspoons baking powder
1/2         teaspoon baking soda
1             teaspoon vanilla
1             large apple, finely chopped (1-1/3 cups)
2            tablespoons oatbran

Preheat oven  to 350 degrees F. Grease or spray a 12- cup muffin tin.

Cream butter and sugar in mixer bowl until light and fluffy. (I heated a stick of margarine in the microwave on high for 10 seconds to soften.)

Add eggs 1 at a time, beating well after each addition.

Mix milk and banana in a small bowl. Add to better; mix well.

Combine the flour, salt, baking powder, and baking soda together with a whisk. Add to batter; mix well.

Stir in vanilla, apple, and oatbran with a wooden spoon.

Fill batter evenly filling each cup about 3/4 full.

Bake for 20 minutes or until muffins test done with a toothpick.

Cool slightly on wire rack and remove (I ran a knife around the inside edges to loosen.)

Serve warm.